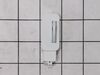
This guide rail, also known as a drawer slide rail, is a genuine OEM replacement part for the freezer section of your refrigerator. This slide rail supports the storage basket in your freezer, allowin...
This left-side drawer slide is designed for use in select refrigerator-freezer models, supporting the freezer drawer and allowing it to glide smoothly in and out. Made of durable white plastic and mea...
Looking for a way to restore your LG refrigerator to prime condition? Our genuine LG Basket Assembly, Door might just be what you need. Made specifically for select LG fridge models, this sturdy and e...
Looking to boost your refrigerator's performance? This LG Crisper Drawer is just what you need! Specifically crafted for your LG refrigerator, it's designed to keep your fruits and vegetables wonderfu...
This handle screw, also known as a mounting bolt, is a mounting screw to help secure the door handle to your refrigerator door. If your handle is loose, you may just need to tighten the screw. If your...
Built from durable, wear resistant material, this cam prevents door sagging and supports long term hinge stability. It helps maintain proper refrigerator function by ensuring the door operates with co...
This refrigerator door hinge bushing is a durable white plastic component that provides a smooth pivot point for the hinge pin, helping keep the door properly aligned and sealed. It is commonly used t...
Looking to simplify your fridge organization? We can help! Our LG Refrigerator Deli Drawer Tray Assembly isn't just any part'it's a genuine OEM replacement made specifically for select LG refrigerator...
Video makes it look easy. Kenmore refrigerator does not have "groove" along the right hand side of switch that allows for pushing down on release. Used a thin screwdriver to get under to push while holding switch edge with pliers. Kept slipping. Tape sides to avoid scratching inside of refrigerator.
removed the upper freezer door to access screws to remove lower door. laid bottom door on its side, removed bad bushing, put new bushing in, put bottom door back on refridge, put upper door back on fridge. Door worked easy as when new. good closure of door and story..Happy customer, and wife even happier.....thank you....
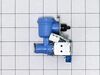
This couldn't have been easier. Two tiny screws in the front needed unscrewed, and then two plastic clips in the middle just had to be popped lose. Finally, you unplugged the power cord. Then, you just needed to reverse the process by plugging the new ice maker in, popping the clips in place, and screwing the two holes back in and turning the whole thing on. Voila! Perfect ice cubes again. And for only a little over $100.