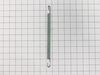
The door hinge cable works in conjunction with the dishwasher door by connecting the door hinge to the door spring and helping to support and balance the weight of the door as you open and close it. I...
The dishwasher roller assembly connects to the dishrack, and is located in the lower level of the dishwasher. It allows the dishrack to easily slide in and out. If the lower rack keeps falling off the...
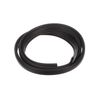
If your dishwasher is leaking or not cleaning as well as it used to, the door gasket might be the culprit. This flexible rubber seal fits around the tub and keeps water and steam inside during each cy...
This nozzle assembly, commonly referred to as a spray arm, is located at the bottom of select LG dishwashers and is responsible for distributing pressurized water across dishes during the wash cycle. ...
This flexible, corrugated drain hose assembly is designed to efficiently channel wastewater from your dishwasher to the household drainage system. Installed at the rear of the unit, it connects the di...
This dishrack roller assembly is designed to facilitate smooth movement of the dishwasher rack, allowing it to glide in and out with ease. Engineered for durability, it attaches securely to the rack a...
Finding the right parts for your dishwasher can be tricky, but were here to help. Consider this Dishrack Roller Bracket by LG? an authentic, OEM part designed to keep your dishwasher operating at opti...
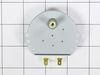
This part is the replacement inlet valve for your dishwasher. It is approximately 4-1/2 inches by 3-1/2 inches. The water inlet valve in your dishwasher connects to the water source and solenoid wire...
This lower dishrack assembly is designed to securely hold dishes and cutlery during the wash cycle in select LG dishwasher models. Constructed from coated metal, it resists rust, cracking, and peeling...
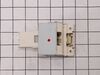
If your dishwasher won’t start or is leaking during a cycle, the door latch might be the problem. This genuine LG latch assembly keeps the door closed tight, helping prevent water from escaping and ma...
$104.96
In Stock
Questions And Answers for LDF7561ST
We're sorry, but our Q&A experts are temporarily unavailable.
Please check back later if you still haven't found the answer you need.
5 questions answered by our experts.
< Prev
1
Next >
Sort by:
Search filter:
Clear Filter
Your search term must have 3 or more characters.
Keep searches simple. Use keywords, e.g. "leaking", "pump", "broken" or "fit".
Sorry, we couldn't find any existing answers that matched.Try using some different or simpler keywords, or submit your new question by using the "Ask a Question" button above!
Bryce
August 10, 2025
The dishwasher wash cycle stops and shows an error message: "OE". I can give it a drain override command, and it will intermittently pump away the water. The drain hose seems clear, and the filters are clean. But it will not complete a cycle or pump away all the water.
For model number LDF7561ST
Hello Bryce, thank you for getting in touch. Dishwasher displaying the "OE" error code indicates a drainage problem. The dishwasher is unable to properly drain the water used during the wash cycle. You will need to replace the drain pump, part number PS11707090, to fix the issue. We hope this helps.
The spray arm broke from the assembly, is their a replacement part?
For model number LDF7561ST
Hi Stephen, thank you for reaching out. According to our research, your model comes with three spray arms: Upper Spray Arm, part number PS3527665, Middle Spray Arm, part number PS7788355, and Bottom Spray Arm, part number PS7788355. We hope this helps! If you need help placing an order, customer service is open 7 days a week. Thanks again for your great question.
The unit leaves about 1cup of water in the bottom after use with no alarms.
For model number LDF7561ST
Hello Terry, thank you for getting in touch. Based on our research, we would recommend checking the drain hose for blockage. If this does not resolve the issue, then you may need to check the drain pump, part number PS11706890, to solve the problem. We hope this helps!
When the dishwasher door is opened there is a part attached to keep it from dropping
For model number LDF7561ST
Hi Maryann, thank you for reaching out. Based on our understanding, you may need the door hinge spring, part number PS3524564. It applies tension to the dishwasher door through the door hinge to prevent the door from dropping too quickly when you open the dishwasher. We hope this information is useful!
Simple, removed screws securing machine in the cabinet, then pull the unit out of the cabinet space about 10 inches. Springs are accessible within this extension. You need strong hands to extend the springs and attach them. Once attached, push machine back in place and re-install the anchor screws. In my situation, only one spring was broken, so the attached side revealed the correct slot to place the hook on the top position, the bottom position has a plastic lead for the spring, and that lead is attached to a rope to the door hinge. Note: Replace BOTH springs, even if only one is broken.
The inside gasket deteriorates over time - However replacement is easy. the main thing you have to remember is after you remove the old gasket, install the new one starting at the middle top of the tub and work your way down both sides. Also, don't push the gasket all the way in...only enough to hold in place. When you close the door the gasket will form a better seal around the door.