This OEM gray Dishwasher Lower Dishrack Wheel Assembly is a plastic kit that allows the rack to slide in and out of the dishwasher easily. If it breaks or becomes damaged. sliding will feel difficult....
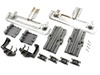
This authentic Dishwasher Upper Rack Adjuster Kit with white wheels is a kit made up of primarily plastic and metal components, which will require a screwdriver to install. This kit comes with all the...
The rack track stop on your dishwasher is designed to stop the dish rack at the appropriate place when opening and closing the rack. If your dishwasher is not cleaning your dishes properly, the rack s...
Sold individually. This part secures the upper side of the dishwasher to the underside of the counter or cabinet to prevent the dishwasher from moving, shaking, or tilting forward.
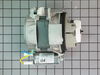
This drain pump is used in dishwashers to remove water from the dishwasher tub. If the impeller in the dishwasher is damaged or the motor has been shorted out and will not drain, it is possible the bo...
Prevent leaks and maintain optimal cleaning performance with this durable dishwasher door seal. It creates a secure barrier to keep water contained during wash cycles, ensuring reliable operation. Rep...
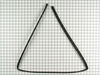
This part is the replacement door seal for your dishwasher. It is approximately 22 inches long and 2 inches wide. This door seal is made of gray plastic and is found at the bottom the dishwasher. The ...
Also known as rack adjuster. Sold individually.
This is an original part from KitchenAid, Kenmore, Whirlpool, Jenn-Air, and Maytag for use with Dishwashers. The dishrack adjuster arm positioner clip...
This 18 ml bottle of white appliance touch-up paint is used to cover scratches or marks on your appliance. The white touch-up paint can be used on refrigerators, microwaves, ranges, clothes dryers, an...
$15.95
In Stock
Questions And Answers for KUDC10IBBL0
Be the first to ask our experts a question about this model!
✖
Ask a Question
Ask our experts a question on this model and we'll respond as soon as we can.
Pulled dishwasher from under counter, attached link to spring, hooked spring back into frame/chassis, threaded link through pulleys, attached other end of link onto door, reinstalled dishwasher under counter. All's well. Note-I purchased an extra link anticipating that the other one will fail. They're cheap enough.
Caviat: The actual repair is less than 15 minutes, but I spent a lot of time playing with it before I figured out it was that easy and fast. You don't need to remove the dishwasher from the counter to do this. And it will probably help to look at the new part closely so you can understand where the retainer clip is to press it and release the old pump.
First remove the water from the dishwasher pan that would not drain with a wet/dry vac. Otherwise the water will all drain on the floor when you remove the pump. Then remove the two screws on the kickplate on the front of the unit below the door. Remove the kickplate/maintainence access cover. The drain pump is on the right about 8 inches in. Using two hands you grasp the drain pump with your right hand and use the left hand to push the retaining clip down. Then the drain pump will rotate 1/4 turn counterclockwise and can be removed without pulling the dishwasher out. There is likely to be some water leak out that was traped in the pump housing that you can not reach with the vac. Disconnect the wire. Connect the wire to the new pump, put it in place and 1/4 turn clockwise to install it. Replace the kickplate and you're done.
1) Remove top and bottom dish baskets from the dishwasher, this will give you room to work. To remove top basket there are clips at the end of the slide rails. 2) Remove lower spray arm by unscrewing plastic screw, it should only be hand tight. 3) In order to remove the strainer cover, you will need to remove the plastic tube that takes water to the middle and top spray arms. Unclip this tube from the top and middle clips and then work it out of the strainer assembly tube. Now you should be able to remove the tube at the bottom of the dishwasher by unscrewing it 1/4 turn. 4) Remove the strainer cover by unscrewing the 4 Torqs screws. 5) You will now see two smaller torqs screws that hold the hold the Chopper Assembly cover down. Take these two screws out and remove the two piece cover. 6) Pull out the broken Chopper Assembly, make sure you get all the pieces! 7) Install the new Chopper Assembly. Make sure that you install the Assembly with the small part of the screen towards the bottom of the housing. Also make sure you compress the spring as you install the part. I used a small pair of neddle nose pliers to compress the spring behind the screen in order to install the chopper assembly. 8) Put everything back together and make sure it works!


 Diagram and Parts List for KitchenAid Dishwasher")