This 18 ml bottle of white appliance touch-up paint is used to cover scratches or marks on your appliance. The white touch-up paint can be used on refrigerators, microwaves, ranges, clothes dryers, an...
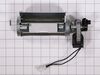
If your oven’s control panel is getting too hot or showing fan errors, this cooling fan might be the fix. It helps keep the electronics cool by circulating air behind the panel, which can prevent over...
This is a multi-use and multi-appliance screw. It can be used on a microwave, refrigerator, range/oven, air conditioner, dehumidifier, washer, or dryer. The measurements of this screw are 8 x 1/2 inch...
This oven temperature sensor is designed to monitor and regulate the internal heat levels of your range, ensuring consistent and accurate cooking performance. It communicates directly with the control...
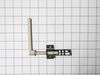
The light socket on your electric range connects the power source to the light bulb. If your oven light is malfunctioning, you may need to replace the light socket. The light socket is located in the ...
Use this scraper for your ceramic/glass cooktop. It has a retractable blade and is an all-purpose tool for cooktops, mirrors, windows and tile. Use it to also remove paint, paper, dirt, stickers and more.
This oven bake igniter is for gas ovens with Direct Spark Ignition (DSI). It ignites the gas to light the bake burner. Before installation, turn off the house circuit breaker and gas supply. Wear glov...
$110.40
In Stock
Questions And Answers for KSGG700ESS2
We're sorry, but our Q&A experts are temporarily unavailable.
Please check back later if you still haven't found the answer you need.
5 questions answered by our experts.
< Prev
1
Next >
Sort by:
Search filter:
Clear Filter
Your search term must have 3 or more characters.
Keep searches simple. Use keywords, e.g. "leaking", "pump", "broken" or "fit".
Sorry, we couldn't find any existing answers that matched.Try using some different or simpler keywords, or submit your new question by using the "Ask a Question" button above!
James
January 21, 2024
NEED TO REPLACE ALL 5 BURNER BASES :
W10732322 -1
W10732320-2
W10732319-1
W10898384-1
DO YOU HAVE THE REPLACEMENT PARTS?
I CAN FIND ALL OF THEM AS REPLACEMENT S OF ORIGINAL # BUT NOT THE 10898384
For model number KSGG700ESS2
Hello James, thank you for contacting us. The parts you have mentioned are not compatible with your model. The compatible left front burner head for your model is PS12745756, the left rear burner head is part number PS12070536, and the right front burner head is part number PS12070535. The right rear and the center burner heads are part number PS12070537. If you need help placing an order, customer service is open 7 days a week!
NEED TO REPLACE THE 5 BURNER HEADS ON MODEL # KSG700ESS2. DO YOU HAVE THEM? ARE THEY IN STOCK? COST? ITEM NUMBERS SO I CAN ORDER. THANK YOU.
THESE ARE THE NUMBERS I TOOK FROM THE BASE OF THE BURNER HEADS THAT NEED REPLACING: 1-W10732322, 2-W10732320, 1-W1073219, 1-W10898384
For model number KSGG700ESS2
Hi James, thank you for writing in. Our research has found, part numbers PS12745756, PS12070536, PS12070535 and PS12070537 are what you need. Pricing is on our website and is subject t change. We hope this helps.
Hi David, thank you for getting in touch. We have concluded that the issue is with the burner valve, part number PS12074820. You may need to replace it to fix the issue. We hope this sorts out your problem!
The control panel keeps going blank and then on. Demo mode keeps coming up on the control panel. Oven will lite but goes off after a minute.
For model number KSGG700ESS2
Hi Adam, thank you for reaching out. The issue seems to be with the control board, part number PS11773112. It controls the various cooking functions, modes, and times for the appliance. You may need to replace it to fix the issue. We hope this sorts out your problem!
Hi Larry,
Thank you for your question. According to your owner's manual, to remove the drawer, open the drawer to its fully open position. Using a flat-blade screwdriver, gently loosen the drawer from the glide alignment notch and then lift up the drawer alignment tab from the guide and repeat this procedure for the other side. The drawer is no longer attached to the drawer glides. Using both hands, pick up the drawer and complete the removal. To reinstall the drawer, align the forward drawer notches with the notches in the drawer glides on both sides. Place the rear alignment tabs into the drawer glides on both sides. Push the drawer in all the way. Gently open and close the drawer to ensure it is seated properly on the glides on both sides. We hope this helps!
I numbered every part. ex: 1 L., for first part removed left side. I used a magic marker to circle the holes and wrote the number of screws used on the part, set the srews in a separete place, so that I new where these screws went to. The cleanup was pretty time consuming, but I was able to keep my stove, when every repairman I called to fix my stove told me I was better off buying a new stove. ($600.00 stove 2 years old)Please Note: The insulation blanket needed for the entire stove is two pieces, the sides and top are one part # and the bottom and back, are another part #. I did not know this. I just purchased the top and sides. I got lucky, the back and bottom were still in good shape. So I guess I should have read the description of the part more carefully to see what it covers, before I ordered it. It took two people two hours to do the work, it was really nice to have an extra set of eyes, to remember what direction pieces of metal from the stove went. I would do it all over in a heart beat instead of buying a new stove.
Socket Lite come with clips attached to the outside of the housing. After you unhook the 3 lead wires that are attached to the unit. All you have to do is push in on the clips and release the unit. Then you snap in the new unit. Attach the 3 wire leads, put a oven bulb in the socket end, and the install the light cover
Removed oven from wall unit and took the back off. Removed the old socket assembly by depressing the ears and forcing unit into the oven. The electrical wires were easily removed since they are spade connections and slip off. They also are different sizes so that there is no chance of erroneously putting them back in an incorrect order. The new unit simply slips in from the front and snaps into place. The most difficult part of the entire process is removing the old unit. A little "friendly persuasion" is required to get the old unit out.


 Diagram and Parts List for Whirlpool Range")