


KFEG500EBS6 KitchenAid Range - Overview
Sections of the KFEG500EBS6
[Viewing 5 of 5]


 Diagram and Parts List for KitchenAid Range")
Keep searches simple, eg. "belt" or "pump".

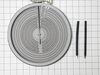
Bake Element
PartSelect #: PS11703285
Manufacturer #: W10779716
This is a heating element compatible with various makes of ranges and ovens and is sold as an individual part. Measuring 20.5-inches wide and 20.25-inches (with terminals) long, this heating element i...
$79.97
In Stock
Order within the next 1 hr and 21 mins and your part ships today!

Touch-Up Paint - White
PartSelect #: PS385132
Manufacturer #: 72017
This 18 ml bottle of white appliance touch-up paint is used to cover scratches or marks on your appliance. The white touch-up paint can be used on refrigerators, microwaves, ranges, clothes dryers, an...
$15.95
In Stock
Order within the next 1 hr and 21 mins and your part ships today!

Range Safety Thermostat
PartSelect #: PS11740991
Manufacturer #: WP3196548
This part is used as a safety feature. If your range overheats this part will shut the range down.
$51.07
In Stock
Order within the next 1 hr and 21 mins and your part ships today!

Screw
PartSelect #: PS12349731
Manufacturer #: W11233072
This is a multi-use and multi-appliance screw. It can be used on a microwave, refrigerator, range/oven, air conditioner, dehumidifier, washer, or dryer. The measurements of this screw are 8 x 1/2 inch...
$26.58
In Stock
Order within the next 1 hr and 21 mins and your part ships today!

Sensor
PartSelect #: PS11726314
Manufacturer #: W10833885
This oven temperature sensor is designed to monitor and regulate the internal heat levels of your range, ensuring consistent and accurate cooking performance. It communicates directly with the control...
$150.68
In Stock
Order within the next 1 hr and 21 mins and your part ships today!

Range Rear Leveling Leg
PartSelect #: PS11748094
Manufacturer #: WPW10058460
Sold individually.
$14.02
In Stock
Order within the next 1 hr and 21 mins and your part ships today!

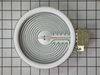
6" Surface Element, 1200 W
PartSelect #: PS12348164
Manufacturer #: W11171119
Sold individually.
$178.86
In Stock
Order within the next 1 hr and 21 mins and your part ships today!

Appliance Scraper
PartSelect #: PS408570
Manufacturer #: WA906B
Use this scraper for your ceramic/glass cooktop. It has a retractable blade and is an all-purpose tool for cooktops, mirrors, windows and tile. Use it to also remove paint, paper, dirt, stickers and more.
$13.68
In Stock
Order within the next 1 hr and 21 mins and your part ships today!

Touch-up Paint - Black
PartSelect #: PS385141
Manufacturer #: 72032
16ml
$22.58
In Stock
Order within the next 1 hr and 21 mins and your part ships today!

Broiler Pan with Roasting Rack
PartSelect #: PS1519212
Manufacturer #: W10123240
This is a 3 piece set.
$129.46
In Stock
Order within the next 1 hr and 21 mins and your part ships today!

Dual Surface Element - Front-Right
PartSelect #: PS16543522
Manufacturer #: W11517959
$134.36
In Stock
Order within the next 1 hr and 21 mins and your part ships today!

2 Piece Broiler Pan
PartSelect #: PS971245
Manufacturer #: 4396923
The top of this part is now black.
$59.89
In Stock
Order within the next 1 hr and 21 mins and your part ships today!
Questions And Answers for KFEG500EBS6
We're sorry, but our Q&A experts are temporarily unavailable.
Please check back later if you still haven't found the answer you need.
Common Symptoms of the KFEG500EBS6
[Viewing 7 of 7]Element will not heat
Fixed by
these parts
these parts

Show All
Little to no heat when baking
Fixed by
these parts
these parts


Show All
Oven not heating evenly
Fixed by
these parts
these parts
Show All
Oven is too hot
Fixed by
these parts
these parts
Show All
Little to no heat when broiling
Fixed by
these parts
these parts
Show All
Will Not Start
Fixed by
these parts
these parts

Show All
Door won’t close
Fixed by
these parts
these parts

Show All


Keep searches simple. Use keywords, e.g. "leaking", "pump", "broken" or "fit".
The oven would take an hour to preheat.
First, we turned on broil and the upper element turned orange and obviously worked. We figured the bottom element went out. The diagram on this site showed a bottom heating element that looked nothing like ours, but after reading other reviews, and reading that part that goes through the back of the oven was in the middle, and not off to the side, we ordered this element. It was perfect. All you have to do is unplug the oven, take out the bottom pan covering the element by removing 2 screws in the back, remove the lower small cover on the back of the oven and then unplug the old element, unscrew the old element on the inside of the stove, then install the new element and put everything back like it was. Nothing to it. It worked like a charm and my oven now heats up fast again. Easiest appliance repair job ever!
Parts Used:
-
Helen from PURVIS, MS
-
Difficulty Level:Very Easy
-
Total Repair Time:Less than 15 mins
-
Tools:Screw drivers
53 of 56 people
found this instruction helpful.
Was this instruction helpful to you?
Thank you for voting!
Surface Element Out
Took 2 screws under front edge of smooth top. Unscrewed ground wire from back of smooth top unit. Unplugged 2 wire bundles, from back. Took bad element out , put in new one. Put back together. About 10 min's tops. Easy peasy.
Parts Used:

-
Terry from Rockwall, TX
-
Difficulty Level:Really Easy
-
Total Repair Time:Less than 15 mins
-
Tools:Screw drivers
61 of 82 people
found this instruction helpful.
Was this instruction helpful to you?
Thank you for voting!
Oven Bake Element bad
1. Unplugged stove
2. Removed two (2) screws from bottom panel in oven cavity
3. Lifted out bottom panel
4. Removed two (2) screws from bake element standoffs.
5. Removed two (2) screws from bake element (Rear of oven cavity)
6. Removed Terminal Block Cover Box by removing two (2) screws and lifting up on it.
7. Removed lugs from the ends of the bake element.
8. Extracted bake element.
9 Inserted bake element through rear opening and attached the two lugs removed in step 7.
10 Inserted two screws removed in step 5.
11. This bake element only had a standoff bracket in the front. Used one (1) screw from step 4. for front standoff.
12 Replaced bottom panel and two screws.
13 Reinstalled Terminal Block Cover Box and two screws.
14. Plugged oven in and tested oven.
Parts Used:
-
Bryan from ROME, NY
-
Difficulty Level:Really Easy
-
Total Repair Time:15 - 30 mins
-
Tools:Screw drivers
31 of 41 people
found this instruction helpful.
Was this instruction helpful to you?
Thank you for voting!