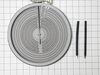
This is a heating element compatible with various makes of ranges and ovens and is sold as an individual part. Measuring 20.5-inches wide and 20.25-inches (with terminals) long, this heating element i...
This an authentic OEM 40-Watt replacement light bulb, used in a number of household appliances. It is specially designed to withstand extreme temperatures, which is why these replacement bulbs are mos...
This 18 ml bottle of white appliance touch-up paint is used to cover scratches or marks on your appliance. The white touch-up paint can be used on refrigerators, microwaves, ranges, clothes dryers, an...
This temperature sensor detects the temperature within the oven cavity. This oven temperature sensor, for ranges, works together with the oven control board to measure and regulate the oven temperatur...
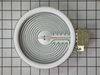
If your range’s burner isn’t heating properly or the temperature seems off, this dual element control switch could be the fix. It’s designed to manage heat for dual surface elements and fits a variety...
This is a multi-use and multi-appliance screw. It can be used on a microwave, refrigerator, range/oven, air conditioner, dehumidifier, washer, or dryer. The measurements of this screw are 8 x 1/2 inch...
The light socket on your electric range connects the power source to the light bulb. If your oven light is malfunctioning, you may need to replace the light socket. The light socket is located in the ...
If your stove burner won’t heat up, stays on high, or won’t adjust, this switch might be the fix. It controls the heat for 6-inch electric burners and fits many Whirlpool, Maytag, and KitchenAid range...
It provides a way of connecting individual electrical wires and offers protection of the device from electrical surges (voltages and/or currents).
$43.19
In Stock
Questions And Answers for KERS202BSS1
We're sorry, but our Q&A experts are temporarily unavailable.
Please check back later if you still haven't found the answer you need.
4 questions answered by our experts.
< Prev
1
Next >
Sort by:
Search filter:
Clear Filter
Your search term must have 3 or more characters.
Keep searches simple. Use keywords, e.g. "leaking", "pump", "broken" or "fit".
Sorry, we couldn't find any existing answers that matched.Try using some different or simpler keywords, or submit your new question by using the "Ask a Question" button above!
Don
December 10, 2019
How do i remove the door?
For model number KERS202BSS1
Hello Don, thank you for your question. To Remove:
1. Open oven door all the way.
2. Pinch the hinge latch between two fingers and pull forward.
Repeat on other side of oven door.
A. Hinge latch
2. Open the oven door.
You should hear a "click" as the door is set into place.
3. Move the hinge levers back to the locked position. Check
that the door is free to open and close. If it is not, repeat the
removal and installation procedures.
I hope this helps!
Was this helpful?
Thank you for voting!
Robert
March 11, 2020
Can I have the instruction book for that model ?
For model number KERS202BSS1
Hello Robert, Thank you for the question. Very sorry, we do not carry the manuals, just parts. We suggest contacting KitchenAid directly. We hope this helps.
Was this helpful?
Thank you for voting!
Daniel
December 16, 2022
My stoves oven don't heat up like it should
For model number KERS202BSS1
Hi Daniel, thank you for reaching out. If your oven is not heating, we suggest that you check the oven sensor, part number PS11749737, electronic control board, part number PS11753227, and bake element, part number PS11703285. If you require assistance to place an order, please contact customer service. We hope that helps!
FIRE in left side bottom of oven . I think the heating element has a leak ?
For model number KERS202BSS1
Hello DW, thank you for your question. Yes. A fire within the cavity usually means the Heating Element has broken and must be replaced. We have a video on how to replace the Bake Element PS11703285. Good luck with your repair.
Opened up the back of the stove. Unpluged the sensor. Replaced the sensor. Replace the back of the stove.
The sensor that has been replaced is not what is expected. After reading all of the instructions for adjusting the temperatures, the only temp that stays steady is when we first turn on the oven to 350 degrees. That stays steady but when I turn it to 400 it slowly goes up to 425 degrees.
First, we turned on broil and the upper element turned orange and obviously worked. We figured the bottom element went out. The diagram on this site showed a bottom heating element that looked nothing like ours, but after reading other reviews, and reading that part that goes through the back of the oven was in the middle, and not off to the side, we ordered this element. It was perfect. All you have to do is unplug the oven, take out the bottom pan covering the element by removing 2 screws in the back, remove the lower small cover on the back of the oven and then unplug the old element, unscrew the old element on the inside of the stove, then install the new element and put everything back like it was. Nothing to it. It worked like a charm and my oven now heats up fast again. Easiest appliance repair job ever!
Took 2 screws under front edge of smooth top. Unscrewed ground wire from back of smooth top unit. Unplugged 2 wire bundles, from back. Took bad element out , put in new one. Put back together. About 10 min's tops. Easy peasy.


 Diagram and Parts List for KitchenAid Range")