This 18 ml bottle of white appliance touch-up paint is used to cover scratches or marks on your appliance. The white touch-up paint can be used on refrigerators, microwaves, ranges, clothes dryers, an...
Glass ONLY. This inner door glass is a heat resistant part that fits into a stove, oven, wall oven, cooktop, or range as the inner glass panel of the appliance door.
This single oven rack is used to provide a durable surface for your cookware inside the oven for baking/broiling. The oven rack measures approximately 24.76” x 15.78”, is made of metal and is chrome i...
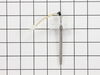
This 5-watt 12-volt halogen light bulb provides light in the oven cavity when the door is open or the switch is turned on. The light assembly is a little over 1” long. If the light is not coming on th...
This is a multi-use and multi-appliance screw. It can be used on a microwave, refrigerator, range/oven, air conditioner, dehumidifier, washer, or dryer. The measurements of this screw are 8 x 1/2 inch...
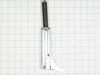
This part is the replacement door gasket for your oven. It is made of gray rubber and is sold individually. The door gasket runs along the circumference of the oven door and creates a seal that insula...
Ask our experts a question about this model and we'll get back to you as soon as possible!
3 questions answered by our experts.
< Prev
1
Next >
Sort by:
Search filter:
Clear Filter
Your search term must have 3 or more characters.
Keep searches simple. Use keywords, e.g. "leaking", "pump", "broken" or "fit".
Sorry, we couldn't find any existing answers that matched.Try using some different or simpler keywords, or submit your new question by using the "Ask a Question" button above!
Kat
February 18, 2020
Microwave not turning off once door is opened, now it will not run at all once we put it back together
For model number KEMC308KSS01
Hello, Thank you for your question. That issue is caused from one of your door switches. It looks like this switch would need to be replaced- PartSelect Number: PS2338920. We hope this helps.
2 people found this helpful.
Was this helpful?
Thank you for voting!
Charlene
December 25, 2024
What is the part # for a left hinge for a Whirlpool double oven
For model number KEMC308KSS01
Hello Charlene, thank you for reaching out. The left side hinge for the oven's door of your model is part number PS11747292. Glad to be of help!
Hello Kurt, Thank you for contacting us. If the microwave portion is not heating, then we recommend checking the diode, the microwave thermal fuse, the magnetron, and the high voltage capacitor. You can test the parts with a multimeter. For safety reasons, since the microwave capacitor can still store electricity even when the microwave is unplugged, it is usually advised that you discharge the capacitor before any attempt at repair. We have included a link on how to do so. Good luck with your repair.
Easily removed the door from the oven by releasing clips attached to the door hinge -- very nicely engineered. Removed about 6 philips head screws to allow the door assembly to be taken apart for access to the glass. Lifted out the broken glass, cleaned the inside of the door, installed the new glass, reassembled the door (a two minute project), and reattached the door to the oven. Cleaning the inside of the door took longer than the actual repair!
This built-in oven was slid out of it's space and set on a box. I removed the back cover with nut driver and located the safety overload device. removed nuts and used pliers to remove wires and replace them. The power must be off to do this repair.Replaced the cover and slid back into place. This could be a lot more difficult if your power cord or gas line is not long enough to make it out of your wall space. Or of your oven is attached well to the frame.
Removed the oven door by following the straightforward instructions in the user's manual. Removed philips head screws to take the door assembly apart. Removed clips holding the two inner door glass plates, and the two plates. Removed the clamp holding the broken glass plate, then the glass and associated glass fragments. Then cleaned and re-installed the three glass plates and their clamps in reverse order. Re-assembled the door and re-attached to the oven. Only cautionary note is to be careful when removing, handling and re-installing the various glass plates. Watch out for fragments from the broken plate; they can cut you and/or fall on the floor.


 – Part Number: W11675844")