


JGS1450ML1 Whirlpool Range - Overview
Sections of the JGS1450ML1
[Viewing 6 of 6]


 Diagram and Parts List for Whirlpool Range")
Keep searches simple, eg. "belt" or "pump".

Touch-Up Paint - White
PartSelect #: PS385132
Manufacturer #: 72017
This 18 ml bottle of white appliance touch-up paint is used to cover scratches or marks on your appliance. The white touch-up paint can be used on refrigerators, microwaves, ranges, clothes dryers, an...
$15.95
In Stock

Screw
PartSelect #: PS12349731
Manufacturer #: W11233072
This is a multi-use and multi-appliance screw. It can be used on a microwave, refrigerator, range/oven, air conditioner, dehumidifier, washer, or dryer. The measurements of this screw are 8 x 1/2 inch...
$26.58
In Stock

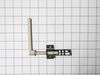
Sensor
PartSelect #: PS11726314
Manufacturer #: W10833885
This oven temperature sensor is designed to monitor and regulate the internal heat levels of your range, ensuring consistent and accurate cooking performance. It communicates directly with the control...
$150.68
In Stock

Range Insulation
PartSelect #: PS11750415
Manufacturer #: WPW10208653
Oven Wrap Insulation.
$76.96
In Stock

Range Rear Leveling Leg
PartSelect #: PS11748094
Manufacturer #: WPW10058460
Sold individually.
$14.02
In Stock


Oven Bake Igniter
PartSelect #: PS11752876
Manufacturer #: WPW10324262
This oven bake igniter is for gas ovens with Direct Spark Ignition (DSI). It ignites the gas to light the bake burner. Before installation, turn off the house circuit breaker and gas supply. Wear glov...
$110.40
In Stock


Door Gasket
PartSelect #: PS16660412
Manufacturer #: W11562931
This oven door gasket prevents heat from escaping the oven cavity when in use. It contains all of the attaching clips needed for installation.
$76.20
In Stock

Range Front Leveling Leg
PartSelect #: PS11753245
Manufacturer #: WPW10341186
Sold individually.
$35.00
In Stock

LP Orifice
PartSelect #: PS12070661
Manufacturer #: W11087486
This LP orifice is for the bake and broil, 17K & 11K. The LP orifice helps control the gas that comes out of the burner tubes.
$80.82
In Stock
Questions And Answers for JGS1450ML1
We're sorry, but our Q&A experts are temporarily unavailable.
Please check back later if you still haven't found the answer you need.
Common Symptoms of the JGS1450ML1
[Viewing 6 of 6]Little to no heat when baking
Fixed by
these parts
these parts

Show All
Oven not heating evenly
Fixed by
these parts
these parts

Show All
Oven is too hot
Fixed by
these parts
these parts
Show All
Will Not Start
Fixed by
these parts
these parts
Show All
Gas igniter glows, but will not light
Fixed by
these parts
these parts
Show All
Door won’t close
Fixed by
these parts
these parts
Show All


Keep searches simple. Use keywords, e.g. "leaking", "pump", "broken" or "fit".
mice had made nests in the insulation wrap in the range
I numbered every part. ex: 1 L., for first part removed left side. I used a magic marker to circle the holes and wrote the number of screws used on the part, set the srews in a separete place, so that I new where these screws went to. The cleanup was pretty time consuming, but I was able to keep my stove, when every repairman I called to fix my stove told me I was better off buying a new stove. ($600.00 stove 2 years old)Please Note: The insulation blanket needed for the entire stove is two pieces, the sides and top are one part # and the bottom and back, are another part #. I did not know this. I just purchased the top and sides. I got lucky, the back and bottom were still in good shape. So I guess I should have read the description of the part more carefully to see what it covers, before I ordered it. It took two people two hours to do the work, it was really nice to have an extra set of eyes, to remember what direction pieces of metal from the stove went. I would do it all over in a heart beat instead of buying a new stove.
Parts Used:
-
Wendy from Red Hook, NY
-
Difficulty Level:Easy
-
Total Repair Time:More than 2 hours
-
Tools:Screw drivers
125 of 200 people
found this instruction helpful.
Was this instruction helpful to you?
Thank you for voting!
Scratches in Surface
This product comes in a bottle with a brush like Liquid Paper. It goes on incredibly easy. A second coat might be needed. I wanted to prevent rust from setting in so I covered the scratches and dings. The paint is a little brighter since my washer is 10 years old but it still looks great.
Parts Used:
-
Michelle from Richardson, TX
-
Difficulty Level:Really Easy
-
Total Repair Time:Less than 15 mins
79 of 202 people
found this instruction helpful.
Was this instruction helpful to you?
Thank you for voting!
Oven temperature was WAY off, sometimes 50 degrees.
Turned the breaker off. Removed the racks, pulled the oven out and removed the back. Disconnected and unscrewed the old sensor from the back, connected and screwed in the new one. Returned the racks and slid the oven back in.
The only remotely challenging part was disconnecting the old sensor. I had to figure out where to press with the flat screwdriver to get it to release.
I had found a good YouTube video and didn't use the app.
The only remotely challenging part was disconnecting the old sensor. I had to figure out where to press with the flat screwdriver to get it to release.
I had found a good YouTube video and didn't use the app.
Parts Used:
-
Sarah from Raleigh, NC
-
Difficulty Level:Really Easy
-
Total Repair Time:15 - 30 mins
-
Tools:Screw drivers
10 of 14 people
found this instruction helpful.
Was this instruction helpful to you?
Thank you for voting!