This 40-Watt light bulb is sold individually.
It is specially designed to withstand extreme temperatures, so this bulb is compatible with a variety of appliance types including refrigerators, ranges,...
This is a replacement drawer support for your oven. The drawer support provides stability to the drawer unit as it opens and closes. If your oven drawer is hanging or will not slide in or out efficien...
This part is a replacement lens for your oven or range. The lens is red in color, and when the elements are turned on, the light behind the lens will turn on to inform the user that the element is, in...
If your stove’s burner isn’t heating right—maybe it’s stuck on high or won’t turn on at all—this control switch could be the fix. It’s made for 6-inch burners and lets you adjust the heat smoothly, no...
The electronic oven control board manages heating and temperature functions in wall ovens. Modified wiring may require professional installation. Unplug the oven or shut off the circuit breaker before replacing.
This single chrome oven rack provides a reliable flat cooking surface for your cookware inside of the oven cavity. The oven rack is made of metal and measures approximately 24” wide by 17 1/2” deep. T...
Having trouble with your wobbly GE range? Our adjustable leveling leg is the simple solution you've been looking for. When your range isn't sitting perfectly even, it can lead to a host of issues from...
Need a solution for a jittery drawer in your General Electric Range/Stove/Oven? The Genuine Replacement Drawer Glide is the answer. It keeps your broil or storage drawer sliding smoothly on your range...
This right-side drawer glider allows smooth and stable drawer movement. Designed for durability and precise alignment, it supports effortless opening and closing.
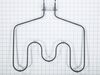
This broil unit generates high heat for broiling and finishing cooking tasks. It is designed to deliver consistent heat output for effective cooking performance. Replacing a worn or damaged broil unit...
$126.86
In Stock
Questions And Answers for JCBP67DP2WW
Be the first to ask our experts a question about this model!
✖
Ask a Question
Ask our experts a question on this model and we'll respond as soon as we can.
After removing the back of the range the oven control board was visible and accessible by removing four nuts. There was some resistance removing the leads from the oven coils and light-bulb mechanisms but with some leverage and pliers they came loose. The only challenge was the face plate of the unit is attached using adhesive and needed to be carefully peeled off and added to the new oven control board. Getting this right was just a matter of taking time and lining up the components correctly. After applying the face, the new control board went right in. I reattached the back, plugged the unit back in, and the over has worked great for the past week. Part select being able to identify the part numbers listed from the component likely saved me at least $100 of having a GE certified repair technician come in.
called service co. and described problem while i was looking at parts diagram and he agreed with my feeling what part got fried. he told me the part would be 183.00 plus labor and drive time. when i told him i was looking at the part on line for 65 dollars he hung up on me. i recieved the part and was slightly dissapointed to know there was a sepperate adhesive overlay. i saw that it was a sepperate part but if i knew it was adhesive i would have spent the extra 20 dollars for a new one. but, to my surprise the old one peeled off easily and gently re-apllied it to the new conrol board alighning it well seemed to be the trickiest part of the job. took the five wires with connectors out of the old one and inserted them into the same place on the new one. removed the old one from the frame (4 pan phillp sheet metal screws) and then screwed the new wired control board in. plugged in the unit and pressed the bake button and then mixed the brownie batter. replaced the back panel cover. 65 dollars and 15 minutes.


 – Part Number: WS01F11489")