


JBP27BL1BB General Electric Range - Overview
Sections of the JBP27BL1BB
[Viewing 3 of 3]


Manuals & Care Guides for JBP27BL1BB
Click to downloadKeep searches simple, eg. "belt" or "pump".

Burner Bowl - 8 Inch
PartSelect #: PS244399
Manufacturer #: WB31T10015
This part is located beneath the element and catches any spills.
$29.35
Special Order

Burner Bowl - 6 Inch
PartSelect #: PS244398
Manufacturer #: WB31T10014
This burner bowl is also known as a burner drip bowl or burner drip pan, and is designed for use with your cooktop or range. It is black in color and is approximately 6 inches in diameter. It can be f...
No Longer Available

Surface Burner Switch - 8 Inch - 2500W
PartSelect #: PS236750
Manufacturer #: WB24T10025
The 8-inch surface element switch is also known as an infinite heat switch, and is a part for your range. It controls the large surface element. It will turn the element on and off, and allow you to c...
$74.43
Special Order

Light Bulb - 40W
PartSelect #: PS217532
Manufacturer #: 40A15
This 40-Watt light bulb is sold individually.
It is specially designed to withstand extreme temperatures, so this bulb is compatible with a variety of appliance types including refrigerators, ranges,...
$19.10
Special Order

Temperature Sensor Kit
PartSelect #: PS236490
Manufacturer #: WB23X5340
This kit includes the sensor as well as the connectors. NOTE This sensor is 2" long.
$124.11
Special Order

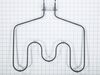
Bake Element
PartSelect #: PS956141
Manufacturer #: WB44K10012
This bake element is found on the bottom of the oven.
$189.96
Special Order

Range Surface Element Control Switch - 6 Inch - 1560 W
PartSelect #: PS236754
Manufacturer #: WB24T10029
If your stove’s burner isn’t heating right—maybe it’s stuck on high or won’t turn on at all—this control switch could be the fix. It’s made for 6-inch burners and lets you adjust the heat smoothly, no...
$69.15
Special Order

BROIL ELEMENT
PartSelect #: PS17626201
Manufacturer #: WB30X46986
If your oven isn’t getting hot enough when you broil, this replacement broil element could be the fix. It’s the part that heats from the top of the oven to give food that crispy finish. Easy to instal...
No Longer Available

Foot - Leveller
PartSelect #: PS223802
Manufacturer #: WB02X10521
Sold individually.
$29.72
Special Order

Surface Burner Terminal Block Kit
PartSelect #: PS783534
Manufacturer #: WB17T10006
This kit includes the female contact with wires, terminal block and mounting clip.
$87.90
Special Order

CONTROL OVEN TO9
PartSelect #: PS16873547
Manufacturer #: WB27X45466
The electronic oven control board manages heating and temperature functions in wall ovens. Modified wiring may require professional installation. Unplug the oven or shut off the circuit breaker before replacing.
No Longer Available

Oven Rack
PartSelect #: PS6447646
Manufacturer #: WB48T10095
This single chrome oven rack provides a reliable flat cooking surface for your cookware inside of the oven cavity. The oven rack is made of metal and measures approximately 24” wide by 17 1/2” deep. T...
$90.54
Special Order
Questions And Answers for JBP27BL1BB
We're sorry, but our Q&A experts are temporarily unavailable.
Please check back later if you still haven't found the answer you need.
Common Symptoms of the JBP27BL1BB
[Viewing 10 of 10]Element will not heat
Fixed by
these parts
these parts


Show All
Touchpad does not respond
Fixed by
these parts
these parts

Show All
Will Not Start
Fixed by
these parts
these parts
Show All
Little to no heat when baking
Fixed by
these parts
these parts

Show All
Little to no heat when broiling
Fixed by
these parts
these parts

Show All
Oven not heating evenly
Fixed by
these parts
these parts
Show All
Oven is too hot
Fixed by
these parts
these parts
Show All
Door won’t close
Fixed by
these parts
these parts


Show All
Will not program
Fixed by
these parts
these parts
Show All
Timer will not advance
Fixed by
these parts
these parts
Show All


Keep searches simple. Use keywords, e.g. "leaking", "pump", "broken" or "fit".
The switches failed on both front burners.
Remove nobs from both switches.
Pull out the range (the hardest part).
REMOVE THE POWER PLUG FROM THE WALL
Remove 7 screws with nut driver and take off upper back panel.
Remove 2 phillips screws from front, they hold the switch brackets.
The new switches don't fit in the bracket so discard the bracket keeping the screws.
Removing 1 wire at a time from the old switch transfer to the new noting the letter/number ie "H1 P1" combos they are all there just not in the same places on the new switch.
When wiring is complete, using the bracket ,screws from the front screw on the switches.
Replace the back panel with 7 screws.
In my case the old nobs did not fit the shafts of the new switches. I found some at the local hardware store. I bought 4 for $0.29 each! I expect to be replacing the other burner switches shortly.
Parts Used:
-
Marc from Columbia, NJ
-
Difficulty Level:Easy
-
Total Repair Time:15 - 30 mins
-
Tools:Nutdriver, Screw drivers
97 of 107 people
found this instruction helpful.
Was this instruction helpful to you?
Thank you for voting!
Blown Oven Control Board
After removing the back of the range the oven control board was visible and accessible by removing four nuts. There was some resistance removing the leads from the oven coils and light-bulb mechanisms but with some leverage and pliers they came loose. The only challenge was the face plate of the unit is attached using adhesive and needed to be carefully peeled off and added to the new oven control board. Getting this right was just a matter of taking time and lining up the components correctly. After applying the face, the new control board went right in. I reattached the back, plugged the unit back in, and the over has worked great for the past week. Part select being able to identify the part numbers listed from the component likely saved me at least $100 of having a GE certified repair technician come in.
Parts Used:
-
Julien from Barnhart, MO
-
Difficulty Level:A Bit Difficult
-
Total Repair Time:15 - 30 mins
-
Tools:Nutdriver, Screw drivers
56 of 63 people
found this instruction helpful.
Was this instruction helpful to you?
Thank you for voting!
burner was shorting out
unplugged unit pulled it away from wall took off the backplates traced wire to plug replaced with part ordered very smooth operation. the most impressive thing to me was i ordered part on computer and it was at my door in 30 hours awesome.
Parts Used:
-
douglas from louisville, KY
-
Difficulty Level:Really Easy
-
Total Repair Time:30 - 60 mins
-
Tools:Nutdriver
47 of 49 people
found this instruction helpful.
Was this instruction helpful to you?
Thank you for voting!