These agitator directional cogs are commonly referred to as dog ears. They come four to a package and are usually used with direct drive washing machines.
This direct drive motor coupling (Direct Drive Washer Motor Coupling, Motor Coupling, Washer Motor Coupling, Coupling Kit) provides a cushioned connection between the transmission and the motor shaft....
This pump is intended for use with washing machines that do not have belts. This drain pump has two ports for water to pass through: a large one, and a smaller one.
The agitator kit is most commonly used if the top part of the agitator is not moving correctly but the bottom is. This kit now includes all pieces shown in photo plus the thrust spacer, inner cap seal...
The suspension spring supports the outer tub and keeps the tub steady during loads that could cause an unbalance. If this part breaks, is worn down or has stretched out and lost its spring, it could c...
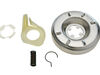
A worn clutch can cause a slower spin speed which will leave your clothes wet after a cycle. This clutch assembly comes with brake cam driver, blue spring for large capacity washers and black spring f...
This 18 ml bottle of white appliance touch-up paint is used to cover scratches or marks on your appliance. The white touch-up paint can be used on refrigerators, microwaves, ranges, clothes dryers, an...
This white thrust spacer is made of plastic and is also commonly referred to as a retainer ring. It is used in the agitator assembly of many direct drive washing machine models. This is the retaining ...
Also known as an O-Ring. This black o-ring seal is three inches in diameter.
$14.71
In Stock
Questions And Answers for ITW4300SQ0
Ask our experts a question about this model and we'll get back to you as soon as possible!
4 questions answered by our experts.
< Prev
1
Next >
Sort by:
Search filter:
Clear Filter
Your search term must have 3 or more characters.
Keep searches simple. Use keywords, e.g. "leaking", "pump", "broken" or "fit".
Sorry, we couldn't find any existing answers that matched.Try using some different or simpler keywords, or submit your new question by using the "Ask a Question" button above!
Kristie
February 5, 2020
It seems to lose power. Would start back after thumping it. Now does not come on at all
For model number ITW4300SQ0
Hello and thank you for writing.
It certainly sounds like it could be a faulty lid switch PS11745957 and/or a loose or a faulty capacitor PS11746660 you should check the part(s) for signs of damage or test with a multimeter, and replace the part(s) as needed. We hope this helps. Please contact us anytime if you require further assistance.
How do you remove washer top to check or replace lid switch?
For model number ITW4300SQ0
Hello Tony, thank you for your question. There are two different versions of appliances that use that lid switch. The first set of instructions are as follows:
Remove the two screws on the back of the control panel. The control panel then flips back. The switch is on the left side. To remove the switch, I first detached the wire to the control panel and unscrewed the grounding wire
If the unit does not have the two screws at the back of the control panel follow these instructions:
Before beginning any repair, please unplug the appliance from the electrical outlet or turn the circuit breaker off. First, pull the washer away from the wall to access the backside. Once removed from the wall you will need to loosen the Philips head screws holding the back panel in place. You will need to slide the top panel forward to release it from the mounting tabs. Rotate back the top panel which will expose the existing lid switch. Use a nut driver to remove the screw holding the ground wire in place. Lift up the top lid which will move an arm inside that connects to the switch by moving that arm it will allow you to remove the switch. Squeeze on the release tab to remove the switch and disconnect the wiring harness that goes to the lid switch. Reconnect the new switch to the wiring harness. Lift up the lid again and position the new switch and push it down so it clips into place. Lower the lid and connect the ground wire and screw it in place. With the switch installed, take the top panel and roll it back down into position and align the top panels mounting tabs then lock it into place. Use a Phillips head screw driver to tighten the remaining 2 screws into place. Reconnect the power cord or turn the circuit breaker back on and the washer should be ready to use.
I hope this helps.
1 personfound this helpful.
Was this helpful?
Thank you for voting!
Timothy
March 30, 2025
Why water draining back in washing machine?
For model number ITW4300SQ0
Hi Timothy,
Thank you for your question. If water is draining back into the washer, the drain hose may be kinked or clogged, or the drain pump may be clogged or malfunctioning. You will need to inspect these parts to see which one is causing the issue. We hope this helps!
After spinning the tub is leaning toward the front of the washer. When it refills the water runs off the top rear of the tub and out the back side onto the floor. Do the suspension springs keep the drum level?
For model number ITW4300SQ0
Hello Brenda, thank you for your question. The suspension springs, and the balance ring, Part #: PS11741965, keep the tub level. I hope this helps.
Was this helpful?
Thank you for voting!
< Prev
1
Next >
✖
Ask a Question
Ask our experts a question on this model and we'll respond as soon as we can.
The job looked intimidating but turned out to be very easy. First take off the water pump by removing the two clips that hold it in place. Place a shallow pan under the pump to catch the water that is in the pump and hoses. Open the hose clamps with a pair of pliers or channel locks (better) and slide the hoses off of the water pump. The motor comes off next. Unplug the electrical connector from the motor and two wires from the capacitor. Remove the two screws holding the clamps in place and then pop off the two clamps. You will need to hold up the motor with one hand while you remove the clamps or it will fall to the floor once the clamps are removed. One piece of the coupling assemble will be attached to the motor and the other will be attached to the gearcase drive shaft. If you want to clean up the mess created by the shredded rubber center piece of the coupling assembly you will have to take off the motor mounting plate. It is held on by two bolts and removing it makes installing the coupling easier but probably not necessary. Push the back half of the coupling on to the gearcase drive shaft until the shaft is flush with the face of the coupling. Install the new rubber center piece on to the coupling then re-install the motor mounting plate. Install the other half of the coupling on to the motor shaft and lift the motor up to the coupling. You have to rotate the motor shaft by spinning the fan blades until the coupling lines up so you can slide it into the other half of the coupling. Then just reattach the motor, connectors and water pump in the reverse order of disassembly.
First pry off the cap of the agitator. Then using a socket remove the bolt that holds the plastic cup in place. Remove this cup by prying it loose from the two tabs that hold it in place. Once this cup is removed you can get to the broken cogs. Slip the new cogs into the underside of the cup, and slide the cup back down in the agitator housing using the slots on the side for a guide. (You may want to remove the entire agitator and assemble everything upside down, then flip it all back over to mount, so the cogs don't fall out). Tighten the bolt, snap the cap back in place on top of the agitator and your'e done. Easy repair.
The instructions came with the repair kit, it was fairly simple and straight foward.
One bolt held the entire agitator unit in the washer, as well as held the upper and lower halves together. Once that nut was removed the two halves seperated and the plastic clutch pieces could easily be replaced wtih the new onces in the repair kit.
Very easy do-it-yourself repair! Took about 20 minutes because I was being cautious. Next time I could do it in 5 minutes.


 Diagram and Parts List for Inglis Washer")