This Drive Belt is 89.5" long and comes in black, featuring four ribs on the inside for a better grip. This is a long belt that wraps all the way around the dryer drum, around a tension pulley, and th...
This OEM Timer Knob is a white plastic knob which can be easily installed onto your machine's timer rod, in order to control the timer. If the part breaks off, it should be replaced. Refer to your use...
If your dryer’s making loud noises or the drum seems shaky, this rear bearing sleeve might be the fix. It helps the drum spin smoothly and stay in place. When it wears out, you might hear squeaks or n...
TThe door strike for your dryer is mounted on the dryer frame that the door shuts onto. It fits into the door catch on the door and keeps the door closed. If the door strike is damaged or missing, the...
This Genuine OEM door latch is designed for use with a wide range of GE clothes dryers. Constructed from a combination of durable metal and plastic, the latch is mounted onto the dryer frame to secure...
This drum glide bearing is an authentic OEM replacement part that is compatible with dryers. It is white in color and made of highly durable plastic. The bearing allows the drum to rotate smoothly and...
Restore dependable startup functionality to your dryer with this replacement push-to-start switch, designed to activate the appliance when pressed and released. Compatible with a range of dryer models...
This is a replacement O-ring for the drum bearing retainer on your dryer. The drum bearing is found at the back of the dryer drum. The O-ring is designed to create a seal on the drum bearing. The O-r...
This OEM replacement dryer slide bearing is white in color, and approximately 3 inches long. The slide bearings are supportive linings for your dryer. If they have eroded, or are damaged, the drums wi...
No Longer Available
Questions And Answers for HTDX100GM8WW
Ask our experts a question about this model and we'll get back to you as soon as possible!
4 questions answered by our experts.
< Prev
1
Next >
Sort by:
Search filter:
Clear Filter
Your search term must have 3 or more characters.
Keep searches simple. Use keywords, e.g. "leaking", "pump", "broken" or "fit".
Sorry, we couldn't find any existing answers that matched.Try using some different or simpler keywords, or submit your new question by using the "Ask a Question" button above!
Ignacio
March 13, 2020
Why does machine make a clanging noise, also a small residue of oil under dryer.
For model number HTDX100GM8WW
Hello Ignacio, thank you for your question. We would recommend checking the motor and motor pulley and belt. Those are the most common causes of the noise. The residue might be something from the belt or the burner assembly, so we would recommend inspecting that area well. I hope this helps.
2 people found this helpful.
Was this helpful?
Thank you for voting!
Terry
August 16, 2021
Dryer timer knobs had broken several times when i turned on this timer this year.Now timer knob can not turning the timer any more. do you have ways to take care this problem.
For model number HTDX100GM8WW
Hi Terry,
Thank you for your question. If you are unable to turn the timer knob and previous knobs have broken when you tried before, there is an issue with the shaft on the timer and the timer will need to be replaced. The part number listed under your model number for the timer is PS9491767. If you would like to place an order for it, you may order it either online or by calling our customer service line and anyone will be happy to assist you. We hope this helps! If you have any questions, please let us know.
The start button will turn on the dryer but won't keep it running as I take my hand off the button. I have checked the oblivious , dryer button, timer knob is good from a standpoint of it does turn so wondering could it be the control panel? Wasn't thinking the fuse as if I could manually hold the starter button it would run. Or is it the starter button itself? Don't want to replace a part I don't need
For model number HTDX100GM8WW
Hello Billy, thank you for your inquiry. Based on our understanding of the issue, we would suggest replacing the push-to-start switch, part number PS3487190, to solve the problem. We hope that helps!
My question is what would be the problem if dryer does not get real hot
For model number HTDX100GM8WW
Hello Anita, Thanks for your question. If the dryer heats but not enough to dry clothes, we would recommend testing the high limit thermostats with a multimeter to see if they have continuity. Replace if it has no continuity. We hope this helps!
Removed the front Dryer panel. Left drum in place and lifted it up slightly to get access to motor drive. Slipped belt in place and put panel back on. This was a first attempt ever at fixing an appliance and it was no big deal.
2 screws removed to remove top. 4 screws removed from inside to remove front panel w/ door. 4 screws removed from top of control panel, loosed and popped top right off. Flathead screwdriver to pop off old plastic panel. Removed old wire chase (plastic, approx 3” long). Removed built-up lint, wiped down area for new duct. Snapped new duct on. Dryer works like new!! Took about 35 minutes, most of time spent cleaning up inside of dryer from lint due to broken duct.
One problem was that salesperson sold me on a new felt strip to go with new duct. That felt comes already installed on the new duct so I did not need it. Cost me a few extra dollars I did not need to spend.
Other than that, easy ordering, fast shipment, and parts are as close to original as possible.
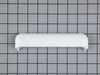
I pried out the remaining pieces of the handle out of the door with a screwdriver. When the new part arrived, I snapped it into place and it was done. It fit perfectly.


 – Part Number: WE03X37319")


 – Part Number: WE03X37320")