This 18 ml bottle of white appliance touch-up paint is used to cover scratches or marks on your appliance. The white touch-up paint can be used on refrigerators, microwaves, ranges, clothes dryers, an...
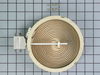
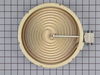
This 6-inch, 1200-watt radiant surface heating element is a genuine replacement part designed for select ranges. It supplies consistent heat to the designated cooking zone on the stovetop, ensuring ev...
This single oven rack is used to provide a durable surface for your cookware inside the oven for baking/broiling. The oven rack measures approximately 24.76” x 15.78”, is made of metal and is chrome i...
This 120-130 volt 15-watt light bulb is used to illuminate the interior part of the oven cavity when the door is open or when the light switch is turned on. The bulb has a small screw base and is appr...
This surface element is for ranges.
The surface element supplies the heat to a cooking area on top of the range.
Unplug the range or shut off the house circuit breaker for the range before insta...
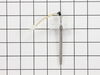
This is a multi-use and multi-appliance screw. It can be used on a microwave, refrigerator, range/oven, air conditioner, dehumidifier, washer, or dryer. The measurements of this screw are 8 x 1/2 inch...
This part is located at the bottom of the oven. This bake element is for ranges. The bake element is at the bottom of the oven and supplies the heat for baking. Unplug the range or shut off the house ...
This part is the replacement door gasket for your oven. It is made of gray rubber and is sold individually. The door gasket runs along the circumference of the oven door and creates a seal that insula...
$57.27
In Stock
Questions And Answers for GY396LXPB03
Be the first to ask our experts a question about this model!
✖
Ask a Question
Ask our experts a question on this model and we'll respond as soon as we can.
Turned the breaker off, I removed 2 screws securing the range top to the range, opened the top and secured it in the up position, Removed the 2 screws securing the element ,one at a time I swapped the quick connectors from the old element to the new and repeated the process in reverse. I save over $100.00 in labor, plus most companies get you for a trip charge. It was easy!!
I removed the two screws that held the bake element in place. Next I removed the Bake Element. I had to unscrew the oven to go behind it because when one piece off of the element broke, it slide back behind the oven. I pushed the wire back thru the piece holes, connected the Element, and pushed the element with the wires back through the holes. I rescrewed the element in place and the oven. PartSelect helped me to save this year's Christmas.
This built-in oven was slid out of it's space and set on a box. I removed the back cover with nut driver and located the safety overload device. removed nuts and used pliers to remove wires and replace them. The power must be off to do this repair.Replaced the cover and slid back into place. This could be a lot more difficult if your power cord or gas line is not long enough to make it out of your wall space. Or of your oven is attached well to the frame.


 – Part Number: WP4173175")


 – Part Number: W11675844")