This Drive Belt is 89.5" long and comes in black, featuring four ribs on the inside for a better grip. This is a long belt that wraps all the way around the dryer drum, around a tension pulley, and th...
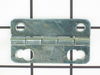
TThe door strike for your dryer is mounted on the dryer frame that the door shuts onto. It fits into the door catch on the door and keeps the door closed. If the door strike is damaged or missing, the...
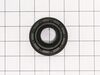
This drum glide bearing is an authentic OEM replacement part that is compatible with dryers. It is white in color and made of highly durable plastic. The bearing allows the drum to rotate smoothly and...
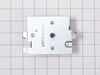
Restore dependable startup functionality to your dryer with this replacement push-to-start switch, designed to activate the appliance when pressed and released. Compatible with a range of dryer models...
This solid dryer door handle is designed to replace a damaged or broken handle, restoring smooth and reliable opening and closing of the dryer door. Built for durability, it provides a sturdy grip tha...
$38.00
In Stock
Order within the next 4 hrs and your part ships today!
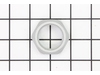
This OEM replacement dryer slide bearing is white in color, and approximately 3 inches long. The slide bearings are supportive linings for your dryer. If they have eroded, or are damaged, the drums wi...
The door latch lid lock is to lock the door on your washer when the appliance is in use. Your washer will not start if your door is not locked. If your latch is broken, you may not be able to start a ...
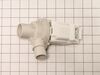
Is your dryer not working as efficiently as it used to? The problem may lie in its drum support! This GE drum support shaft and bracket assembly offers robust support at the back end of your dryer dru...
This washer control knob assembly is a genuine OEM replacement for select GE washers and washer/dryer combos. Featuring a sleek black design with silver accents, it provides precise control over wash ...
$107.18
In Stock
Order within the next 4 hrs and your part ships today!
Questions And Answers for GUD37ESMJ1DG
Ask our experts a question about this model and we'll get back to you as soon as possible!
3 questions answered by our experts.
< Prev
1
Next >
Sort by:
Search filter:
Clear Filter
Your search term must have 3 or more characters.
Keep searches simple. Use keywords, e.g. "leaking", "pump", "broken" or "fit".
Sorry, we couldn't find any existing answers that matched.Try using some different or simpler keywords, or submit your new question by using the "Ask a Question" button above!
Nick
April 26, 2023
Hi guys. Tell me, who knows what the problem may be. GE combo washer/dryer, filling water, then 1-2 seconds begins to wash and then just stops. If I press start again, the washer jerks for 1 second and that's it.
For model number GUD37ESMJ1DG
Hi Nick, thank you for contacting us. We have researched the model and would suggest making sure the drain hose is not clogged. If the issue remains, the problem might be with the drive motor, part number PS12320238. Over time, the bearings inside the motor get rusty or damaged, causing the motor windings to overheat during operation. The motor might also make humming noise or produce a burning smell. Soon as the sensors detect overheating, the cycle stops. Checking the drive motor for continuity using a multimeter might help. We hope this information is useful!
1 personfound this helpful.
Was this helpful?
Thank you for voting!
Roy
December 21, 2019
I have a stacker washer and dryer the is very noise what could wrong can you help
For model number GUD37ESMJ1DG
Hello Roy and thanks for writing.
It certainly sounds like a faulty belt drive PS11766728 you should check for signs of damage, and replace it if needed. We hope this helps. Please contact us anytime.
Hello Agnes, thank you for writing. It could be because of a clogged vent. Or if your model has moisture sensors, they could be coated with fabric softener so that they do not read correctly. We hope this helps.
Removed the front Dryer panel. Left drum in place and lifted it up slightly to get access to motor drive. Slipped belt in place and put panel back on. This was a first attempt ever at fixing an appliance and it was no big deal.
The end repair was very simple and took minimal effort. The time and difficulty was all in the testing. I disassembled the dryer and removed the drum and then hard wired each thermo-fuse to determine where the fault was. After test all of those I was stumped. When I opened the door the light would not come on so I assumed it was a power fault closer to the source. However after all of my testing I couldn't find anything wrong. I then removed the light bulb and realized it was burned out which led me to the door switch being the fault. I removed the switch and soldered the three wire together and the dryer started right up! All I had to do was order a new $15 part, unsolder the wires and plug them in. Would have been so much simpler if that light bulb hadn't of been burned out causing me to over think my diagnosis. This was my first major appliance repair and I did it with only the help of the parts diagram provided on the website.
I had to take most of the dryer apart because there is no rear access to the motor. It turned out to be easy to dissasembel the dryer. The only problem that I had was that I could not figure out how to route the belt around the motor and the idol pullies. I could not find anywhere that gave instructions on how to properly tension the belt. I finally figured out that the idoler pulley needs to be locked in place on the right side of the engie mount. Then the belt needs to be routed over idoler pulley and under the motor pulley. Finally release the idoler pully from the locked postion to put tension on the belt. It really turned out to be pretty easy.


 – Part Number: WE03X37319")


 – Part Number: WE03X37320")