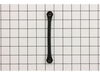
The tub dampening straps support the wash tub and reduce vibration by keeping the tub at the center of the cabinet. If your washer shakes and moves, or is making a loud banging noise during the wash c...
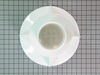
The main tub seal is located between the transmission and the outer tub. It's the primary water seal in the outer tub for the transmission-shaft. This seal is difficult to replace and should probably ...
This tub bearing goes in your washing machine. You will find it on the bottom of the outer tub, where the transmission goes through the tub. If you hear metal on metal when the washer is spinning, you...
This is a water pressure switch hose, also known as the air dome tube, for your washer. It is made of clear plastic and is sold individually. The hose transports water to your water pressure switch, s...
$26.58
Special Order
Questions And Answers for GTWN4250M1WS
Ask our experts a question about this model and we'll get back to you as soon as possible!
9 questions answered by our experts.
< Prev
1
2
Next >
Sort by:
Search filter:
Clear Filter
Your search term must have 3 or more characters.
Keep searches simple. Use keywords, e.g. "leaking", "pump", "broken" or "fit".
Sorry, we couldn't find any existing answers that matched.Try using some different or simpler keywords, or submit your new question by using the "Ask a Question" button above!
Joe
December 14, 2019
Doesn't agtatate or spin is there a reset button on the motor
For model number GTWN4250M1WS
Hi Joe, there is no reset button on the motor as far as we cold tell. Thank you for your question and good luck with your repair!
Set on super it only fills 1/2 way, is this normal? And, do you know CU capacity? Thank you!
For model number GTWN4250M1WS
Hello Katherine, thank you for reaching out. Based on the description that you have provided, we would recommend replacing the pressure switch, part number PS2354068. The cubic feet capacity of your model is 3.6. We hope that helps!
WHY ARE MY CLOTHES STILL DRIPPING WET AFTER LAST DRAIN SPIN
For model number GTWN4250M1WS
Hello Roy, thank you for your inquiry. If your clothes are still dripping wet after the last drain spin, there could be several potential causes:
1. Overloading the Washer: If the washer is overloaded, it may not be able to spin properly, leaving clothes wetter than usual. Try reducing the load size.
2. Unbalanced Load: An unbalanced load can prevent the washer from spinning at full speed. Make sure the load is evenly distributed.
3. Drainage Issues: Check if the drain hose is clogged or kinked, which can prevent proper drainage.
4. Malfunctioning Drain Pump: The drain pump may not be working properly, which can prevent water from being fully expelled from the washer. We would suggest checking it, the part number is PS8768445. You may need to replace it to fix the issue. We hope this solves your problem!
Wash status control does not work except on easycare, what switchshould i buy
For model number GTWN4250M1WS
Hello Larry, thank you for reaching out. It seems like the washer control board is defective and needs to be replaced. The part number for the washer control board is PS3507656. If you need help placing an order for it, please feel free to give us a call. We look forward to hearing from you!
Hello Jeanette, thank you for contacting us. It looks like your washer is losing balance during spin and generating load-banging noise. We would recommend checking the tub dampening strap, part number PS271100, and the suspension rods, part number PS960673, and part number PS3511633. Customer service is available 7 days a week if you require assistance placing an order. Thanks again for reaching out!
1. Drained the wash tub by taking the drain hose from the back of the washing machine and dropping it below the tub - water flowed out of hose a lot easier than trying to suck water out of tub using a pump (tried this on the first time I tried to fix washer). (Washing machine on 2nd floor of house and didn't want water running on floor) 2. Removed the 2 bolts holding the Pump/Motor assembly to the machine. 3. Removed both hose clamps on the Pump/Motor assembly and removed Pump. 4. Attached the new drain inlet hose to the pump and then to the tub with the original hose clamps. 5. Attached the drain hose to the pump and then plugged in the 2 wires for the pump. 6. Plugged in the washing machine and everything worked.
NOTES: 1. Hardest part was working with hose clamps (spring type clamps) in the tight space under the machine. 2. Easier to fix since I pulled machine apart a few days before - removing the clog in the pump/motor assembly only to get everything back together to find out that the motor was dead. Still well worth the time and effort due to not having to go out and buy a new Machine...
After removing frt panel which prys off I checked for anything obvious like a loose belt. Then I jiggled the magnet switch located on the inside of the loading cover. I saw the machine start agitating the it stopped again when I stopped touching it. I ordered the new part and spliced it in with the wire crip tool. Now the machine is A ok.
Aside from getting the wet clothes and most of the water out,the toughest part of the job for me was to figure out how to get inside the machine. I nearly wrecked the thing trying to lift the top panel. After some frustration I removed the star-type screws on back of the control panel and found, tucked away neatly, the documentation/parts list complete with instructions on how to remove the FRONT panel. Once I got inside it was easy to locate the pump. I ran the drain cycle for a moment to see if the pump turned at all. The original had an exposed fan so it was easy to see that indeed the motor was not turning. I inspected all the hose and electrical connections to make sure I had the tools I'd need and the savvy to replace the part(s) if I could locate them. I'm not much of a web-head, so I was a little surprised when I typed G.E. appliances and the search took me to partselect.com where I was pretty much coached through the procedure before I even ordered the part. The box arrived ahead of schedule (yay) and when I looked at the pump it didn't look much like the one I was replacing. But then I realized it was the same thing just ten years more advanced. I used a small pair of vise grips to pinch and lock the pipe clamps open. I know there is a plier made for this, but... Anyways, after loosening the clamps and sliding them away from the pump I pulled the hoses off and let the last of the rinse water still in them run down my shirt sleeve to my elbow. (optional, not recommended) Thus refreshed I then rummaged through my socket set and found what I needed to remove the 2 sheet metal mounting screws and disconnected the 2 power leads. I removed the faulty pump and proudly showed it to my wife. Unimpressed, she asked how much longer. I quickly reversed the procedure to install the new unit and confidently piled in a load of laundry. The cycle completed just fine and has done so since. I will and have recommmended partselect.com to friends and will use it again for sure.