If your dryer’s taking longer to dry clothes or the lint screen looks damaged, it might be time for a new lint filter. This easy-to-install replacement works with both electric and gas dryers and help...
This Drive Belt is 89.5" long and comes in black, featuring four ribs on the inside for a better grip. This is a long belt that wraps all the way around the dryer drum, around a tension pulley, and th...
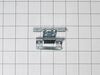
This OEM replacement dryer slide bearing is white in color, and approximately 3 inches long. The slide bearings are supportive linings for your dryer. If they have eroded, or are damaged, the drums wi...
This is a duct felt seal for a dryer. The duct felt seal allows the front-load dryer drum to glide smoothly on the front panel. Your dryer will not function properly if the drum felt seal is compromis...
Having trouble with your dryer taking too long or using too much energy to dry your clothes? You might need a new moisture sensor. This sensor, created by GE, plays a key role in making sure your drye...
Is your dryer not working as efficiently as it used to? The problem may lie in its drum support! This GE drum support shaft and bracket assembly offers robust support at the back end of your dryer dru...
This dryer door strike plate helps secure the door in the closed position by properly engaging with the door latch during operation. Designed for reliable alignment and durability, it is commonly repl...
Ask our experts a question about this model and we'll get back to you as soon as possible!
3 questions answered by our experts.
< Prev
1
Next >
Sort by:
Search filter:
Clear Filter
Your search term must have 3 or more characters.
Keep searches simple. Use keywords, e.g. "leaking", "pump", "broken" or "fit".
Sorry, we couldn't find any existing answers that matched.Try using some different or simpler keywords, or submit your new question by using the "Ask a Question" button above!
Joe
January 11, 2025
How many prongs for power chord
For model number GTD58EBSV0WS
Hi Joe, thank you for reaching out. This model can be used with either a 3 or 4 prong cord. It will just depend which outlet type you have in your space. The 4 prongs power cord for your model with 5 feet length is part number PS3488131, and the 4 prongs cord with 4 feet length is part number PS3488130. The 3 prongs power cord of 5 feet length is part number PS3488121, and 3 prongs cord of 4 feet length is part number PS3488122. We hope that helps!
2 people found this helpful.
Was this helpful?
Thank you for voting!
Phillip
November 23, 2024
Dryer runs, but does not heat
For model number GTD58EBSV0WS
Hello Phillip, Thank you for the question. We suggest testing the three Thermostats with a multimeter to check the continuity. Thank you for the inquiry, good luck with the repair!
Dyer hums won't start unless you give the drum a boost
For model number GTD58EBSV0WS
Hi Jason, thank you for contacting us. The issue is likely the start windings inside the drive motor, part number PS12743452. If these are burnt out or shorted, the motor cannot initiate rotation but will still hum when energized. You may need to replace it to fix the issue. We hope this solves your problem!
Was this helpful?
Thank you for voting!
< Prev
1
Next >
✖
Ask a Question
Ask our experts a question on this model and we'll respond as soon as we can.
Removed the front Dryer panel. Left drum in place and lifted it up slightly to get access to motor drive. Slipped belt in place and put panel back on. This was a first attempt ever at fixing an appliance and it was no big deal.
I had to take most of the dryer apart because there is no rear access to the motor. It turned out to be easy to dissasembel the dryer. The only problem that I had was that I could not figure out how to route the belt around the motor and the idol pullies. I could not find anywhere that gave instructions on how to properly tension the belt. I finally figured out that the idoler pulley needs to be locked in place on the right side of the engie mount. Then the belt needs to be routed over idoler pulley and under the motor pulley. Finally release the idoler pully from the locked postion to put tension on the belt. It really turned out to be pretty easy.
Pryed off the top with a flat head screwdriver and removed the 2 screws holding the front panel to the sides. Then lifted the front panel off of the bottom brackets. Belt fit perfectly and followed the provided instructions to loop it around the motor and pulley. PartSelect got the part to me within a couple of days and the repair was a snap.


 – Part Number: WE03X37320")