This handle screw, also known as a mounting bolt, is a mounting screw to help secure the door handle to your refrigerator door. If your handle is loose, you may just need to tighten the screw. If your...
This refrigerator door shelf bin is a clear, gallon-sized storage accessory designed for installation on the right-side door of select refrigerator models. Crafted from durable, food-safe resin, it fe...
This left-side crisper drawer is designed for use in select LG refrigerators, offering a reliable solution for storing fruits, vegetables, and other perishables. Made from clear plastic, it features r...
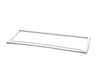
Are you tired of struggling with a broken or missing shelf in your LG refrigerator? We understand how frustrating that can be, especially when your fridge isn't as organized or reliable as it should b...
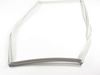
Watch YouTube videos on this topic if you are uncertain before tackling the job. The right door was easy to replace. Just pull the gasket with your fingers and it will come off easily. Place new gasket over door and use fingers to press it inside the groove few inches at a time. Pay attention to gasket orientation.
The left door is a bit harder because you need to remove the mullion at the door edge using a screw driver. Remove two screws on the center hinge and then slide the mullion up to disengage. Then unplug the wires to remove the mullion. Replace the gasket as described above and replace the mullion reversing the directions shown above.
Once I U tubed the the removal and replacement of the gaskets it was super easy. The right gasket change was easy without tools. The left gasket required me to remove the mullion first, which is why I used Utube.
Fortunately, others had left comments about this installation, so proved very helpful. First thing was laying out the gasket flag on the counter to allow it to unbend, get out the kinks from shipping. While the new gasket was laying out on the counter, started removing the old gasket. As it had been there for 11 years, needed pliers to get a corner started. I was slow and careful removing the old gasket in case I needed to put it back in. A very helpful suggestion from others was to lightly rub dishwashing soap on the gasket edge that fits in the groove in the door. Again, slow and careful, got it installed, wiped off any excess dishwashing liquid, and the door closed with a better seal in a long time. Pleasantly surprised how easy this was to do!