Models > GR-L258SSJ

GR-L258SSJ LG Refrigerator - Overview

Sections of the GR-L258SSJ

[Viewing 1 of 1]
Keep searches simple, eg. "belt" or "pump".
Crisper Drawer Front – Part Number: 3551JJ2019D
Crisper Drawer Front
★★★★★
★★★★★
(5)
PartSelect #: PS3520464
Manufacturer #: 3551JJ2019D
This is used on the Opti-bin crisper drawer and it includes the humidity control and a clear plastic window.
$65.08
  In Stock
Plastic Tube - 5/16 Inch – Part Number: MJU62070602
Plastic Tube - 5/16 Inch
★★★★★
★★★★★
(4)
PartSelect #: PS3536013
Manufacturer #: MJU62070602
$29.11
  In Stock
Push Button Switch – Part Number: 6600JB3007E
Push Button Switch
PartSelect #: PS3529283
Manufacturer #: 6600JB3007E
This is a genuine replacement switch. It is a push button style switch that is designed for use in your refrigerator. When the door of your appliance is opened the switch is released, and the light co...
$36.17
  In Stock
Primary Water Valve - Single Coil – Part Number: MJX41178908
Primary Water Valve - Single Coil
★★★★★
★★★★★
(1)
PartSelect #: PS3536019
Manufacturer #: MJX41178908
$83.00
  In Stock
Ice Maker Assembly – Part Number: AEQ36756901
Ice Maker Assembly
PartSelect #: PS3532293
Manufacturer #: AEQ36756901
The wire harness is NOT available separately. Refrigerator ice maker kit AEQ36756901 is an original equipment manufacturer (OEM) part that fits some refrigerators in these series: Kenmore 795; Kenmore...
$388.84
  In Stock
Lamp Cover – Part Number: 3550JJ1070B
Lamp Cover
PartSelect #: PS3520016
Manufacturer #: 3550JJ1070B
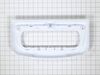
This lamp cover is also commonly referred to as a light lens. This is a genuine replacement part. It is used in a refrigerator to cover the light bulb. It is made of clear plastic. It measures 14 inch...
$25.15
  In Stock
Drawer Slide Rail – Part Number: 4975JA2028A
Drawer Slide Rail
PartSelect #: PS3524806
Manufacturer #: 4975JA2028A
Sold individually.
$31.49
  In Stock
Defrost Sensor Assembly – Part Number: 6615JB2005N
Defrost Sensor Assembly
PartSelect #: PS3636324
Manufacturer #: 6615JB2005N
$64.96
  In Stock
Light Bulb – Part Number: 6912JB2004M
Light Bulb
PartSelect #: PS3530408
Manufacturer #: 6912JB2004M
$27.83
  Special Order
PCB ASSEMBLY,POWER – Part Number: EBR60969202
PCB ASSEMBLY,POWER
PartSelect #: PS3624836
Manufacturer #: EBR60969202
$208.28
  In Stock
Overload Protect – Part Number: 6750C-0004R
Overload Protect
PartSelect #: PS3529535
Manufacturer #: 6750C-0004R
$59.78
  In Stock
Slide Rail - Left Side – Part Number: 5218JA1010F
Slide Rail - Left Side
PartSelect #: PS3527352
Manufacturer #: 5218JA1010F
$182.69
  In Stock

Questions And Answers for GR-L258SSJ

Be the first to ask our experts a question about this model!

Common Symptoms of the GR-L258SSJ

[Viewing 7 of 7]
Leaking
Fixed by
these parts
Fixing Fixing
Show All
Door won’t open or close
Fixed by
these parts
Fixing Fixing Fixing
Show All
Light not working
Fixed by
these parts
Fixing Fixing Fixing
Show All
Ice maker not making ice
Fixed by
these parts
Fixing
Show All
Not dispensing water
Fixed by
these parts
Fixing Fixing
Show All
Ice maker won’t dispense ice
Fixed by
these parts
Fixing Fixing
Show All
Noisy
Fixed by
these parts
Fixing
Show All
Keep searches simple. Use keywords, e.g. "leaking", "pump", "broken" or "fit".
Water feed line running from water valve to filter housing was leaking
Shut off water supply. Disconnect main supply line. Remove rear lower panel on back of refrigerator. Remove all tubing clamps on back. Disconnect leaking tubing from water supply valve. Remove water filter and unscrew/remove water filter housing. Replace tubing - connect to water filter housing then to water supply valve. Reconnect filter housing and filter. Reinstall lower panel, then main water supply line, then all tubing clamps. Turn water back on and check for leaks after discarding several glasses of water to fill filter. Job complete!
Parts Used:
Plastic Tube - 5/16 Inch
  • Tom from EASTON, PA
  • Difficulty Level:
    Easy
  • Total Repair Time:
    30 - 60 mins
  • Tools:
    Screw drivers, Wrench (Adjustable)
11 of 18 people found this instruction helpful.
Was this instruction helpful to you?
Thank you for voting!
Changing out the Ice Maker tube
An easy way to get a refrigerator out from the wall is to use a tow strap or 1/2 to 3/4 in. rope. Throw a loop behind refer while keeping both ends in your hands. Let it settle down to the lower half of unit and pull using both hands. Comes right out.
Remove lower panel. Unscrew water valve from cabinet. Remove all tube holders Lay some rags down to catch a little water drainage.
Turn off water supply valve at wall. Unplug Power. Remove filter and filter holder. (one screw).
remove tube from valve by removing plastic C clip. Push plastic ring towards the valve and pull out tube at same time.
With the tube free, remove filter, then mount screw to remove the inside filter holder. When it is out, pull the tube doing the same process as the lower end. Pull tube out and replace with new one putting everything back in reverse order.
Before placing tube holders back on, turn on water to check for leaks.
After turning water back on and plugging in power, push refer back into place.
While I was there, I also replaced the hose from the wall to the refer.
Parts Used:
Plastic Tube - 5/16 Inch
  • HARRY from SPARKS, NV
  • Difficulty Level:
    Really Easy
  • Total Repair Time:
    15 - 30 mins
  • Tools:
    Screw drivers, Wrench (Adjustable)
8 of 12 people found this instruction helpful.
Was this instruction helpful to you?
Thank you for voting!
Our refrigerator was not dispencing water or ice.
Turned of water to refrigerator and unplugged refrigerator. Removed the water line from refrigerator. Removed back panel. Removed mounting screw from the water valve, Unhooked wire harness from valve and removed the water line on back of valve. Reconnected wiring harness to new valve, reconnected water line on back of valve. Replaced the back panel to refrigerator and put the water line back on the new valve. Turned on water valve and checked for leaks. It's now dispensing water and ice.
Parts Used:
Primary Water Valve - Single Coil
  • Nancy from NEW ALBANY, IN
  • Difficulty Level:
    Very Easy
  • Total Repair Time:
    Less than 15 mins
  • Tools:
    Pliers, Screw drivers, Wrench (Adjustable)
10 of 18 people found this instruction helpful.
Was this instruction helpful to you?
Thank you for voting!