


GLMV168KS4 General Electric Range - Overview
Sections of the GLMV168KS4
[Viewing 1 of 1]
Keep searches simple, eg. "belt" or "pump".

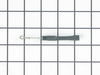
Microwave Fuse
PartSelect #: PS1481237
Manufacturer #: WB27X10928
This ceramic microwave fuse is just over an inch in length. It is white in the center, and metal on both ends. This is a 20-amp fuse, and is used to power your microwave. If the touch pad on the micro...
$25.31
Special Order

Light Socket - 250V 75W
PartSelect #: PS230544
Manufacturer #: WB08X10016
Light bulb not included.
$35.95
Special Order

Drive Motor
PartSelect #: PS237772
Manufacturer #: WB26X10038
This motor rotates the glass turntable in the microwave and accepts a D-shaped shaft.
$65.18
Special Order

Aluminum Grease Filter
PartSelect #: PS255242
Manufacturer #: WB6X486
This aluminum filter collects grease particles in the air from cooking. Sold individually.
No Longer Available

Flat Cab Mounting Bolt
PartSelect #: PS651196
Manufacturer #: WB01X10180
This part is the replacement flat cab mounting bolt for your microwave. The bolt is approximately 4 inches long. It is designed to hold the microwave in place in your cabinet. The main reason to repla...
$16.95
Special Order

Charcoal Filter
PartSelect #: PS243779
Manufacturer #: WB2X9883
This vent hood filter collects grease particles in the air from cooking. Sold individually.
No Longer Available

Hood Damper Assembly
PartSelect #: PS651224
Manufacturer #: WB06X10436
Need a specialized replacement part to get your GE Appliance back to peak performance? Our GE Appliances Vent Damper might be exactly what you're looking for. This genuine original equipment manufactu...
No Longer Available

Thermostat Cut-Out
PartSelect #: PS239319
Manufacturer #: WB27X10195
Also known as Thermostat or Humidity Sensor for Fault Code.
$48.95
Special Order


Door Handle
PartSelect #: PS232103
Manufacturer #: WB15X10023
Screws NOT included.
$181.09
Special Order


Microwave Mounting Plate
PartSelect #: PS2339928
Manufacturer #: WB56X10862
This plate mounts the microwave under the cabinet.
No Longer Available
Questions And Answers for GLMV168KS4
We're sorry, but our Q&A experts are temporarily unavailable.
Please check back later if you still haven't found the answer you need.
Common Symptoms of the GLMV168KS4
[Viewing 6 of 6]Won’t turn on
Fixed by
these parts
these parts


Show All
No heat
Fixed by
these parts
these parts

Show All
Tray won’t turn
Fixed by
these parts
these parts
Show All
Touchpad does not respond
Fixed by
these parts
these parts
Show All
Noisy
Fixed by
these parts
these parts

Show All
Door not closing properly
Fixed by
these parts
these parts

Show All


Keep searches simple. Use keywords, e.g. "leaking", "pump", "broken" or "fit".
Microwave completely stopped working
Turned out the issue was easily solved by replacing a single, inexpensive fuse.
First off, UNPLUG THE MICROWAVE.
The fuse is located under the plastic grill at the top of the microwave. It's held on by two screws. Once you've removed the screws and taken off the plastic grill, you go to the right side of the microwave and remove another screw that holds a small metal grill in place. Removing the small metal grill is probably the toughest part of this repair. You kind of have to rock it back and forth a bit to get it to release. Once that's off, you can get to the fuse. I removed the burnt out one with a pair of needle nose pliers. I also put a small piece of cardboard under the fuse when I did this so I didn't accidentally drop it into the innards of the microwave. I did the same thing when I replaced the new fuse. I then plugged the appliance back in and made sure it worked. Once that was confirmed, I replaced both grills.
Parts Used:
-
Kim from Cliffside Park, NJ
-
Difficulty Level:Really Easy
-
Total Repair Time:15 - 30 mins
-
Tools:Screw drivers
964 of 1257 people
found this instruction helpful.
Was this instruction helpful to you?
Thank you for voting!
turne table ot moving. Filter never changed
I had no idea what to expect. I was tired to see this turn table not moving. I removed the 7 screws at the bottom of the microwave that I thought was hiding the turn table mechanism. Bingo! I removed the 2 screws holding the motor and check if the power was coming to the motor and it was. The motor was cooked.
I decided to change the filter since I was working on this. When I received it, and proceeded to change it, I found out that there was no filter. Finding the right position was a bit tricky. The most difficult part was to remove the front vent grille.
Don’t be shy, try it! Make sure, to disconnect the power when changing the filter.
Parts Used:
-
Jean-Christophe from Salisbury, MA
-
Difficulty Level:Easy
-
Total Repair Time:30 - 60 mins
-
Tools:Screw drivers
387 of 400 people
found this instruction helpful.
Was this instruction helpful to you?
Thank you for voting!
The turntable motor went out and was making a horrible sound when I started the microwave
First I unplugged the microwave. :) Then, I removed the 6 screws found underneath the microwave, which allowed the bottom piece to hang down so I could see the turntable motor. I took the two screws out holding the motor in place and pulled the electric connectors off the motor terminals. Then I got the new part from PartSelect.com, replaced the electrical commectors, fit the motor back into the slot it came from (cause the pin has to be seated up in the hole) and replaced the 2 screws holding in the motor. Then I put the bottom metal piece back up and put the 6 screws back in. It was really easy - and I'm a chick! ;)
Parts Used:
-
Kim from Centerville, GA
-
Difficulty Level:Really Easy
-
Total Repair Time:Less than 15 mins
-
Tools:Screw drivers
159 of 225 people
found this instruction helpful.
Was this instruction helpful to you?
Thank you for voting!