The Lower Spray Arm is used in your dishwasher to spray water and clean your dishes. If broken there will be visible damage or your dishes may no longer be cleaned properly. If your spray arm is broke...
This grey OEM dishwasher tub gasket is a 73" grey rubber part that creates a seal around the dishwasher to prevent any water leakage during a cycle. If it's damaged or broken, you'll start seeing wate...
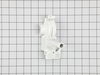
This dishwasher water inlet valve is a genuine OEM component designed to regulate water flow into the appliance during the fill cycle. Typically located behind the lower kickplate panel in either fron...
The single rack roller kit comes with one axle/clip and one wheel/roller. The rack wheel is designed to allow the rack of your dishwasher to roll in and out. If the rack will not complete this task, o...
This part is a replacement spray arm support for your dishwasher. It is made of white plastic and is approximately 3 inches long, 1 inch wide, and 3 inches tall. This is the support for the lower spra...
This plastic cover and stem assembly helps hold the lower spray arm in place.
$39.21
In Stock
Questions And Answers for GLD2250RDC3
Ask our experts a question about this model and we'll get back to you as soon as possible!
1 question answered by our experts.
< Prev
1
Next >
Sort by:
Search filter:
Clear Filter
Your search term must have 3 or more characters.
Keep searches simple. Use keywords, e.g. "leaking", "pump", "broken" or "fit".
Sorry, we couldn't find any existing answers that matched.Try using some different or simpler keywords, or submit your new question by using the "Ask a Question" button above!
Brian
June 17, 2024
Hi, The dishwasher will not turn on. It has 120volt coming in but the keypad won't light up. any suggestions that will allow me to continue troubleshooting?
For model number GLD2250RDC3
Hello Brian, thank you for getting in touch. Based on our understanding of the issue, we would suggest checking the touchpad, part number PS816017, to solve the problem. It lets you choose the dishwasher cycle and option settings. Glad to be of assistance!
Remove the bottom cover plate. Disconnect the water inlet and black rubber hose. Remove 2 mounting screws. Pull out electrical connector. Reverse order. Be sure to get the brass inlet connector really tight so it won't leak. I did the final tightning after the part is mounted. Not a bad repair at all. The only problem was that it leaked in the first place and messed up my subfloor and laminate flooring.
First I opened the door all the way. Second I reached down to the bottom gasket then grabed it on the right end of the seal that is on the right side of the door. Then I pulled the end outward from the bottom of the door toward the heater coil in the bottom of the washer. It came out real easy. You see it just snaps into a little plastic groove under the door. I then cleaned up the area for food and soap particules. I then placed the new gasket in place by lining up the notch toward the right end with the piece of plastic that encloses the right end of the plastic notch on the bottom right end of the door. Then push it in untill it stops going into the notch. It snaps in but does not make a snaping sound. It just won't go in no more.