


GFS207 Refrigerator - Overview
Models starting with GFS207
Click on the best match to narrow your results.
- GFS207 (MN01) Caloric Refrigerator (ELECTRIC REFRIGERATORS)
- GFS207 (MN00) Amana Refrigerator
- GFS207 (MN02) Amana Refrigerator
- GFS207-MN00 Amana Refrigerator (ELECTRIC REFRIGERATORS)
- GFS207-MN01 Amana Refrigerator (ELECTRIC REFRIGERATORS)
- GFS207-MN02 Amana Refrigerator (ELECTRIC REFRIGERATORS)
- GFS207/MN00 Amana Refrigerator
- GFS207/MN01 Caloric Refrigerator (Side-by-side, Electric)
- GFS207/MN02 Amana Refrigerator
- GFS207MN01 (GFS207MN0 1) Amana Refrigerator
Keep searches simple, eg. "belt" or "pump".

Light Bulb - 40W
PartSelect #: PS884734
Manufacturer #: 8009
This an authentic OEM 40-Watt replacement light bulb, used in a number of household appliances. It is specially designed to withstand extreme temperatures, which is why these replacement bulbs are mos...
$22.58
In Stock

Defrost Timer
PartSelect #: PS11723171
Manufacturer #: W10822278
This eight-hour defrost timer will replace most other defrost timers. This device acts like a clock. It continually advances and alternates between activating the cooling cycle and the defrost heater....
$45.48
In Stock

Refrigerator Condenser Fan Motor Kit
PartSelect #: PS395284
Manufacturer #: 833697
This condenser fan motor operates in a clockwise fashion and carries carries 2W and 115V. It comes with screws, a mounting nut for the blade and a cushion. This part provides forced-air cooling for the condenser coil.
$110.99
In Stock

Evaporator Fan Motor Kit
PartSelect #: PS376645
Manufacturer #: 482731
The evaporator is found in the back of the freezer. This kit comes with two mounting grommets, two sleeves (not to be used on porcelain models), two #8 mounting screws, and a push-on fan blade.
NOT...
$93.93
In Stock

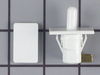
Door Light Switch
PartSelect #: PS11738900
Manufacturer #: WP2149705
This part controls the light.
$52.59
In Stock

Refrigerator Cold Control Thermostat
PartSelect #: PS316579
Manufacturer #: 1123394
This cold control thermostat has a temperature range from 29.5 degrees Fahrenheit to 16.5 degrees Fahrenheit and a capillary length of 35 inches.
$162.13
In Stock

Refrigerator Bimetal Defrost Thermostat
PartSelect #: PS11742471
Manufacturer #: WP4387499
This thermostat opens at 50 degrees Farenheit and closes at 25 degrees Farenheit.
$82.45
Special Order

Start Relay
PartSelect #: PS323342
Manufacturer #: 2154436
The start relay briefly boosts the compressor, and then shuts off as soon as the motor gets up to speed.
$96.63
Special Order

Fuse
PartSelect #: PS11747999
Manufacturer #: WPW10017410
This microwave time delay fuse is a 20-amp safety component designed to protect the appliance from damage caused by power surges. If your microwave fails to start, a blown fuse may be the reason. Repl...
$25.95
In Stock

Fresh Food Door Gasket
PartSelect #: PS328693
Manufacturer #: 2188450A
This white fresh food door gasket is used to seal the refrigerator door when closed to keep the cool air inside and the room air out.
$200.44
Special Order


Filter Drier Tube
PartSelect #: PS11728084
Manufacturer #: W10843121
This filter dryer is for refrigerators and filters refrigerant that travels through the sealed system of the refrigerator.
$50.69
In Stock
Common Symptoms of models starting with GFS207
[Viewing 15 of 15]Fridge too warm
Fixed by
these parts
these parts


Show All
Noisy
Fixed by
these parts
these parts
Show All
Freezer section too warm
Fixed by
these parts
these parts
Show All
Freezer not defrosting
Fixed by
these parts
these parts
Show All
Light not working
Fixed by
these parts
these parts
Show All
Will Not Start
Fixed by
these parts
these parts
Show All
Leaking
Fixed by
these parts
these parts
Show All
Fridge and Freezer are too warm
Fixed by
these parts
these parts
Show All
Fridge runs too long
Fixed by
these parts
these parts
Show All
Fridge too cold
Fixed by
these parts
these parts

Show All
Frost buildup
Fixed by
these parts
these parts
Show All
Too warm
Fixed by
these parts
these parts
Show All
Freezer too cold
Fixed by
these parts
these parts
Show All
Door Sweating
Fixed by
these parts
these parts

Show All
Won’t start
Fixed by
these parts
these parts
Show All


Keep searches simple. Use keywords, e.g. "leaking", "pump", "broken" or "fit".
Sometimes the condenser fan would start causing the refrigerator to overheat.
Unplug the appliance.
Removed the screws holding the back panel.
Removed the fan blade.
removed 3 screws holding the condenser fan.
Remove the 3 metal brackets attached to the fan.
(First note which studs the brackets are attached to. Attach the 3 metal brackets to the new fan. (New screws were supplied)
Cut and strip the wire about two inches from the fan.
Cut and strip the new wire. I cut the new wire in half (about 6 inches.) Connect the two wires, twist and used 2 wire nuts. Tie wrap the wire to the wire harness. Mount the new fan (three screws)
Screw the back panel back on.
Mount the new
Parts Used:
-
Tom from Franklin, WI
-
Difficulty Level:A Bit Difficult
-
Total Repair Time:15 - 30 mins
-
Tools:Nutdriver, Pliers
184 of 222 people
found this instruction helpful.
Was this instruction helpful to you?
Thank you for voting!
Unit very noisy and freezer too warm
First I removed the racks in the freezer. The rack supports on the sides lift off without tools. The evaporator cover is at the back of the freezer. 4 phillips head screws. The cover lifts up then forward to expose the evaporator, evaporator fan and duct. The duct is held by 3 hex head screws. The evaporator fan is attached to the duct with a wiring pigtail to a plug. Unplug the fan and remove the duct. The fan is held by 2 hexhead screws. The new fan is put in place and assembly is simply the reverse of disassembly. The unit is quiet and cools properly now. The new part fit perfectly.
Parts Used:
-
Michael from Churchville, NY
-
Difficulty Level:Easy
-
Total Repair Time:15 - 30 mins
-
Tools:Nutdriver, Screw drivers
89 of 95 people
found this instruction helpful.
Was this instruction helpful to you?
Thank you for voting!
Defrost timer was faulty. Required a mild tap to restart
Trouble shot the electrical circuit per the electrical schematic and zeroed in when I noted the Defrost Timer circuit was open. When I tapped on the bottom of the timer it began functioning normally (for a few days). Ordered a new Defrost Timer Kit and along with the installation instruction, I watched the on-line video. It was very helpful!!
After installation was complete, I plugged the Refrigerator into the electrical outlet and.......nothing happened! Hmmm!
Removed the Defrost Time Kit and inspected it for any damage and found none. Then I placed a flathead screwdriver to the manual advance knob and slightly rotate the gear mechanism. I heard a distance "click”. I believe the Timer was in the ‘defrost’ mode when received.
I reinstalled the timer, verified the wiring connections and this time plugged the Refrigerator into the electrical outlet and ….. it worked!!!
I unplugged the refrigerator, finished the installation per the instructions, plugged the unit in and monitored it for a few hours (just in case). That was a week ago and the Refrigerator is working like new.
The instructions were written in a manner which required re-reading a few times as they could be a bit vague. The video was what really helped and I appreciate PartSelect adding it to the instructions.
Parts Used:
-
LES from MADERA, CA
-
Difficulty Level:Really Easy
-
Total Repair Time:30 - 60 mins
-
Tools:Nutdriver, Screw drivers
69 of 76 people
found this instruction helpful.
Was this instruction helpful to you?
Thank you for voting!