This an authentic OEM 40-Watt replacement light bulb, used in a number of household appliances. It is specially designed to withstand extreme temperatures, which is why these replacement bulbs are mos...
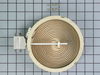
This is the replacement large surface element for your cooktop or range. It is approximately 10-inches in diameter and is 1200/2500 watts. The large surface element is installed under the cooktop and ...
This 18 ml bottle of white appliance touch-up paint is used to cover scratches or marks on your appliance. The white touch-up paint can be used on refrigerators, microwaves, ranges, clothes dryers, an...
This temperature sensor detects the temperature within the oven cavity. This oven temperature sensor, for ranges, works together with the oven control board to measure and regulate the oven temperatur...
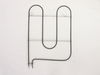
This 6-inch, 1200-watt radiant surface heating element is a genuine replacement part designed for select ranges. It supplies consistent heat to the designated cooking zone on the stovetop, ensuring ev...
This is a multi-use and multi-appliance screw. It can be used on a microwave, refrigerator, range/oven, air conditioner, dehumidifier, washer, or dryer. The measurements of this screw are 8 x 1/2 inch...
The light socket on your electric range connects the power source to the light bulb. If your oven light is malfunctioning, you may need to replace the light socket. The light socket is located in the ...
$87.79
In Stock
Questions And Answers for GERC4110SQ0
Ask our experts a question about this model and we'll get back to you as soon as possible!
4 questions answered by our experts.
< Prev
1
Next >
Sort by:
Search filter:
Clear Filter
Your search term must have 3 or more characters.
Keep searches simple. Use keywords, e.g. "leaking", "pump", "broken" or "fit".
Sorry, we couldn't find any existing answers that matched.Try using some different or simpler keywords, or submit your new question by using the "Ask a Question" button above!
Mike
February 11, 2025
Symptoms are as others have mentioned; uneven cooking, inaccurate temp. (if I set the oven for 350, the oven thermometer says 250), the preheating temp on the display climbs extremely rapidly. The one thing that I don't see is that occasionally I get the error code, "E2 F2 Oven overheat" or something to that effect. I end up having to unplug the unit in order to reset it.
Could this collection of symptoms indicate a faulty temperature probe/sensor?
For model number GERC4110SQ0
Hello Mike, Thank you for contacting us. Researching your model, this is usually caused by an issue with the temperature sensor, control board or associated wiring. You can test the sensor and wiring connectors with a multimeter and check the board for any visible damage. Good luck with your repair.
Oven is taking long to heat appears to heat quicker to temp when on bake very slow when on convention. Does the heat sensor need replacing.?
For model number GERC4110SQ0
Hello Kathy, thank you for your question. Yes, the oven sensor is the most likely issue. That is Oven Sensor Part Number: PS11749737. If that part doesn't fix the issue, the oven electronic control board should be replaced. I hope this helps.
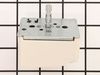
What would be the proper number for the front right dual burner infinite switch?
thank you
For model number GERC4110SQ0
Hi Michael, thank you for contacting us. The part number for the compatible infinite switch for the front right dual burner is PS11747215. We hope this information helps!
I need a dual infinite switch for the left switch for my Whirlpool glass top electric range. Is PS11747215 the right part number. I see that is the number for the right side switch. Is the left side the same part number?
For model number GERC4110SQ0
Hi Rosalie, thank you for the question. The surface element switch you mentioned is compatible with the left front dual element. We hope that helps!
Turned the breaker off, I removed 2 screws securing the range top to the range, opened the top and secured it in the up position, Removed the 2 screws securing the element ,one at a time I swapped the quick connectors from the old element to the new and repeated the process in reverse. I save over $100.00 in labor, plus most companies get you for a trip charge. It was easy!!
I numbered every part. ex: 1 L., for first part removed left side. I used a magic marker to circle the holes and wrote the number of screws used on the part, set the srews in a separete place, so that I new where these screws went to. The cleanup was pretty time consuming, but I was able to keep my stove, when every repairman I called to fix my stove told me I was better off buying a new stove. ($600.00 stove 2 years old)Please Note: The insulation blanket needed for the entire stove is two pieces, the sides and top are one part # and the bottom and back, are another part #. I did not know this. I just purchased the top and sides. I got lucky, the back and bottom were still in good shape. So I guess I should have read the description of the part more carefully to see what it covers, before I ordered it. It took two people two hours to do the work, it was really nice to have an extra set of eyes, to remember what direction pieces of metal from the stove went. I would do it all over in a heart beat instead of buying a new stove.