


GDF450PGR0WW General Electric Dishwasher - Overview
Sections of the GDF450PGR0WW
[Viewing 6 of 6]


Keep searches simple, eg. "belt" or "pump".

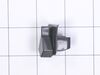
Dishwasher End Cap
PartSelect #: PS7783360
Manufacturer #: WD12X10426
This is an end cap for a dishwasher rack. This part is about 2.5 inches long, is black, and is made of plastic. You may need to replaced this part if it is broken, or if your dishwasher rack continuou...
$18.10
Special Order


Latch Striker
PartSelect #: PS8690622
Manufacturer #: WD13X10071
This dishwasher latch strike is a manufacturer-approved replacement part for your appliance. The latch strike is an important component in your dishwasher door assembly, and adds an extra layer of sec...
$17.70
Special Order

Screw
PartSelect #: PS283515
Manufacturer #: WR01X10065
Size: 10-32 GXTT FLP .595
Sold individually.
$13.95
Special Order

GASKET BEACH PLASTIC
PartSelect #: PS11721765
Manufacturer #: WG04F08972
$19.39
In Stock
Order within the next 30 mins and your part ships today!

Hex Head Screw 10-32 GX HXW 3/8
PartSelect #: PS8688150
Manufacturer #: WD02X10220
If you're looking to get your dishwasher working like new, then look no further than the GE Hex Head Screw. This handy little item ensures your dishwasher runs efficiently and smoothly in the long run...
$13.95
Special Order

LOWER SPRAY ARM
PartSelect #: PS17137081
Manufacturer #: WD22X33499
This genuine part fits perfectly and no longer requires a heatshield. Keep your dishes spotless with this lower spray arm assembly, designed to spray water and detergent throughout the wash cycle. Loc...
No Longer Available

UPPER RACK
PartSelect #: PS18351367
Manufacturer #: WD28X35779
This dishrack is for dishwashers. The dishrack holds the dishes in place during the dishwashing cycle. Follow the instructions in the manual when installing this part.
No Longer Available

EXTENSION DRAIN HOSE
PartSelect #: PS17873549
Manufacturer #: WD24X34763
This extension drain hose provides added length and flexibility for proper drainage routing. Secure flow helps prevent leaks and backups. Replacing a damaged hose restores reliable drainage and installation flexibility.
No Longer Available

Dishwasher Tub Gasket
PartSelect #: PS11774412
Manufacturer #: WD08X23476
The tub gasket, also known as the door gasket runs along the perimeter of your dishwasher basin and creates a seal that prevents water from leaking out when the tub is full. If you notice water on the...
No Longer Available

Questions And Answers for GDF450PGR0WW
We're sorry, but our Q&A experts are temporarily unavailable.
Please check back later if you still haven't found the answer you need.
- < Prev
- 1
- Next >
Sort by:
Search filter:
Clear Filter
Your search term must have 3 or more characters.
Keep searches simple. Use keywords, e.g. "leaking", "pump", "broken" or "fit".
Sorry, we couldn't find any existing answers that matched.Try using some different or simpler keywords, or submit your new question by using the "Ask a Question" button above!
Kim
August 27, 2023
how do you properly set the rinse agent dispenser
For model number GDF450PGR0WW

Hello Kim, thank you for contacting us. The rinse agent dispenser holds 3.5 oz. (104 ml) of rinse agent. Under normal conditions, this will last approximately one month. To set the rinse agent dispenser, follow the following steps: Make sure the dishwasher door is fully open. Open the rinse agent dispenser door. Slowly add rinse agent until the cup is full. You may need to pause several times to allow rinse aid to settle. Note: Indicator window does not light up. Clean up any spilled rinse agent with a damp cloth to prevent foam from forming inside the dishwasher. Close the rinse agent dispenser door. You can adjust the amount of rinse agent that is released into the final wash. If water drops or hard water spots remain on dishes after the dry cycle, increase the setting. To adjust the setting, open the rinse agent dispenser door and turn the adjuster clockwise to increase and counterclockwise to decrease. We hope that helps!
1 person found this helpful.
Was this helpful?
Thank you for voting!
- < Prev
- 1
- Next >
Common Symptoms of the GDF450PGR0WW
[Viewing 10 of 10]Leaking
Fixed by
these parts
these parts


Show All
Not cleaning dishes properly
Fixed by
these parts
these parts


Show All
Noisy
Fixed by
these parts
these parts
Show All
Will Not Start
Fixed by
these parts
these parts


Show All
Not draining
Fixed by
these parts
these parts


Show All
Door latch failure
Fixed by
these parts
these parts

Show All
Will not fill with water
Fixed by
these parts
these parts

Show All
Not drying dishes properly
Fixed by
these parts
these parts

Show All
Door won’t close
Fixed by
these parts
these parts
Show All
Will not dispense detergent
Fixed by
these parts
these parts

Show All

Keep searches simple. Use keywords, e.g. "leaking", "pump", "broken" or "fit".
Dishwasher would not fill with water and would shut off
I found it online! There were step by step instructions that were easy to understand. I have never had to do anything like this in my life, only recently had to start doing everything around the house myself due to husband's illness.
The repairman came out, charged me $100 to determine what the dishwasher needed & left me with the part number. He was going to charge me $389 to install the part and they were over charging for the part. The repairman suggested I just get a new dishwasher.
I ordered the part from the website at 1/2 the price that the other place charges and found it on line. With the step by step instructions and the online page, I successfully installed it MYSELF. Saved me a ton of $$.
I LOVE the website
Thank You!!!!
Parts Used:

-
Linda from MYRTLE BEACH, SC
-
Difficulty Level:Easy
-
Total Repair Time:More than 2 hours
-
Tools:Nutdriver, Pliers, Screw drivers, Wrench (Adjustable)
18 of 21 people
found this instruction helpful.
Was this instruction helpful to you?
Thank you for voting!
Spray arm had become unattached and burned by the heat element
It was a simple as: attach and done!
There is a ring on the part that tightens clockwise to the nipple that sprays out the water that it rests on. Twist clockwise and you are done!
It is a mystery how it was unattached to begin with but not a problem in the end, it was easy to fix!
Thanks for sending genuine GE parts!
There is a ring on the part that tightens clockwise to the nipple that sprays out the water that it rests on. Twist clockwise and you are done!
It is a mystery how it was unattached to begin with but not a problem in the end, it was easy to fix!
Thanks for sending genuine GE parts!
Parts Used:

-
Mark De from BRONX, NY
-
Difficulty Level:Very Easy
-
Total Repair Time:Less than 15 mins
15 of 17 people
found this instruction helpful.
Was this instruction helpful to you?
Thank you for voting!
A slow drip from the pump area.
Replaced floating seal. Un plugged and Pulled washer out from the counter and laid on its left side. Pull pump out of seal by hand. Straight screwdriver to lever seal out of fitting. Clean hole and wipe seal then push into hole. Reinsert pump reverse install.
To make it easier I previously extended the water supply hose to nearly 8 feet so did not have to disconnect it.
To make it easier I previously extended the water supply hose to nearly 8 feet so did not have to disconnect it.
Parts Used:

-
Joseph from Waldorf, MD
-
Difficulty Level:Easy
-
Total Repair Time:30 - 60 mins
-
Tools:Nutdriver
13 of 15 people
found this instruction helpful.
Was this instruction helpful to you?
Thank you for voting!