The drain pump and motor assembly may also be known as the washer drain pump and is a part for your washer. The drain pump helps expel water from the washing machine. The drain pump is activated after...
This hot water inlet valve is designed to regulate water flow into the washing machine during operation. Featuring a standard hose fitting inlet and a single water outlet, it opens as needed to allow ...
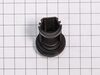
This round rubber tub seal is designed to prevent water leakage between the front and rear halves of the outer tub in select washing machines. Positioned at the junction of the tub components, it comp...
This replacement pump filter, also known as a filter assembly, is a genuine OEM part for your washer or washer/dryer combo. Before beginning this repair, turn off the power and water supply to your wa...
Is your LG washing machine not working as efficiently as it used to? It could be due to a faulty wash pump motor. This is the part that keeps the water circulating during the wash cycle, crucial for e...
Is your LG washing machine acting up? Our LG Washer Water Level Sensor Pressure Switch may be just what you need. This top-notch replacement part is specifically designed for certain LG models and fun...
The door boot seal clamp, also referred to as an outer door gasket clamp, holds the door boot in place in a front-loading washer. If your washer is leaking from the door and there are no signs of dama...
$26.22
In Stock
Questions And Answers for GCWF1069CS1
Ask our experts a question about this model and we'll get back to you as soon as possible!
1 question answered by our experts.
< Prev
1
Next >
Sort by:
Search filter:
Clear Filter
Your search term must have 3 or more characters.
Keep searches simple. Use keywords, e.g. "leaking", "pump", "broken" or "fit".
Sorry, we couldn't find any existing answers that matched.Try using some different or simpler keywords, or submit your new question by using the "Ask a Question" button above!
Eric
February 6, 2023
HOW DO i GET THE LID OFF
For model number GCWF1069CS1
Hello Eric, thank you for contacting us. You will need to pull out and remove the Dispenser Drawer. Next you will need to remove the Control panel. There are two screws that hold the panel in place. Once removed you can pull the Panel off the cabinet. Next you can disconnect the PCB display harness to remove the panel completely from the appliance. Once the panel is removed it will expose the screws holding the Top Cover in place. Once the screws are removed you can push the top plate cover backwards to release and remove. We hope this information helps!
Was this helpful?
Thank you for voting!
< Prev
1
Next >
✖
Ask a Question
Ask our experts a question on this model and we'll respond as soon as we can.
Removed the top of the washer by removing the 4 back screws and 2 small brackets. Then I removed the front panel, this was actually the hardest part, 2 screws and 8 tabs that you pop out carefully from the top of the panel. I only disconnected the power button and was able to rest the panel on top of the washer. The rest of the washer came apart quickly just moving down the front of the washer and removing the door, latch, tub gasket, drain cover. Removing the pump was just a mater of disconnecting the drain hoses, and one clip under the drain assembly. 3 screws attach the drain to assembly to the pump and only 2 wires that are clearly marked. Reassembly is just going back through in reverse order of disassenbly. The best thing about this is that it all comes apart with a standard phillips screwdriver.
Thank you for the very helpful YouTube video. After watching the video, I was able to diagnose the problem, buy the part from your website, and complete the repair. This is my personal machine - I am not a professional repairman.
Pull washer away from wall. Unplug cord and remove drain hose from receptacle. Remove 4 screws holding panel to rear of washer. Squeeze and slide back hose clamps on each end of drain hose and loosen center clamp with screwdriver. Remove old hose. Reinstall new hose in reverse order using existing clamps. Re-install back panel.