This 18 ml bottle of white appliance touch-up paint is used to cover scratches or marks on your appliance. The white touch-up paint can be used on refrigerators, microwaves, ranges, clothes dryers, an...
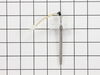
This 120-130 volt 15-watt light bulb is used to illuminate the interior part of the oven cavity when the door is open or when the light switch is turned on. The bulb has a small screw base and is appr...
This is a multi-use and multi-appliance screw. It can be used on a microwave, refrigerator, range/oven, air conditioner, dehumidifier, washer, or dryer. The measurements of this screw are 8 x 1/2 inch...
The interior oven door glass is the innermost heat resistant piece of glass that faces in your oven when the door is closed. The glass measures approximately 9.99-inchx16.99-inch. If the glass is crac...
This part is located at the bottom of the oven. This bake element is for ranges. The bake element is at the bottom of the oven and supplies the heat for baking. Unplug the range or shut off the house ...
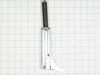
This broil element helps your oven cook food from the top—perfect for browning or crisping. If your broil setting isn’t working or food isn’t cooking evenly, this part might be the fix. It’s made to f...
Need to fix your oven or stove? We have a solution for you - the Whirlpool Blower Motor Assembly. This is a genuine original equipment manufacturer (OEM) part that fits perfectly in a range of brands ...
$261.10
In Stock
Questions And Answers for GBD277PRT00
Be the first to ask our experts a question about this model!
✖
Ask a Question
Ask our experts a question on this model and we'll respond as soon as we can.
Something Kitchen Aid wont tell you but running a self clean on this model stove blows the fuse located on the back of the stove.
First I slid the stove out and removed the back of the stove held in place by 8 Phillips screws. The thermostat fuse is located near the top middle on the back of the stove. Remove the 2 screws holding it in place. Disconnect the wires, plug in the new part. Put it all back together. Job done in less than 30 minutes.
This repair would have cost $164 through A&E factory service.
The first thing I did was to remove the oven door by releasing the two latches on the hinges (by hand). I then raised the door toward the vertical position and lifted up. The hinges slide out of the oven housing. I laid the door, inside face up on my island counter top. This ensures that none of the parts will fall when disassembling the door. Next I unscrewed the screws 4 top and bottom and four on the inside face. This releases the frame from the front housing. Lift the frame off the door, exposing the glass pieces. Lift off the broken inside glass and place the new piece in the glass retaining housing. Replace the outside frame and replace all screws. Take door back over to oven and slide hinge bottoms back into slots on oven. Rotate to horizontal position and flip latches back to locked position. Total time was about 10 minutes mainly because I was curious how the door was constructed and I poked around while it was disassembled.
I removed the two screws that held the bake element in place. Next I removed the Bake Element. I had to unscrew the oven to go behind it because when one piece off of the element broke, it slide back behind the oven. I pushed the wire back thru the piece holes, connected the Element, and pushed the element with the wires back through the holes. I rescrewed the element in place and the oven. PartSelect helped me to save this year's Christmas.


 – Part Number: WP4173175")