This kit includes one bearing, one ball shaft, one ball bearing, one ball bearing retainer, a small tube of high temperature lubricant, and installation screws.
The rear drum support bearing helps support the dryer drum to rotate quietly and smoothly during operation. The bearing attaches on the inside of the rear panel of the dryer cabinet. If your dryer is ...
This thermal fuse limiter, with a limit of 220 degrees Fahrenheit, is manufactured for both gas and electric clothes dryers. Once the internal temperature of the dryer reaches 220 degrees, the heating element cuts out.
This dryer lint screen is for laundry centers.
Dryer lint screen captures lint and debris from the exhaust air flowing from the dryer.
Follow the instructions in the owner's manual when installing this part.
The upper felt seal for your dryer is attached to the top edge of the drum support area, and is held there by a high temperature adhesive. It creates a seal where the dryer door opens and closes, so t...
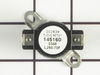
This high limit thermostat has a limit of 260 degrees Fahrenheit. Meaning that it will cut out when the internal dryer temperature reaches 260. This thermostat cuts back in when the temperature drops ...
This part controls the temperature of the inside of the dryer drum and prevents the dryer from overheating. This part is located in the blower housing.
$69.02
In Stock
Questions And Answers for FLCE752CAW1
Ask our experts a question about this model and we'll get back to you as soon as possible!
2 questions answered by our experts.
< Prev
1
Next >
Sort by:
Search filter:
Clear Filter
Your search term must have 3 or more characters.
Keep searches simple. Use keywords, e.g. "leaking", "pump", "broken" or "fit".
Sorry, we couldn't find any existing answers that matched.Try using some different or simpler keywords, or submit your new question by using the "Ask a Question" button above!
Peter
April 5, 2023
When starting the dryer it will start and run for about 5 seconds and then shut off, just wondering why and how to dis it
For model number FLCE752CAW1
Hello Peter, thank you for contacting us. The issue is most probably related to the thermal limiter, part number PS419402, as a faulty thermal limiter can shut off the dryer. We hope this helps.
The dyer lint does extract, and lint collects on top of the screen, yet the tenant feels the air flow coming out from the exhaust vent outside.
They have to a vacum the dryer as soon as they open it!
The model number above is what is on the UPC symbol on the dryer door.
Can you tell me the age of the system? This is the correct model number, as your system is not recognizing the number FLCE752CAW3
Also, there is no cap on the bottom of the dryer door. I think that is the problem as that is an additional area for the lint to go into.
For model number FLCE752CAW1
Hello Ingrid, thanks for reaching out. There are a few reasons the lint might not be gathering on the lint screen correctly. First, we recommend making sure the vent hose is 4 inches diameter and is made of solid metal or aluminum, not plastic and is the proper length based on installation instructions. Make sure the vent is clear from any obstructions, buildup and moisture can cause it to not vent properly. Check the outside wall cap and make sure it is opening fully. Remove and clean the lint filter with warm soapy water and then dry thoroughly. Fabric softener can build up on the screen and reduce its ability to let air through. If the screen can't be cleaned, it may need to be replaced. We hope this helps. Please submit a new question if you have any follow ups.
well, i started at the top and worked my way down. by taking the top off, it gave me more room to get the dryer tub out. took the two screw`s out of the vented plate on the back of the machine to undo the belt. this is a stackable washer-dryer combo, so next i took off the white plate on front between washer & dryer. took off the control panel, unpluged it, then took dryer door front off. then removed the two screw`s that hold that bracket on ,in the back of dryer, pulled the drum out & replaced the belt, but before replacing anything i took the shopvac to it , there was alot of lint in there.when replacing the Grounding Ball Clip & Grounding Ball, i took a one inch by two inch magnet and used it to hold the Grounding Ball & Clip in place so i could get the two screws started in the Drum Support Bearing & Bearing Bracket. after installing that i put the shaft in place & lined the dryer tub up with the 3 screw hole`s ,and boom, bang, pow...nothing to it. it`s easy...parts came very fast....Thx PartsSelect.com...i`ve told all my friend`s about PartsSelect
1. Unplug dryer from outlet 2. Using Lg. flat screwdriver, pry under the front edge of the top and release two spring tabs 3. Lift up top and tilt back out of your way 4. Unscrew two phillips scews on inside of front panel 5. Lift up and out the front panel. Two spring clips at bottom. 6. Rlease tension on drum belt at the motor. Access panel at rear of dryer. 7.Unscrew 3 screws from inside, center rear of drum. 8. Remove drum through the front of the dryer. You may have to spread the sides apart a little bit for it to fit 9. Lift up on the rear drum bearing to remove it from the bearing retainer. ( U shaped plastic socket) 10. unsrew 2 screws and remove the bearing retainer, ground ball. Ball retainer is on outside of dryer. 11. Vacuum everything--duct, blower, lint trap, ect. 12. Intall new bearing retainer and grounding ball, an assistant is helpful at this time, one to hold ball retainer on rear of dryer, one to screw it in from the inside 13. reassemble remainder of parts in reverse order.
Unplugged Dryer. Opened top of Dryer, over the drum. Removed Thermal Limiter. Tested the Thermal Limiter - found it was open. Checked all vents and exhaust tube for lint build-up. Replaced Thermal Limiter. Closed top of dryer. Plugged Dryer back. Tested Dryer - it works.