


EW27WD55GS1 Electrolux Warming Drawer - Overview
Sections of the EW27WD55GS1
[Viewing 4 of 4]


Manuals & Care Guides for EW27WD55GS1
Click to downloadInstall
Installation Instructions
(0.27MB)
Install
Installation Instructions
(0.56MB)
Manual
Owner's Manuals
(1.27MB)
Manual
Owner's Manuals
(6.96MB)
Specs
Product Specifications Sheet
(0.37MB)
Wiring
Wiring Diagram
(0.04MB)
Keep searches simple, eg. "belt" or "pump".

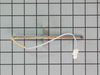
Temperature Sensor
PartSelect #: PS820208
Manufacturer #: 316217002
Also known as Probe. The quick connect on this part may be different than your original part. If it doesn't fit, you have to cut off the quick connect and wire together with porcelain wire nuts.
$80.31
In Stock
Order within the next 9 hrs and your part ships today!


Oven Rack
PartSelect #: PS9492586
Manufacturer #: 807328301
Sold individually.
$96.41
In Stock
Order within the next 9 hrs and your part ships today!


SCREW
PartSelect #: PS451167
Manufacturer #: 5300803416
$13.89
In Stock
Order within the next 9 hrs and your part ships today!

Questions And Answers for EW27WD55GS1
We're sorry, but our Q&A experts are temporarily unavailable.
Please check back later if you still haven't found the answer you need.
Common Symptoms of the EW27WD55GS1
[Viewing 6 of 6]Little to no heat when baking
Fixed by
these parts
these parts
Show All
Oven is too hot
Fixed by
these parts
these parts
Show All
Oven not heating evenly
Fixed by
these parts
these parts
Show All
Element will not heat
Fixed by
these parts
these parts
Show All
Will Not Start
Fixed by
these parts
these parts
Show All
Little to no heat when broiling
Fixed by
these parts
these parts
Show All

Keep searches simple. Use keywords, e.g. "leaking", "pump", "broken" or "fit".
Oven not heating to desired temperature
Replaced clock control by removing surface burner control knobs and plastic nuts, and then the cover over the oven control. Two screw hold the clock in place, after removal and disconnecting the plug-in you can reinstall the new clock control. The Heat Sensor inside the oven will also need to be replaced. It is located inside the oven and attached with two screws; the back of the oven will need to be removed to unplug. Reverse removal procedure and turn the power back on to the stove.
Parts Used:
-
Dan from Bellevue, ID
-
Difficulty Level:Easy
-
Total Repair Time:15 - 30 mins
-
Tools:Screw drivers
155 of 241 people
found this instruction helpful.
Was this instruction helpful to you?
Thank you for voting!
Oven would not maintain correct set temperature.
Removed electrical connector and two screws. Attached the electrical connector to the new probe and attached with the two screws.
Parts Used:
-
Barbara from RAINBOW CITY, AL
-
Difficulty Level:Very Easy
-
Total Repair Time:Less than 15 mins
-
Tools:Screw drivers
17 of 26 people
found this instruction helpful.
Was this instruction helpful to you?
Thank you for voting!
Oven wouldn’t get up to temperature
I removed the sensor from inside the oven with a 1/4” nut driver, pulled the sensor out slowly and then took the connection apart and found out that the connector was different, I cut the connector off of the oven side and then cut the connector off of the new sensor and wired it together. I am still trying to find the ceramic nuts. My oven is working for now. Very easy fix, just wish there were ceramic wire nuts with the new sensor
Parts Used:
-
Al from THORNTOWN, IN
-
Difficulty Level:Very Easy
-
Total Repair Time:15 - 30 mins
-
Tools:Nutdriver
8 of 9 people
found this instruction helpful.
Was this instruction helpful to you?
Thank you for voting!