


EV160NZTQ01 Whirlpool Freezer - Overview
Sections of the EV160NZTQ01
[Viewing 5 of 5]


 Diagram and Parts List for Whirlpool Freezer")

Manuals & Care Guides for EV160NZTQ01
Click to downloadKeep searches simple, eg. "belt" or "pump".

Touch-Up Paint - White
PartSelect #: PS385132
Manufacturer #: 72017
This 18 ml bottle of white appliance touch-up paint is used to cover scratches or marks on your appliance. The white touch-up paint can be used on refrigerators, microwaves, ranges, clothes dryers, an...
$15.95
In Stock

Refrigerator Door Switch
PartSelect #: PS12728638
Manufacturer #: W11384469
Door switch turns the light off when you close the door.
$48.68
In Stock

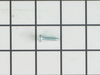
Refrigerator Screw
PartSelect #: PS11742240
Manufacturer #: WP400021-1
Sold individually.
$25.25
In Stock

Fan Blade and Spring Clip
PartSelect #: PS11754833
Manufacturer #: WPW10445742
This blade attaches to the evaporator fan motor.
$21.37
In Stock

Refrigerator Screw
PartSelect #: PS11742754
Manufacturer #: WP489478
Sold individually.
$10.09
In Stock

Freezer Leveling Leg
PartSelect #: PS11740634
Manufacturer #: WP3-82710-001
Sold individually.
$21.95
In Stock

Defrost Timer
PartSelect #: PS11740630
Manufacturer #: WP3-81329
This device acts like a clock. It continually advances and alternates between activating the cooling cycle and the defrost heater.
$169.27
In Stock

Freezer Evaporator Fan Motor
PartSelect #: PS11740626
Manufacturer #: WP3-60336-001
This evaporator fan motor is located in the back of the freezer, and circulates air over the refrigerator coils. These coils will convert the heat into cool air, which is then circulated.
$339.41
In Stock

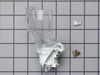
Light Socket Kit
PartSelect #: PS371236
Manufacturer #: 4387478
The bulb is sold separately.
$89.63
In Stock

Bimetal Defrost Thermostat
PartSelect #: PS11738201
Manufacturer #: WP1-81801-001
This part is a temperature sensing devise. It senses the rise in evaporator temperature during a defrost cycle and cycles the defrost heater off after all frost is melted. It is calibrated to permit...
$81.71
In Stock


Refrigerator Screw
PartSelect #: PS11740623
Manufacturer #: WP3-24838-048
Sold individually.
$10.09
Special Order
Questions And Answers for EV160NZTQ01
We're sorry, but our Q&A experts are temporarily unavailable.
Please check back later if you still haven't found the answer you need.
Common Symptoms of the EV160NZTQ01
[Viewing 6 of 6]Light not working
Fixed by
these parts
these parts

Show All
Noisy
Fixed by
these parts
these parts


Show All
Frost buildup
Fixed by
these parts
these parts


Show All
Too warm
Fixed by
these parts
these parts
Show All
Will Not Start
Fixed by
these parts
these parts
Show All
Won’t start
Fixed by
these parts
these parts
Show All


Keep searches simple. Use keywords, e.g. "leaking", "pump", "broken" or "fit".
Lights inside refrigerator not working
I used a flat-head screwdriver to pop out the old light rocker switch. Then, I unplugged the wires, plugged them into the new light rocker switch, and then popped the new switch into the hole. That's it! Lights began working again.
Parts Used:
-
Clint from Rayville, MO
-
Difficulty Level:Really Easy
-
Total Repair Time:Less than 15 mins
-
Tools:Screw drivers
136 of 249 people
found this instruction helpful.
Was this instruction helpful to you?
Thank you for voting!
Froze over fan motor burnt out
Removed shelves from inside freezer then removed 4 screws holding cover panel. Pulled panel up and slightly pulled forward to remove. Removed wiring connections then removed two screws that held the motor & fan assembly. Removed the support bracket from the old motor and installed same on the support bracket. Reversed removal procedures for installation. Cover panel is a little bit of a problem when trying to reinstall. Put in panel as high as you can and then slide down. You must then exert a little pressure on the bottom portion to get it to seat correctly. Install four remaing screws and you are done. I had this repaired previously by a professional repairman and noticed from the pictures you folks provided that he had installed the screws on the support bracket incorrectly. That was the reason for the fan blade to rip apart.
Parts Used:
-
James L. from Madison, AL
-
Difficulty Level:Easy
-
Total Repair Time:15 - 30 mins
-
Tools:Nutdriver, Screw drivers
72 of 81 people
found this instruction helpful.
Was this instruction helpful to you?
Thank you for voting!
Light Would Not Go On In The Refrigerator
First I removed the old lightbulb from the socket and replaced it with a new one to confirm that the bulb was not the problem. I then pryed the socket out with a flat-head screwdriver. I could tell that the socket was anchored in its hole with clips so it was relatively easy to pry it out. Once the socket was out, I disconnected the lead wires and ordered a replacement socket kit from Partselect. When the new one arrived, I reconnected the lead wires to it, snapped it back into its hole, screwed in a new lightbulb, and presto!! The light was back on with no further problem. Thank you, Partselect!! A $15.00 part saved me what probably would have been at least a $100. service call and heaven knows what the technician would have told me I needed!!!
Parts Used:
-
DANIEL from MINNEAPOLIS, MN
-
Difficulty Level:Easy
-
Total Repair Time:Less than 15 mins
-
Tools:Screw drivers
62 of 82 people
found this instruction helpful.
Was this instruction helpful to you?
Thank you for voting!