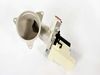
This door latch, also referred to as a door strike, is designed to secure the washer door during operation, helping to prevent leaks and ensure the appliance starts properly. Made from brushed metal, ...
This door lock assembly is engineered to secure the washer door during active wash and spin cycles, ensuring safe and uninterrupted operation. Designed for compatibility with select models from Frigid...
If your dryer drum has stopped spinning and your clothes are coming out damp, it might be time to replace the belt. This essential part helps the drum rotate, allowing warm air to circulate and dry yo...
Lint filter assembly. Part has been redesigned. If you are replacing this filter you may also need to replace grille as well. Please see model diagram for correct grille.
This is a replacement screw for your washer or dryer. The screw is approximately half an inch in length and is a Phillips-head screw. It screws in from the outside of the drum, into the vane/baffle. T...
This is a genuine replacement drum roller for a dryer. This part includes a roller which has an axle and two tri-rings. The dryer drum roller holds the drum in place while it rotates on the dryer supp...
This dryer thermal fuse is a critical safety component designed to protect the appliance from overheating. It automatically shuts off power to the motor or heating system if excessive temperatures are...
Worried by a leaky or loose appliance door? We've got just the thing for you. The Frigidaire Door Boot Gasket Seal could be the fix you need to get your appliance running smoothly again. It's not just...
When I described the noise to a YouTube appliance diagnostician, I was directed to check the felt seals front and back of the rotating drum for wear, tears, or foreign objects. As it happens the felt seals looked find and there were foreign objects so, not wanting to disassemble and reassemble the dryer more than I had, I ended up replacing all the replaceable moving parts that I considered possible culprits: The idler tension spring, the idler tension bracket (which includes a nylon pulley wheel), the drum belt, the five rubber-tipped bearings that support the drum and keep it in place, and the foam seal on the blower housing which seemed a little brittle and old, as well as high-temperature adhesive for the latter. The instructional videos here and on YouTube were extremely helpful (I doubt that I would have attempted this job at all, had I not watched these ahead of time). The most time-consuming aspect was waiting for the arrival of the parts as I didn't order them all at the same time or all from the same place (I ordered from whomever could ship me a given part the fastest. Disassembly took less than an hour. Re-assembly with the new parts in place took about the same but was a little more awkward because this appliance sits in a very narrow closet and it's difficult to ensure that the 4" flexible duct stays in place when sliding the appliance back into the closet. No regrets. Now I know the basics if this dryer needs attention in future and I also know all the parts that I can eliminate as suspects in any future maintenance (the parts that I replaced)
Fixed it eventually with part PS470049 ('M' Series Ignition Coil Kit). See separate story.
The flame sensor did not fix it but read on for info on how to replace this part. Before replacing this part, I should have read another posting in a different web site about the ignition coils: if you see a red glow inside the burner unit but the flame does not come on, then the problem is likely to be with the coils, not the flame sensor. However since some users here had solved the problem by replacing the flame sensors, I figured I'd try it. The setting for "More dry, less dry" never worked either so maybe this would fix two problems at once.
This dryer is a stacked front loader sitting on top of our washing machine. Opening the little front door (lower left side) is easy once you figure out that a little screw below needs to be removed. I almost broke the door trying to pull it open. The sensor is attached to the side of the flame area cylinder. It was hard to remove both the screw and the part itself from the slots as it's very springy. In fact when I finally removed it, it dropped to the base of the unit and sparks went flying as one of the electrical clips touched the metal (ground). Tip: first disconnect the electrical lead coming from the back of the unit to the ingnition block and later I used rubber gloves just in case. (I could not access the plug/outlet in the back). I installed the new part easily, though I was confused by the electrical leads: the white wire connects to the lead that has a red plastic dot on the side, but I think that must be a mechanical part and not a (wrong) marking, while the red connects to the other lead. Anyway, I connected it the same way I found it and put it back. Reconnected the other electrical wires and closed the door.
This did not fix the problem which turned out to be with the gas valve coils: as they get old, they turn off the flame when they get hot, even though the dryer keeps on turning. To read how to replace that part, search for comments under part number PS470049 ('M' Series Ignition Coil Kit). I don't know whether replacing the flame sensor is going to fix the "more dry-less dry" function, will have to see. Still, this website is great. Our dryer is a Westinghouse bought in 1991 (almost 20 years old!) and with this fixes it's just like new.
I googled the problem, read the recommendation found the part and read that it was an easy fix. Took the broken part off the door and noticed the broke off piece was in the latch on the machine. Ordered the two parts, paid the $30 2-day delivery. Parts arrived and the machine was up and runnning in under 5 minutes