This authentic rear crisper support is a white, plastic part which is rated as "easy" to install by our customers. This OEM part replaces the rear crisper cover support in your fridge and mounts to th...
This part releases water from the supply line when it's activated. NOTE: This part may appear different than the original, but is an authorized manufacturer replacement.
This 40-watt appliance light bulb is a reliable replacement for use in select ranges, refrigerators, freezers, and microwaves. It provides bright, consistent lighting to help you see clearly inside yo...
This water filter reduces contaminants to improve water clarity, taste, and overall quality. Clean water supports appliance performance and user satisfaction. Regular replacement helps maintain optima...
This 3.8-watt LED light bulb is designed to illuminate the interior of select refrigerator models, providing bright and efficient lighting when the door is opened. If your current bulb is dim, flicker...
This is a replacement front slide clip for your refrigerator. The clip is sold individually, and is made of white plastic. It is approximately 1-inch wide and 1-inch long. The clip mounts the drawer s...
The basket clip slide is commonly found in refrigerators and freezers. This part is made of high-quality plastic, and is used to connect the basket to the basket sliders. No tools are required when re...
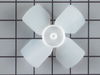
This 8-cube ice maker is used to create ice for your refrigerator. The ice maker receives water from the water inlet valve and will freeze until ice cubes are formed. Once the water has been frozen t...
This kit includes the ice maker, power cord, bail arm, and fill cup. If your ice maker is not making or dispensing ice, or you notice a leak, you may need to replace the rear-mount ice maker assembly....
This refrigerator crisper glass insert is a genuine OEM replacement designed to restore the functionality and organization of your appliance’s lower storage area. Measuring approximately 17.12 inches ...
$144.67
In Stock
Questions And Answers for EI23CS55GS0
Be the first to ask our experts a question about this model!
✖
Ask a Question
Ask our experts a question on this model and we'll respond as soon as we can.
In my specific appliance the water valve is located in the bottom right hand corner looking at it from the back. To get to it I remove the thin layer of cardboard the covers the back of the fridge. I then proceeded to disconnect the 1/4" copper tubing which is the water feed coming out of the wall. Then I removed the screws that hold the valve assembly in place. I took the water valve out and removed the electrical connections as well as the plastic tubing which feed the water dispenser and the ice maker. To install the new water valve it was just a matter of reversing steps.
Even though my wife said that our icemaker broke, there was actually nothing wrong with it. It was the valve that let water flow in during the 'harvest' cycle. A real easy way to test the icemaker without voltage and current measurements, is to fill the tray by hand with a little cup of water; wait till the water freezes and see if the maker dumped the ice into the bin.
Unplugged the refrigerator. Removed the 4 hex head screws on the lower back panel at the back of the freezer. Used a blow dryer to defrost the pipes and area surrounding the thermostat. Unplug the connection from the back of the freezer, unplug the 2 wires, one that goes to the heater, one that comes from power. Unclip the thermostat from the pipe and note which pipe you unclipped it from. Cut the wires on the old thermostat midway between the plugs and the sensor. Using the supplied butt connectors, strip the wire ends on color matched wires (should be a dark blue or black) and crimp them together. Repeat with the other wire. Discard the white shrink wrapping. I wasn't able to get it small enough with a hair dryer or lighter. Plug the thermostat back into it's respective plugs. Clip the thermostat back onto the pipe you removed it from. Replace the back panel with the four screws. Ensure the bottom of the panel is set inside of the drip tray. Replace any shelving you removed. Plug the refrigerator back into the wall. Your done!