This manufacturer-approved air filter system for refrigerators eliminates odors and any impurities. It does this by neutralizing and removing odor-causing molecules. For best results, it is important ...
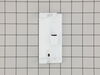
This part releases water from the supply line when it's activated. NOTE: This part may appear different than the original, but is an authorized manufacturer replacement.
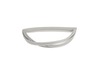
This GREY magnetic door gasket is designed to help your 36-inch French-door refrigerator maintain a consistent internal temperature by forming a tight seal between the doors and the cabinet. Made from...
This screw is used in refrigerators. The screw can be loosened or tightened with a Phillips-head or square-head screwdriver. This screw is used to secure the refrigerator handle to the refrigerator do...
Ensure your freezer operates efficiently with this replacement drawer gasket, designed to form a tight seal that keeps cold air in and warm air out. Made in light gray and compatible with select model...
This mullion hinge pin is designed to secure the mullion in place within compatible refrigerator models, allowing it to pivot smoothly as the doors open and close. Measuring approximately 1.5 inches b...
This genuine OEM evaporator fan motor is essential for maintaining consistent cooling inside your refrigerator by circulating cold air over the evaporator coils and distributing it throughout the fres...
Sold individually.
This is a genuine part. The handle mounting shoulder screw (no.10 ab) is made for use with many refrigerators. The metal screw helps to fasten the handle assembly to the outer do...
In my specific appliance the water valve is located in the bottom right hand corner looking at it from the back. To get to it I remove the thin layer of cardboard the covers the back of the fridge. I then proceeded to disconnect the 1/4" copper tubing which is the water feed coming out of the wall. Then I removed the screws that hold the valve assembly in place. I took the water valve out and removed the electrical connections as well as the plastic tubing which feed the water dispenser and the ice maker. To install the new water valve it was just a matter of reversing steps.
Even though my wife said that our icemaker broke, there was actually nothing wrong with it. It was the valve that let water flow in during the 'harvest' cycle. A real easy way to test the icemaker without voltage and current measurements, is to fill the tray by hand with a little cup of water; wait till the water freezes and see if the maker dumped the ice into the bin.
pulled fridge from wall, removed card board cover, unplug the fridge. turn the water off to the fridge. remove the water source from fridge first then remove 2 screws that hold the valve. then the wire plugs. hoses.. they were color coded.