This NSF-certified refrigerator water filter is engineered to improve the taste, clarity, and safety of your drinking water by reducing contaminants such as mercury, lead, and trace pharmaceuticals. D...
This OEM-compatible screw is designed for use with many GE dishwashers. Measuring 8-16 HXW and 1/2" in length, this stainless steel screw secures the middle spray arm hub to the upper rack assembly, e...
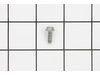
This is a door handle fastener to secure the handle to your refrigerator drawer. It is also known and a mounting bolt or screw. It is approximately 1 inch in total length, and is made of metal.
Fix a freezer door that won’t close properly with this genuine spring hinge mullion. It keeps the flipper seal tight, preventing warm air from entering and helping maintain the right temperature. If y...
The Refrigerator Evaporator Fan Motor is an OEM replacement part for some GE refrigerators. It is responsible for circulating air over the evaporator coils, which are responsible for cooling the refri...
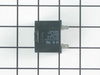
This part helps the compressor kick on and off while maintaining a constant temperature to keep things frozen in your freezer. This part has been updated by the manufacturer and may appear different t...
This door shelf bin is an authentic OEM part sourced directly from the manufacturer. It is designed for use in your GE refrigerator. It is made of white and clear plastic, and houses items on your ref...
Keep your refrigerator’s crisper drawer in top condition with this replacement vegetable pan glass. It offers a clear, durable surface for storing fruits and vegetables, and fits securely above the dr...
Is your GE refrigerator in need of a little repair? Our Left Hand Ice Door Mid Bin is just what you need. Designed specifically for GE refrigerators, this sturdy bin fits neatly inside your refrigerat...
If your fridge is building up too much frost or not cooling evenly, this defrost thermostat might be the issue. It helps control the temperature during the defrost cycle by shutting off the heater whe...
Ask our experts a question about this model and we'll get back to you as soon as possible!
2 questions answered by our experts.
< Prev
1
Next >
Sort by:
Search filter:
Clear Filter
Your search term must have 3 or more characters.
Keep searches simple. Use keywords, e.g. "leaking", "pump", "broken" or "fit".
Sorry, we couldn't find any existing answers that matched.Try using some different or simpler keywords, or submit your new question by using the "Ask a Question" button above!
JENNIFER
November 11, 2023
INSIDE LED LIGHTS WORK BUT ARE DIM. WE HAVE REPLACED ALL 5 OF THE LIGHTS AND THEY ARE STILL DIM.
For model number DFE28JMKIES
Hi Jennifer, thank you for the question. As you have already replaced all the lights, we would recommend checking the wire harness. If the issue still persists, you may need to replace the main control board, part number PS16619572. We hope that will resolve your problem!
Was this helpful?
Thank you for voting!
Bonnie
May 4, 2024
What are the parts number to replace led lights in the refrigerator?
For model number DFE28JMKIES
Hello Bonnie, thank you for the question. The LED lights for the fresh food section are part number PS12172918. Two of them are located on the left side and one on the right side of the fresh food section. The LED light for freezer section is part number PS16542810. It is located at the bottom of the dispenser door. We hope this helps!
Was this helpful?
Thank you for voting!
< Prev
1
Next >
✖
Ask a Question
Ask our experts a question on this model and we'll respond as soon as we can.
I went to a GE repair center to explain my problem, the service center reccomended that I have a techinician come out o look at it. $75.00 for the visit and what ever labor and materials wuld cost.
I went on line to see if there were others having this same problem and found that there were many with the same problem.
After reading some of the ways that people found out what was wrong ...it became a matter of three components, the timer, heater or thermostat.
I tried the most common component and the less expensive one first , the thermostat switch I installed it very easily snipping two wires and attaching the news using wire nuts I used the diagram on this website to pinpoint the component and there has not been a problem since.
went to your website and viewed exploded view to find the sensor( there are two I just picked one to replace for now), pried the cover off carfully and pulled out the sensor. I snipped the wire in the middle leaving plenty to work with. I shortened the wire on the new piece, spliced the wires together and with some 3M rubberized, tape wrapped them up, replaced the sensor back into the cover and snapped in place.


 – Part Number: WR60X26866")