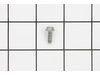
This OEM-compatible screw is designed for use with many GE dishwashers. Measuring 8-16 HXW and 1/2" in length, this stainless steel screw secures the middle spray arm hub to the upper rack assembly, e...
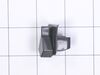
This is replacement door latch for your dishwasher. The door latch is attached to the tub frame, and connects to the door strike to keep your dishwasher door closed during operation. If you have a bro...
This kit includes the lower and middle spray arms. Water is forced through this spray arm by the unit's pump and motor assembly. The force of the water propels the spray arms, spraying water and deter...
This dishwasher tub gasket creates a watertight seal between the tub and door to prevent leaks and maintain efficient performance. Made from durable rubber, it fits into the tub’s channel and is easy ...
Are you grappling with a faulty GE dishwasher? Maybe the lower rack just won't stay put? Let's help you put an end to that stress. Our GE Lower Rack Clip might just be what you've been searching for. ...
Looking to fix your dishwasher and get it back to cleaning your dishes like a champ? Your solution could be the GE Conduit Mid Assembly. This important part, also known as the spray arm manifold, firm...
Meet the GE FDT Coated Lower Dishrack - your dishwasher's new best friend. Its job is simple but vital. It separates and supports your dishes within the rack, making sure each dish gets a thorough cle...
This diverter valve assembly controls water flow between the upper and lower spray arms in compatible dishwashers, ensuring efficient cleaning during each cycle. Located inside the appliance, it direc...
This vent cover helps direct airflow and protect internal vent components. Designed for durability, it supports proper ventilation and efficient appliance performance.
This drain pump kit is designed to remove dirty water from your dishwasher during and at the end of each wash cycle. If you’re noticing standing water after a cycle or leaks beneath the appliance, the...
The lower rack roller supports the smooth sliding of your dishwasher’s bottom rack. Measuring 1.5 inches in diameter and charcoal-colored, this OEM replacement part is sold individually. Replace all f...
No Longer Available
Questions And Answers for DDT595SSJ5SS
Ask our experts a question about this model and we'll get back to you as soon as possible!
2 questions answered by our experts.
< Prev
1
Next >
Sort by:
Search filter:
Clear Filter
Your search term must have 3 or more characters.
Keep searches simple. Use keywords, e.g. "leaking", "pump", "broken" or "fit".
Sorry, we couldn't find any existing answers that matched.Try using some different or simpler keywords, or submit your new question by using the "Ask a Question" button above!
Thomas
November 24, 2023
No lights are on, breaker is not tripped. Tired off breaker for several minutes. This worked a couple of time over the last month. Does not work now.
For model number DDT595SSJ5SS
Hi Thomas, thank you for getting in touch. We would recommend checking the door is closing properly, and there is no obstruction. If it is fine, you will need to replace the control board fuse, part number PS12743197. We hope this sorts out your problem!
Was this helpful?
Thank you for voting!
Jon
March 15, 2026
The upper spray arm (I think you call it the mid spray arm) just under the top rack does not spray or rotate. I have taken the filter, conduit, and both spray arms apart, cleaned them well, and put them back together. I also used a screwdriver to make sure the ball inside the diverter valve is free and not stuck. It seems like I need a seal somewhere but this model doesn't seem to require a seal between the diverter and conduit to upper arm, it just snaps in and that is not broken or damaged. Any suggestions for what I need? Thank you.
For model number DDT595SSJ5SS
Hi Jon, thank you for contacting us. If the pump's impeller is worn or damaged, it may lack the power to push water all the way up the conduit to the top rack. We would suggest checking the circulation pump, part number PS11772000. We hope this sorts out your problem!
Was this helpful?
Thank you for voting!
< Prev
1
Next >
✖
Ask a Question
Ask our experts a question on this model and we'll respond as soon as we can.
Didn't actually do the compete repair but got close. Pulled out dishwasher, disconnected and checked continuity on the existing heating element (about 16 ohms) the new element was also about 16 ohms. This indicates they both were working fine and no need for replacement. Next step would have been to swap the elements would have been simple. Tried to replace main board as well, still not the issue so giving up and replacing the dishwasher. It wasn't the high temp cut off thermostat either incidentally and no error codes in maintenance mode. Check continuity of your existing element before ordering to save aggravation.
Open the washer, remove the bottom dish rack, then twist off the bottom water sprayer. Use a screwdriver to remove the mounting/ stabilizing screws so you can slide out the dishwasher. Close the dishwasher and slide it out. Underneath at the back there are two wires powering the drying element, carefully remove them. Use an adjustable wrench to remove the two plastic mounting nuts for the drying element. Open the washer and remove the old drying element, and insert the new element. Reassemble the dishwasher in the reverse order if disassembly.
1. Turn off breaker supplying power to dishwasher in electrical panel 2. Open dishwasher door 3. Unscrew the screws that secure the dishwasher to the counter. 4. Tip dishwasher forward. Identify the non-functioning door latch. It looks exactly like the replacement. Unclip the wire harness from the door latch. 5. On the inside of the dishwasher, there are 2 screws directly under the door latch. Unscrew them and carefully set aside. 6. Remove old door latch. 7. Set new door latch in place. Holding securely, replace screws removed in step 5. Toward the end they get a little tougher to screw in. 8. Plug wire harness into new door latch. 9. Re-align dishwasher and re-secure to counter in previous position. 10. Test latch to make sure it closes properly. 11. Turn on breaker in electrical panel. The dishwasher should now function properly.