


DBXR453ET2AA General Electric Dryer - Overview
Sections of the DBXR453ET2AA
[Viewing 5 of 5]


Manuals & Care Guides for DBXR453ET2AA
Click to downloadKeep searches simple, eg. "belt" or "pump".

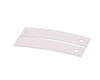
DRYER FRONT BEARING WHITE 2PK
PartSelect #: PS17137205
Manufacturer #: WE03X37318
This authentic, white Drum Bearing Slide, also known as the bearing drum slide, glide, or pad, is a plastic, easy-to-install part for your dryer. It replaces the dryer's front drum slide to allow for ...
No Longer Available

Nut
PartSelect #: PS267646
Manufacturer #: WE2M96
This fastening nut secures components firmly in place, helping maintain proper alignment and safe operation. It is commonly used as a replacement when original hardware is stripped, lost, or damaged.
$20.24
Special Order

Questions And Answers for DBXR453ET2AA
We're sorry, but our Q&A experts are temporarily unavailable.
Please check back later if you still haven't found the answer you need.
- < Prev
- 1
- Next >
Sort by:
Search filter:
Clear Filter
Your search term must have 3 or more characters.
Keep searches simple. Use keywords, e.g. "leaking", "pump", "broken" or "fit".
Sorry, we couldn't find any existing answers that matched.Try using some different or simpler keywords, or submit your new question by using the "Ask a Question" button above!
Cesar
March 13, 2024
Cómo se desarma no veo tornillos por la parte de enfrente
For model number DBXR453ET2AA

Hola César, gracias por comunicarte. Hemos adjuntado un vídeo instructivo que mostrará cómo abrir el dispositivo. ¡Esperamos que esto ayude!

Was this helpful?
Thank you for voting!
Additional Links:
- < Prev
- 1
- Next >
Common Symptoms of the DBXR453ET2AA
[Viewing 3 of 3]Noisy
Fixed by
these parts
these parts
Show All
Marks left on clothes
Fixed by
these parts
these parts
Show All
Drum Not Spinning
Fixed by
these parts
these parts
Show All
Keep searches simple. Use keywords, e.g. "leaking", "pump", "broken" or "fit".
The Front Drum Glides wore out
I first unplugged the unit, opened the top, disconnected and took off the control panel, took off the front panel to determine the source of the squeaking noise coming from the Dryer. I saw that 3 of the 4 Front Drum Glides were gone and the drum had worn away significant amounts of plastic from the Top Bearing Assembly. I purchased the Top Bearing Assembly and a set of 4 Front Drum Glides. Disassembled the damaged parts and reassembled with the new replacement parts. The reassembly took less than 20 minutes. I plugged in the Dryer and viola! It works as good as new.
Parts Used:
-
Al from Elmhurst, IL
-
Difficulty Level:Really Easy
-
Total Repair Time:15 - 30 mins
-
Tools:Screw drivers
6 of 7 people
found this instruction helpful.
Was this instruction helpful to you?
Thank you for voting!
Replaced Drum Bearing Front And Rear
Pulled the unit all apart to replace the rear drum bearing. Also replaced the front bearing. Works like brand new. Easier then I thought
Parts Used:
-
philip from pickens, SC
-
Difficulty Level:Easy
-
Total Repair Time:1- 2 hours
-
Tools:Nutdriver, Screw drivers, Socket set
5 of 6 people
found this instruction helpful.
Was this instruction helpful to you?
Thank you for voting!
Making noise while drum was turning.
Removed 2 screws to remove top. Removed 2 other screws to remove front. Removed old parts. Installed new parts. Reassemble all afetr cleaning duct work out.
Parts Used:
-
Cheryl from Inwood, WV
-
Difficulty Level:Easy
-
Total Repair Time:30 - 60 mins
-
Tools:Screw drivers
1 of 2 people
found this instruction helpful.
Was this instruction helpful to you?
Thank you for voting!