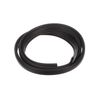
If your dishwasher is leaking or not cleaning as well as it used to, the door gasket might be the culprit. This flexible rubber seal fits around the tub and keeps water and steam inside during each cy...
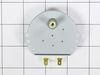
This drain pump assembly is a genuine OEM replacement part for your dishwasher. In order to complete this repair you will need a Phillips screwdriver, pliers, and a socket. You will need to pull the d...
This flexible, corrugated drain hose assembly is designed to efficiently channel wastewater from your dishwasher to the household drainage system. Installed at the rear of the unit, it connects the di...
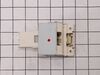
If your dishwasher won’t start or is leaking during a cycle, the door latch might be the problem. This genuine LG latch assembly keeps the door closed tight, helping prevent water from escaping and ma...
Your LG dishwasher deserves the best support, and that's what our Genuine OEM Mounting Bracket Assembly aims to provide. This isn't just any accessory, it's a critical component custom-made by LG for ...
Having trouble with your LG dishwasher? Try our high-quality dispenser assembly. This isn't just any part'it's a genuine LG OEM, so it has the same great quality and precise specs as the original piec...
Got a broken LG dishwasher? We've got a solution you will love. Our genuine OEM Heater Assembly is just the thing you need to bring it back to life. Wondering how? Well, this expertly designed part h...
According to your site, the part(s), to consider, to resolve the problem were: 1.Motor Assembly DC Pump, OR 2.Drain Pump. I simply selected the drain pump because it was cheaper and because it was making a clicking noise. (The only significant noise that this dishwasher was making) To be safe, I unplugged the unit and turned off the water, under the sink. I removed the kick plate and I unscrewed the anchor clips from under the counter and carefully pulled the unit out. I then opened the dishwasher and removed the lower rack. To minimize water clean-up, I took a rag and soaked up the standing water in the bottom until it was nearly dry. I then tipped the dishwasher on it's left side, knowing where the location of the drain pump (front, right), would be in an easier location for me to work. I first unplugged the pumps wiring. Then, with pliers, I was able to disconnect the clips on the short, rubber hoses that hold the pump in alignment.(Use caution: If reusing the same rubber hose(s) on the new pump, it will be easier if you put them on in the same direction as they were take off) Then I removed the rubber supports off their hooks, that allow the pump to hang from the bottom of the dishwasher. Once the rubber hoses are re-connected on the new pump and placed on to it's former proper alignment, you can re-attach the rubber supports to their hooks. And last, but not least, remember to plug the new pump's wires back in place. Carefully stand up dishwasher and push it slowly back into place. I plugged in the unit and turned on the water. Before I screwed the unit back to the counter and kick plate back on the front, I ran a load and watched for leaks beneath the new pumps area. No leaks. "Easy, Peasy".
Shut off electrical breaker, Removed bottom cover plate by removing 2 Phillips head screws. I was able to remove the pump without pulling the dishwasher out by removing wiring connection, hose clamps with a pair of pliers, and removed the 2 rubber hangers However I couldn’t reinstall the pump without pulling the dishwasher out. 1.I disconnected the electrical wiring (breaker was shut off). 2. Shut the water supply off and removed water line at the dishwasher. 3. Disconnected the drain at the sink. 4. Removed the 2 retaining screws 1 on each side that secures the dishwasher in place. 4. Removed the upper and lower racks, Used a shop vac and sucked the water out of the bottom of the dishwasher. 5. Pulled the dishwasher out making sure the drain line came with it. 6. Laid The dishwasher over on the back side to the floor. 7. Reinstalled pump with new hose clamps and hoses that came with the pump. ( it probably would have been easier to remove the pump with the dishwasher pulled out) reinstall the wire connection to the pump (snap in connection), connected the 2 new rubber hangers to pump and connected to the dishwasher . 8. Slide the dishwasher back in place and reconnect water line be sure and use some Teflon tape, reconnect electrical wiring, reconnect drain line, secure dishwasher with screws. Turn water on and check for leaks, turn electrical power back on. I ran the dishwasher to make sure it worked and make sure there weren’t any leaks before I installed the bottom cover plate. I had an appliance service person say that they wouldn’t work on an LG because they were hard to work on and very difficult to get parts. My experience was just the opposite thanks to partselect. The Dishwasher works like brand new.
The inside gasket deteriorates over time - However replacement is easy. the main thing you have to remember is after you remove the old gasket, install the new one starting at the middle top of the tub and work your way down both sides. Also, don't push the gasket all the way in...only enough to hold in place. When you close the door the gasket will form a better seal around the door.