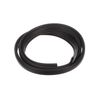
The door hinge cable works in conjunction with the dishwasher door by connecting the door hinge to the door spring and helping to support and balance the weight of the door as you open and close it. I...
The dishwasher roller assembly connects to the dishrack, and is located in the lower level of the dishwasher. It allows the dishrack to easily slide in and out. If the lower rack keeps falling off the...
If your dishwasher is leaking or not cleaning as well as it used to, the door gasket might be the culprit. This flexible rubber seal fits around the tub and keeps water and steam inside during each cy...
This nozzle assembly, commonly referred to as a spray arm, is located at the bottom of select LG dishwashers and is responsible for distributing pressurized water across dishes during the wash cycle. ...
This drain pump assembly is a genuine OEM replacement part for your dishwasher. In order to complete this repair you will need a Phillips screwdriver, pliers, and a socket. You will need to pull the d...
This flexible, corrugated drain hose assembly is designed to efficiently channel wastewater from your dishwasher to the household drainage system. Installed at the rear of the unit, it connects the di...
This dishrack roller assembly is designed to facilitate smooth movement of the dishwasher rack, allowing it to glide in and out with ease. Engineered for durability, it attaches securely to the rack a...
Finding the right parts for your dishwasher can be tricky, but we're here to help. Consider this Dishrack Roller Bracket by LG? an authentic, OEM part designed to keep your dishwasher operating at opt...
This lower dishrack assembly is designed to securely hold dishes and cutlery during the wash cycle in select LG dishwasher models. Constructed from coated metal, it resists rust, cracking, and peeling...
If your dishwasher won’t start or is leaking during a cycle, the door latch might be the problem. This genuine LG latch assembly keeps the door closed tight, helping prevent water from escaping and ma...
$104.96
In Stock
Questions And Answers for D1426DB1
Be the first to ask our experts a question about this model!
✖
Ask a Question
Ask our experts a question on this model and we'll respond as soon as we can.
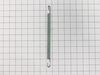
Simple, removed screws securing machine in the cabinet, then pull the unit out of the cabinet space about 10 inches. Springs are accessible within this extension. You need strong hands to extend the springs and attach them. Once attached, push machine back in place and re-install the anchor screws. In my situation, only one spring was broken, so the attached side revealed the correct slot to place the hook on the top position, the bottom position has a plastic lead for the spring, and that lead is attached to a rope to the door hinge. Note: Replace BOTH springs, even if only one is broken.
According to your site, the part(s), to consider, to resolve the problem were: 1.Motor Assembly DC Pump, OR 2.Drain Pump. I simply selected the drain pump because it was cheaper and because it was making a clicking noise. (The only significant noise that this dishwasher was making) To be safe, I unplugged the unit and turned off the water, under the sink. I removed the kick plate and I unscrewed the anchor clips from under the counter and carefully pulled the unit out. I then opened the dishwasher and removed the lower rack. To minimize water clean-up, I took a rag and soaked up the standing water in the bottom until it was nearly dry. I then tipped the dishwasher on it's left side, knowing where the location of the drain pump (front, right), would be in an easier location for me to work. I first unplugged the pumps wiring. Then, with pliers, I was able to disconnect the clips on the short, rubber hoses that hold the pump in alignment.(Use caution: If reusing the same rubber hose(s) on the new pump, it will be easier if you put them on in the same direction as they were take off) Then I removed the rubber supports off their hooks, that allow the pump to hang from the bottom of the dishwasher. Once the rubber hoses are re-connected on the new pump and placed on to it's former proper alignment, you can re-attach the rubber supports to their hooks. And last, but not least, remember to plug the new pump's wires back in place. Carefully stand up dishwasher and push it slowly back into place. I plugged in the unit and turned on the water. Before I screwed the unit back to the counter and kick plate back on the front, I ran a load and watched for leaks beneath the new pumps area. No leaks. "Easy, Peasy".