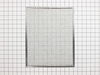
This grease filter is almost fourteen inches long and almost twelve inches wide. This filter is intended for use with some downdraft cooktops and ranges.
This surface burner switch, also known as an infinite switch, is a key electrical component that controls the heat output of your stovetop burners. When you turn the control knob, the switch adjusts t...
This is a multi-use and multi-appliance screw. It can be used on a microwave, refrigerator, range/oven, air conditioner, dehumidifier, washer, or dryer. The measurements of this screw are 8 x 1/2 inch...
This 8 inch surface burner with reinforced delta frame carries 2100 watts and 240 volts. It has five turns and is compatible with many electric ranges. Its center medallion is all black in color.
If one of your range burners has stopped working, this 6-inch coil surface element offers a simple and effective solution. Delivering 1250 watts of heating power, it provides consistent heat for cooki...
Sold individually. This surface burner knob is a little under two inches in diameter. It is a black knob with gray numbering indicating the temperature level of the surface burner. Made entirely of pl...
$40.59
In Stock
Questions And Answers for CVE4180B-C
Be the first to ask our experts a question about this model!
✖
Ask a Question
Ask our experts a question on this model and we'll respond as soon as we can.
1. Killed power and removed the regulator's knob, noted the position of the old control. 2. Took off the cover for the center vent and loosened the two screw holding the housing in place--the screws didn't have to come out completely as it is a U-shaped friction hold. 3. Unscrewed the two screws holding the old control switch in place--lifted the housing enough to get at the old switch and carefully pulled it loose--it was a front burner so the control switch was about as far back as it could be but still wasn't that hard to get at. 4. Turned the new switch to orient the wire connectors, then, using a needle-nose pliers, removed each friction connector, one at a time, and fitted them on the new switch (note: one of the wires fitted best if it went under as opposed to around the base of the new switch). 5. Replaced the control back through the housing and screwed it in place, making sure the orientation of the control matched the way it looked originally. 6. Slide the housing back over the two screws and tightened, replace vent. 7. Replaced the knob and turned on the power.
(The above took me about twice as long to write as it did to make the repair and I write professionally but am not a professional electrician.)
Also, I bought a second control switch because, given the age of the unit, I'm sure another one will go. The second one will assure that it won't happen :-).