


CRGW3484RS0 Whirlpool Range - Overview
Sections of the CRGW3484RS0
[Viewing 7 of 7]


 Diagram and Parts List for Whirlpool Range")
Keep searches simple, eg. "belt" or "pump".

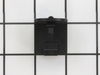
Touch-Up Paint - White
PartSelect #: PS385132
Manufacturer #: 72017
This 18 ml bottle of white appliance touch-up paint is used to cover scratches or marks on your appliance. The white touch-up paint can be used on refrigerators, microwaves, ranges, clothes dryers, an...
$15.95
In Stock

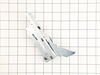
Sensor
PartSelect #: PS11726314
Manufacturer #: W10833885
This oven temperature sensor is designed to monitor and regulate the internal heat levels of your range, ensuring consistent and accurate cooking performance. It communicates directly with the control...
$150.68
In Stock

Rack
PartSelect #: PS16543561
Manufacturer #: W11520287
This oven rack offers a sturdy, chrome-finished surface for baking, roasting, and broiling in your range. It fits a wide selection of compatible ovens and is built to handle high heat and frequent use...
$65.39
In Stock

Range Rear Leveling Leg
PartSelect #: PS11748094
Manufacturer #: WPW10058460
Sold individually.
$14.63
In Stock

Range Inner Oven Door Glass
PartSelect #: PS11744843
Manufacturer #: WP8053948
This is the innermost piece of glass on your door.
$172.69
In Stock


Broiler Pan with Roasting Rack
PartSelect #: PS1519212
Manufacturer #: W10123240
This is a 3 piece set.
$129.46
Special Order

2 Piece Broiler Pan
PartSelect #: PS971245
Manufacturer #: 4396923
The top of this part is now black.
$59.89
In Stock

Drawer Glide Kit - Black
PartSelect #: PS10066107
Manufacturer #: W10763667
This kit helps your range drawer open and close smoothly again. It comes with two glides—one for each side—and is a great fix if your drawer is sticking or hard to move. Made for Whirlpool and related...
$93.65
In Stock
 – Part Number: WPW10310922")
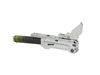
Vent Trim - (Black)
PartSelect #: PS11752547
Manufacturer #: WPW10310922
This black stainless steel oven door vent fits on the top of the oven door, attaches the door handle and the outer glass to the door itself, and vents hot air out of the oven. The vent measures approx...
$169.72
In Stock


Door Gasket
PartSelect #: PS16555283
Manufacturer #: W11542153
This oven door gasket prevents heat from escaping the oven cavity when in use. It contains all of the attaching clips needed for installation.
$69.39
In Stock
Questions And Answers for CRGW3484RS0
We're sorry, but our Q&A experts are temporarily unavailable.
Please check back later if you still haven't found the answer you need.
Common Symptoms of the CRGW3484RS0
[Viewing 6 of 6]Door won’t close
Fixed by
these parts
these parts
Show All
Little to no heat when baking
Fixed by
these parts
these parts

Show All
Oven not heating evenly
Fixed by
these parts
these parts

Show All
Will Not Start
Fixed by
these parts
these parts

Show All
Oven is too hot
Fixed by
these parts
these parts
Show All
Door won’t open after self cleaning cycle
Fixed by
these parts
these parts

Show All


Keep searches simple. Use keywords, e.g. "leaking", "pump", "broken" or "fit".
E1 F5 Error on display
After reading many forums found that this error happens when trying to clean the oven and there is a failure in the latch motor to lock the oven door. It was suggested 1st to just tunr the breaker off to the over wait and then turn it back on to see if the error would clear by itself. If not then you'll have to do what I did and buy a new Latch Motor and replace it. Fairly easy to do:
) Move oven to get to the back panel
) Disconnect oven from power
) Remove the 8 screws to get the back panel off
) REmove the Latch motor screws (2) and remove the motor after twisting to get the latch rod off
) Put in new latch motor by 1st putting the latch rod in the motor assembly
) Screw the new motor in place
) Replace back panel
) Power on Oven
DONE!
Parts Used:

-
Gregory from Thornton, CO
-
Difficulty Level:Easy
-
Total Repair Time:30 - 60 mins
-
Tools:Screw drivers
42 of 52 people
found this instruction helpful.
Was this instruction helpful to you?
Thank you for voting!
Top burners would not light. No "clicking" .
My husband and I replaced the igniter module, following directions we found online. We removed the old one, replaced it with the new one, and thankfully everything is working great!
Parts Used:

-
Carolyn from Bellingham, MA
-
Difficulty Level:Easy
-
Total Repair Time:15 - 30 mins
-
Tools:Screw drivers
24 of 36 people
found this instruction helpful.
Was this instruction helpful to you?
Thank you for voting!
Scratches in Surface
This product comes in a bottle with a brush like Liquid Paper. It goes on incredibly easy. A second coat might be needed. I wanted to prevent rust from setting in so I covered the scratches and dings. The paint is a little brighter since my washer is 10 years old but it still looks great.
Parts Used:
-
Michelle from Richardson, TX
-
Difficulty Level:Really Easy
-
Total Repair Time:Less than 15 mins
81 of 208 people
found this instruction helpful.
Was this instruction helpful to you?
Thank you for voting!