This 18 ml bottle of white appliance touch-up paint is used to cover scratches or marks on your appliance. The white touch-up paint can be used on refrigerators, microwaves, ranges, clothes dryers, an...
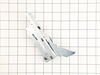
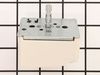
If your range’s burner isn’t heating properly or the temperature seems off, this dual element control switch could be the fix. It’s designed to manage heat for dual surface elements and fits a variety...
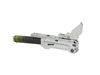
If your stove burner won’t heat up, stays on high, or won’t adjust, this switch might be the fix. It controls the heat for 6-inch electric burners and fits many Whirlpool, Maytag, and KitchenAid range...
This switch helps you control the heat on your stove’s 8-inch burner. If your burner isn’t heating up or won’t adjust properly, this part could be the fix. It works by sending the right amount of powe...
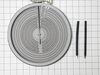
This oven rack offers a sturdy, chrome-finished surface for baking, roasting, and broiling in your range. It fits a wide selection of compatible ovens and is built to handle high heat and frequent use...
Give your oven door a clean, finished look with this white side trim piece. It fits on the right edge of the door, helping seal in heat and protect the glass. If your current trim is cracked or loose,...
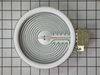
This broil element is a genuine replacement component located at the top of the oven cavity, designed to supply direct heat for broiling and high-temperature cooking. Engineered for select range model...
$184.97
In Stock
Questions And Answers for CREW3874RW0
Be the first to ask our experts a question about this model!
✖
Ask a Question
Ask our experts a question on this model and we'll respond as soon as we can.
Start by turning off the power to the range. It was fairly easy to take the "Control Deck" off the top of the range by removing about 8 screws. I leaned the deck forward without removing any wires except a green ground that was held on by one of the screws. There are two small screws under the switch knob holding the Infinite Switch to the panel. I removed these and let the switch hang on the wires. To avoid missplacing or crossing the wires... I moved one wire at a time to the new switch, then attached the switch to the panel and put it all back together. Whole job was done in about 15 minutes
Took 2 screws under front edge of smooth top. Unscrewed ground wire from back of smooth top unit. Unplugged 2 wire bundles, from back. Took bad element out , put in new one. Put back together. About 10 min's tops. Easy peasy.
After reading many forums found that this error happens when trying to clean the oven and there is a failure in the latch motor to lock the oven door. It was suggested 1st to just tunr the breaker off to the over wait and then turn it back on to see if the error would clear by itself. If not then you'll have to do what I did and buy a new Latch Motor and replace it. Fairly easy to do: ) Move oven to get to the back panel ) Disconnect oven from power ) Remove the 8 screws to get the back panel off ) REmove the Latch motor screws (2) and remove the motor after twisting to get the latch rod off ) Put in new latch motor by 1st putting the latch rod in the motor assembly ) Screw the new motor in place ) Replace back panel ) Power on Oven DONE!


 Diagram and Parts List for Whirlpool Range")