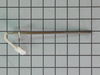
The temperature sensor, also known as an oven probe, detects the temperature within the oven cavity. This temperature sensor is 9 inches in length and is a genuine OEM part. If your oven is too hot, n...
This 40-watt appliance light bulb is a reliable replacement for use in select ranges, refrigerators, freezers, and microwaves. It provides bright, consistent lighting to help you see clearly inside yo...
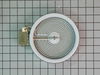
The 6” radiant cooking element with limiter fits under the glass cooktop and supplies heat to the cooking area. If your element is not heating, you can test the element for continuity with a multimete...
Having trouble with your stove or oven's light indicator? Don't fret - we have a solution for you. Our Frigidaire Range Light Lens Indicator, ideal for select Frigidaire, Electrolux, White Westinghous...
$21.50
In Stock
Questions And Answers for CGEF3059RFA
We're sorry, but our Q&A experts are temporarily unavailable.
Please check back later if you still haven't found the answer you need.
3 questions answered by our experts.
< Prev
1
Next >
Sort by:
Search filter:
Clear Filter
Your search term must have 3 or more characters.
Keep searches simple. Use keywords, e.g. "leaking", "pump", "broken" or "fit".
Sorry, we couldn't find any existing answers that matched.Try using some different or simpler keywords, or submit your new question by using the "Ask a Question" button above!
Terry
November 30, 2021
Every once in a while, our stove shuts off, then the clock flashes as it does when the power goes off and back on. I checked the breakers and all connections inside the breaker panel. I removed and checked the plug-in and all connections inside. I removed the back panels and checked all wiring and connections inside. Through all of this, I found nothing. I then turned on the power and jiggled every wire inside, but I couldn’t make it shut off. Might you have any ideas where to go next? Thanks, Terry
For model number CGEF3059RFA
Hello Terry, Thank you for the question. This could be an indication the Electronic Control Board is faulty and may need to be replaced. If you need help placing an order, customer service is open 7 days a week. Please feel free to give us a call. We look forward to hearing from you!
Oven is only around 5 years old and is taking way too long to reach desired temp, approx. over an hour to reach 425. It takes approx. 50mins to reach 230, stays there for a while and slowly creeps up to 425. I recall not long after the issue started, finding a baking tray on the bottom (base/ floor) of the oven which actually caused some burn damage to the oven base, I'm wondering if that has caused the issue?
For model number CGEF3059RFA
Hi Sara, thank you for reaching out. The problem seems to be with the Bake Element and you may need to replace it, the part number is PS1991807. If that does not help, we would suggest checking the Temperature Sensor, part number PS1528542. If you need help placing an order for it, please feel free to give us a call. We look forward to hearing from you!
The stove shows F11err the top works fine but the oven doesn't work .It continually beeps can't make it stop.had to unplug it.
For model number CGEF3059RFA
Hi Marie, thank you for the question. According to our research F11 error code shows a shorted key error. It means when a key on the keypad has been detected as pressed in for a long time, the F11 error is reported and it terminates all commands. We recommend you replace the electronic control board, part number PS9494056, to fix the issue. We hope this solves your problem!
PF alarm appeared on display. Noticed clicking when cord was moved. Had arced for some time and melted original block. New part slightly different. Only has 3 lugs, old one had six. Stack using washers provided. Take note of colors before disassembly. Use caution while working through access opening. The edges are sharp. Only tools needed are phillips screwdriver, deep socket for lug nuts. Nut driver optional. Hope this is helpful.
First we removed two screws under the rim of the range top to open the lid. Lifted the lid and removed the screws from the bracket that holds the elements, Be careful with the clips that hold the element in, if you break them or bend them there aren't any more! Also note which holes they were in, they are marked according to the different sizes of elements. Disconnected the wires, needed needlenose pliers to grip them...connected new element, popped it back in place, replaced bracket, closed top ...Easy peasy!!!
Turned power off at electrical panel. Pulled oven away from wall. Removed back cover (6 screws), then unplugged wires from old receptacle. I had to pull the squeeze clips backwards & break them to remove the old receptacle - couldn't squeeze them enough to remove them otherwise. The old receptacle came out through the inside of the oven, and the new one snapped in easily from inside the oven as well. Replaced wiring, installed new bulb, restored power & tested. Replaced back cover. Good time to vacuum under/behind where the oven usually lives before sliding it back to the wall.