


AWN432SP113TW01 Speed Queen Washer - Overview
Sections of the AWN432SP113TW01
[Viewing 1 of 1]
Keep searches simple, eg. "belt" or "pump".


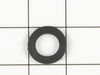
Retaining Ring
PartSelect #: PS11740487
Manufacturer #: WP23748
This metal retaining ring is well under an inch long. Use it for your Maytag brand clothes washer or your clothes dryer.
$18.02
In Stock

Lid Hinge Mounting Screw
PartSelect #: PS11748588
Manufacturer #: WPW10119828
Sold individually. NOTE: The color on the screw may not be the same as the image, but will still function the same.
$11.80
In Stock

V-Style Spin and Agitate Belt - 28-3/4 inches long
PartSelect #: PS11740577
Manufacturer #: WP27001006
This v-style spin and agitate belt is 28-3/4 inches long and half of an inch wide. It is all black in color and made entirely of rubber.
$51.96
In Stock

Drain Hose with Rubber Elbow
PartSelect #: PS11742254
Manufacturer #: WP40053901
This hose attaches to the pump to help remove the water out of the washer. 7 feet in length.
$66.85
In Stock

Washer Inlet Hose Washer
PartSelect #: PS11757437
Manufacturer #: WPY013783
This high pressure inlet hose washer is black. It is an inch in diameter, made of rubber, and used with many washing machines, refrigerators, and dishwashers.
$9.68
Special Order

Standpipe Adapter
PartSelect #: PS2040744
Manufacturer #: 40008101
This part helps stop the washer from overflowing.
$79.58
Special Order


Drive Bell and Seal Kit
PartSelect #: PS2174335
Manufacturer #: R9900189
This washing machine drive bell and seal kit comes with a seal, a plug, a shoulder screw, a drive bell, and some grease.
No Longer Available

Siphon Break Kit
PartSelect #: PS386588
Manufacturer #: 76660
Included in this kit are the clamps for the drain hose.
$121.85
In Stock

Refrigerator Screw
PartSelect #: PS11742733
Manufacturer #: WP489128
This screw is sold individually.
$17.45
Special Order

Single Washer Inlet Strainer
PartSelect #: PS11739405
Manufacturer #: WP22002960
Found at the end of the inlet hoses.
$14.95
Special Order
Questions And Answers for AWN432SP113TW01
We're sorry, but our Q&A experts are temporarily unavailable.
Please check back later if you still haven't found the answer you need.
Common Symptoms of the AWN432SP113TW01
[Viewing 6 of 6]Noisy
Fixed by
these parts
these parts


Show All
Leaking
Fixed by
these parts
these parts


Show All
Will not agitate
Fixed by
these parts
these parts

Show All
Burning smell
Fixed by
these parts
these parts
Show All
Spins slowly
Fixed by
these parts
these parts
Show All
Will not drain
Fixed by
these parts
these parts
Show All

Keep searches simple. Use keywords, e.g. "leaking", "pump", "broken" or "fit".
Water leaking on floor from "mysterious place underneath washer"
Water was leaking on the floor during the wash cycle and especially during draining of the washer. I removed the front panel at ground level and watched while draining after a rinse.
I t was obvious that water was spraying from a hole in the rubber end of the hose (the hose is a fused assembly of a plastic section and a rubber section).
So, I finished draining, removed the hose (required pliers to squeeze off a hose clamp).
Upon inspecting the hose, it was also apparent that the hole was caused by rubbing against a support bracket for the motor. This should not happen, but it did because the plastic standoff supposed to keep the hose away from the bracket was installed 180 degrees backwards.
So, I simply replaced the hose and turned the bracket around to the correct orientation.
Everything worked as planned and my repair cost was much less than if I had called someone out.
Parts Used:
-
Bryan from Chicago, IL
-
Difficulty Level:Easy
-
Total Repair Time:Less than 15 mins
-
Tools:Pliers, Socket set
51 of 57 people
found this instruction helpful.
Was this instruction helpful to you?
Thank you for voting!
The thin walled plastic drain line got a pin hole leak
The washer is four years old.
This is the second time I needed to replace this same drain hose on this same washer since I had the machine
There is only my wife ant myself maybe, 2 -3 medium size loads per week - why I would have two drain lines develop the same problem in almost the same location in two years is disconcerting
There must be a design problem with the clear plastic hose - Suggest Maytag go to a thick walled rubber hose
The hole is alway inside the washer on the bottom just after the hose bracket - I suspect that something rubbing causing a small pin hole to develop - when the condition first starts it is very difficult to located -There will be water under the washer
Run the washer and discharge the water - to locate
The replacement must be made through the lower front removable panel - and is easier to do if the pump return hose is also disconnected from the pump
Be very carful with the thin wall replacement hose - very light weight plastic - do not pull across the floor of washer - it could easily get damaged
Your company did a get job getting the part to me - The Fed Ex track system was great
I could tell exactly where the delivery was al all times -
Parts Used:
-
WALTER from Holualoa, Hawaii, AL
-
Difficulty Level:Really Easy
-
Total Repair Time:15 - 30 mins
-
Tools:Pliers, Wrench set
9 of 10 people
found this instruction helpful.
Was this instruction helpful to you?
Thank you for voting!
replace rubber drain hose adapter
Place black rubber adapter on the end of the drain hose and stick in the stand pipe drain. That's all.
Parts Used:
-
Frank from Austin, TX
-
Difficulty Level:Easy
-
Total Repair Time:Less than 15 mins
7 of 11 people
found this instruction helpful.
Was this instruction helpful to you?
Thank you for voting!