


AER6303MFW5 Whirlpool Range - Overview
Sections of the AER6303MFW5
[Viewing 1 of 1]
Keep searches simple, eg. "belt" or "pump".

Touch-Up Paint - White
PartSelect #: PS385132
Manufacturer #: 72017
This 18 ml bottle of white appliance touch-up paint is used to cover scratches or marks on your appliance. The white touch-up paint can be used on refrigerators, microwaves, ranges, clothes dryers, an...
$15.95
In Stock

Range Insulation
PartSelect #: PS11750415
Manufacturer #: WPW10208653
Oven Wrap Insulation.
$76.96
In Stock

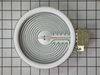
6" Surface Element, 1200 W
PartSelect #: PS12348164
Manufacturer #: W11171119
Sold individually.
$190.25
In Stock

Broil Element
PartSelect #: PS11731333
Manufacturer #: W10856603
This broil element is a genuine replacement component located at the top of the oven cavity, designed to supply direct heat for broiling and high-temperature cooking. Engineered for select range model...
$197.69
In Stock

Appliance Scraper
PartSelect #: PS408570
Manufacturer #: WA906B
Use this scraper for your ceramic/glass cooktop. It has a retractable blade and is an all-purpose tool for cooktops, mirrors, windows and tile. Use it to also remove paint, paper, dirt, stickers and more.
$13.68
In Stock


Broiler Pan with Roasting Rack
PartSelect #: PS1519212
Manufacturer #: W10123240
This is a 3 piece set.
$129.46
Special Order

2 Piece Broiler Pan
PartSelect #: PS971245
Manufacturer #: 4396923
The top of this part is now black.
$59.89
In Stock

Cooktop Cleaner
PartSelect #: PS3492527
Manufacturer #: W10355051
This cooktop cleaner will cut through tough grease and baked-on residue. The cleaner will leave a protective coating of silicone on the cooktop surface as it cleans. This 10oz bottle is safe for all g...
$21.75
Special Order


Griddle
PartSelect #: PS1817948
Manufacturer #: 4396096RB
This griddle can be used on gas and electric cooktops.
$255.46
In Stock

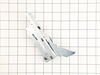
Door Hinge
PartSelect #: PS11752379
Manufacturer #: WPW10299227
If your oven door isn’t opening or closing like it should, this hinge might be the fix. It works on either side of the door and helps it move smoothly and stay open at the right angle. This part doesn...
$71.91
In Stock
Questions And Answers for AER6303MFW5
We're sorry, but our Q&A experts are temporarily unavailable.
Please check back later if you still haven't found the answer you need.
Common Symptoms of the AER6303MFW5
[Viewing 5 of 5]Element will not heat
Fixed by
these parts
these parts

Show All
Little to no heat when broiling
Fixed by
these parts
these parts
Show All
Door won’t close
Fixed by
these parts
these parts
Show All
Little to no heat when baking
Fixed by
these parts
these parts
Show All
Oven not heating evenly
Fixed by
these parts
these parts
Show All


Keep searches simple. Use keywords, e.g. "leaking", "pump", "broken" or "fit".
mice had made nests in the insulation wrap in the range
I numbered every part. ex: 1 L., for first part removed left side. I used a magic marker to circle the holes and wrote the number of screws used on the part, set the srews in a separete place, so that I new where these screws went to. The cleanup was pretty time consuming, but I was able to keep my stove, when every repairman I called to fix my stove told me I was better off buying a new stove. ($600.00 stove 2 years old)Please Note: The insulation blanket needed for the entire stove is two pieces, the sides and top are one part # and the bottom and back, are another part #. I did not know this. I just purchased the top and sides. I got lucky, the back and bottom were still in good shape. So I guess I should have read the description of the part more carefully to see what it covers, before I ordered it. It took two people two hours to do the work, it was really nice to have an extra set of eyes, to remember what direction pieces of metal from the stove went. I would do it all over in a heart beat instead of buying a new stove.
Parts Used:
-
Wendy from Red Hook, NY
-
Difficulty Level:Easy
-
Total Repair Time:More than 2 hours
-
Tools:Screw drivers
125 of 200 people
found this instruction helpful.
Was this instruction helpful to you?
Thank you for voting!
Surface Element Out
Took 2 screws under front edge of smooth top. Unscrewed ground wire from back of smooth top unit. Unplugged 2 wire bundles, from back. Took bad element out , put in new one. Put back together. About 10 min's tops. Easy peasy.
Parts Used:

-
Terry from Rockwall, TX
-
Difficulty Level:Really Easy
-
Total Repair Time:Less than 15 mins
-
Tools:Screw drivers
61 of 82 people
found this instruction helpful.
Was this instruction helpful to you?
Thank you for voting!
The broiler element started sparking and melting in one spot. I thought it would catch on fire and quickly turned off the oven.
First we unplugged the range. My husband removed the old element using a screw driver. He also removed the back panel on the oven after pulling it out from the wall. He unplugged the broiler prongs and plugged in the new element, put it all back together using the screw driver. We plugged it back in, turned on the oven and it is working great! Simple and easy to do in a short amount of time. Cool!!
Parts Used:
-
Ramona from Mexico, MO
-
Difficulty Level:Really Easy
-
Total Repair Time:15 - 30 mins
-
Tools:Screw drivers
32 of 41 people
found this instruction helpful.
Was this instruction helpful to you?
Thank you for voting!