Models > AEP222VAW4

AEP222VAW4 Maytag Range - Overview

Sections of the AEP222VAW4

[Viewing 5 of 5]
Keep searches simple, eg. "belt" or "pump".
Touch-Up Paint - White – Part Number: 72017
Touch-Up Paint - White
★★★★★
★★★★★
(16)
PartSelect #: PS385132
Manufacturer #: 72017
This 18 ml bottle of white appliance touch-up paint is used to cover scratches or marks on your appliance. The white touch-up paint can be used on refrigerators, microwaves, ranges, clothes dryers, an...
$10.20
  In Stock
Drip Bowl - 6 Inch – Part Number: W10196406RW
Drip Bowl - 6 Inch
★★★★★
★★★★★
(5)
PartSelect #: PS2366565
Manufacturer #: W10196406RW
This part has been substituted by the manufacturer and has a hole in the center. It no longer has a solid bottom.
$12.88
  In Stock
Receptacle Kit – Part Number: 814399
Receptacle Kit
★★★★★
★★★★★
(8)
PartSelect #: PS389217
Manufacturer #: 814399
This surface burner receptacle assembly comes with the receptacle, two wires, two wire nuts, and two pieces of heat-shrink tubing.
$48.60
  In Stock
Drip Bowl - 8 Inch – Part Number: W10196405RW
Drip Bowl - 8 Inch
★★★★★
★★★★★
(1)
PartSelect #: PS2366563
Manufacturer #: W10196405RW
This part is located beneath the element and catches any spills.
$13.87
  In Stock
Insulation – Part Number: WPW10208653
Insulation
★★★★★
★★★★★
(6)
PartSelect #: PS11750415
Manufacturer #: WPW10208653
Oven Wrap Insulation.
$77.41
  In Stock
Screw – Part Number: W11233072
Screw
★★★★★
★★★★★
(5)
PartSelect #: PS12349731
Manufacturer #: W11233072
This is a multi-use and multi-appliance screw. It can be used on a microwave, refrigerator, range/oven, air conditioner, dehumidifier, washer, or dryer. The measurements of this screw are 8 x 1/2 inch...
$26.51
  In Stock
Rear Leveling Leg – Part Number: WPW10058460
Rear Leveling Leg
★★★★★
★★★★★
(2)
PartSelect #: PS11748094
Manufacturer #: WPW10058460
Sold individually.
$14.10
  In Stock
Front Foot – Part Number: WP3196037
Front Foot
PartSelect #: PS11740969
Manufacturer #: WP3196037
This adjustable front leveling foot is sold individually.
$57.90
  In Stock
Installation Screw – Part Number: WP3400882
Installation Screw
PartSelect #: PS11741612
Manufacturer #: WP3400882
This screw is sold individually.
$10.25
  In Stock
Screw – Part Number: WP3400832
Screw
★★★★★
★★★★★
(1)
PartSelect #: PS11741605
Manufacturer #: WP3400832
This screw is sold individually.
$6.91
  In Stock
Screw – Part Number: WP98008545
Screw
PartSelect #: PS11747488
Manufacturer #: WP98008545
Sold Individually.
$10.35
  In Stock
Screw – Part Number: WP3400805
Screw
PartSelect #: PS11741601
Manufacturer #: WP3400805
Sold individually.
$10.09
  In Stock

Questions And Answers for AEP222VAW4

Be the first to ask our experts a question about this model!

Common Symptoms of the AEP222VAW4

[Viewing 1 of 1]
Element will not heat
Fixed by
these parts
Fixing Fixing Fixing
Show All
Keep searches simple. Use keywords, e.g. "leaking", "pump", "broken" or "fit".
Drip bowls were rusty and rotting through
I simply removed the elements and replaced the drip bowls with new ones. Put the elements back in and my stove looks %1000 better!
Parts Used:
Drip Bowl - 6 Inch Drip Bowl - 8 Inch
  • Michael from Kings Park, NY
  • Difficulty Level:
    Really Easy
  • Total Repair Time:
    Less than 15 mins
488 of 497 people found this instruction helpful.
Was this instruction helpful to you?
Thank you for voting!
Just Replaced Ole Drip Bowls.
Unplugged burners. . . . . Removed old bowls and replaced with new. . . . . . Plugged burners back in. However, I do want you to know that I could not believe the promptness of your service and the courteous customer service person that assisted me with my problem in selecting the correct drip bowls. You are definitely a unique company!!!!
Parts Used:
Drip Bowl - 8 Inch Drip Bowl - 6 Inch
  • Roger from Osage Beach, MO
  • Difficulty Level:
    Really Easy
  • Total Repair Time:
    Less than 15 mins
378 of 386 people found this instruction helpful.
Was this instruction helpful to you?
Thank you for voting!
mice had made nests in the insulation wrap in the range
I numbered every part. ex: 1 L., for first part removed left side. I used a magic marker to circle the holes and wrote the number of screws used on the part, set the srews in a separete place, so that I new where these screws went to. The cleanup was pretty time consuming, but I was able to keep my stove, when every repairman I called to fix my stove told me I was better off buying a new stove. ($600.00 stove 2 years old)Please Note: The insulation blanket needed for the entire stove is two pieces, the sides and top are one part # and the bottom and back, are another part #. I did not know this. I just purchased the top and sides. I got lucky, the back and bottom were still in good shape. So I guess I should have read the description of the part more carefully to see what it covers, before I ordered it. It took two people two hours to do the work, it was really nice to have an extra set of eyes, to remember what direction pieces of metal from the stove went. I would do it all over in a heart beat instead of buying a new stove.
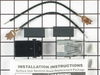
Parts Used:
Insulation
  • Wendy from Red Hook, NY
  • Difficulty Level:
    Easy
  • Total Repair Time:
    More than 2 hours
  • Tools:
    Screw drivers
98 of 132 people found this instruction helpful.
Was this instruction helpful to you?
Thank you for voting!