Use this scraper for your ceramic/glass cooktop. It has a retractable blade and is an all-purpose tool for cooktops, mirrors, windows and tile. Use it to also remove paint, paper, dirt, stickers and more.
This cooktop cleaner will cut through tough grease and baked-on residue. The cleaner will leave a protective coating of silicone on the cooktop surface as it cleans. This 10oz bottle is safe for all g...
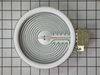
Is your stove burner not heating properly or acting up? This 2500-watt radiant element might be the fix. It fits under the glass cooktop and heats your pots and pans evenly. It’s easy to install with ...
Need a fix for your Whirlpool, KitchenAid, Maytag, Jenn-Air, Amana, Inglis or Magic Chef stove? The Whirlpool Radiant Surface Element with Limiter might be just what you need! This vital replacement p...
Ask our experts a question about this model and we'll get back to you as soon as possible!
1 question answered by our experts.
< Prev
1
Next >
Sort by:
Search filter:
Clear Filter
Your search term must have 3 or more characters.
Keep searches simple. Use keywords, e.g. "leaking", "pump", "broken" or "fit".
Sorry, we couldn't find any existing answers that matched.Try using some different or simpler keywords, or submit your new question by using the "Ask a Question" button above!
Mike
December 11, 2024
Right front burner switch not working. How do I get to it so it can be replaced.this an Amanda electric ceramic stove top that fits in our countertop
For model number AEC6540KFB00
Hello Mike, thank you for your question. Please see a testimonial from a customer. First, turn the breaker off then unwire the power harness. Lift the unit out, it’s a little heavy. Lay it on a flat surface and remove approximately 10 screws with a 1/4 socket. Lift off ceramic top to expose elements and switches. There is a baffle on the right side by the switches, remove 3 screws and lift out, Your switches are now exposed, just remove 2 Phillips head screws and the switch will come out. Just switch the wiring connectors and reinstall switch. Reverse disassembly steps. Good luck!
Was this helpful?
Thank you for voting!
< Prev
1
Next >
✖
Ask a Question
Ask our experts a question on this model and we'll respond as soon as we can.
Took 2 screws under front edge of smooth top. Unscrewed ground wire from back of smooth top unit. Unplugged 2 wire bundles, from back. Took bad element out , put in new one. Put back together. About 10 min's tops. Easy peasy.
really easy! Removed 2 screws under the glass top at the front, access from the open oven door, then removed the ground wire, removed the stove top, took the element holder off,( 2 screws)and replaced with new element, 30 minutes. I ordered the part and came within 18 hrs of ordering it, fantastic experience.