


AB2526PEKW12 Amana Refrigerator - Overview
Sections of the AB2526PEKW12
[Viewing 8 of 8]


Keep searches simple, eg. "belt" or "pump".

Refrigerator Center Rail
PartSelect #: PS11752912
Manufacturer #: WPW10326469
This OEM Center Rail is a white plastic part which supports the crisper frame, which holds the crisper. Fifteen inches long and white in colour, if broken, the support may no longer hold properly. Re...
$34.95
In Stock

Refrigerator Door Switch
PartSelect #: PS12728638
Manufacturer #: W11384469
Door switch turns the light off when you close the door.
$41.75
In Stock

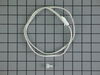
Refrigerator Dual Water Inlet Valve
PartSelect #: PS11743697
Manufacturer #: WP67006531
The water inlet valve is a solenoid-operated switch that, when activated, releases water from the supply line to the water valve and into the compact icemaker mold and to the water line.
$208.88
In Stock

Refrigerator Humidity Control Slide
PartSelect #: PS11743638
Manufacturer #: WP67005864
This part mounts on the crisper drawer cover and is used to limit the amount of air that gets into the crisper.
$14.69
In Stock


Door Switch
PartSelect #: PS12731166
Manufacturer #: W11396033
This light switch may also be known as a refrigerator door switch or a light switch kit, and is compatible with your refrigerator. The function of the refrigerator door switch is to turn on the light ...
$38.96
In Stock

Refrigerator Crisper Frame
PartSelect #: PS11743561
Manufacturer #: WP67003854
This crisper drawer frame supports the drawer and the shelf above it, helping organize produce and maintain airflow for freshness. It features raised edges to contain spills and fits select Whirlpool ...
$294.93
In Stock


Thermistor
PartSelect #: PS2003772
Manufacturer #: 12002355
Long harness thermistor kit.
$54.95
In Stock

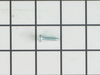
Refrigerator Screw
PartSelect #: PS11742240
Manufacturer #: WP400021-1
Sold individually.
$25.25
In Stock

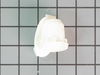
Refrigerator Water Fill Cup & Bearing
PartSelect #: PS11743318
Manufacturer #: WP628356
This icemaker water inlet cup is three inches long. It is all white in color and is made of plastic.
$49.45
Special Order

Ice Maker Shutoff Arm
PartSelect #: PS11743571
Manufacturer #: WP67004028
This part signals the icemaker to stop making ice once the bin has reached a desired amount.
$68.15
In Stock
Common Symptoms of the AB2526PEKW12
[Viewing 17 of 17]Light not working
Fixed by
these parts
these parts


Show All
Leaking
Fixed by
these parts
these parts


Show All
Ice maker not making ice
Fixed by
these parts
these parts

Show All
Door won’t open or close
Fixed by
these parts
these parts


Show All
Fridge too cold
Fixed by
these parts
these parts
Show All
Fridge too warm
Fixed by
these parts
these parts

Show All
Noisy
Fixed by
these parts
these parts
Show All
Not dispensing water
Fixed by
these parts
these parts
Show All
Ice maker dispenses too much ice
Fixed by
these parts
these parts
Show All
Freezer too cold
Fixed by
these parts
these parts
Show All
Ice maker won’t dispense ice
Fixed by
these parts
these parts
Show All
Frost buildup
Fixed by
these parts
these parts

Show All
Freezer section too warm
Fixed by
these parts
these parts
Show All
Freezer not defrosting
Fixed by
these parts
these parts
Show All
Fridge and Freezer are too warm
Fixed by
these parts
these parts
Show All
Will Not Start
Fixed by
these parts
these parts
Show All
Fridge runs too long
Fixed by
these parts
these parts
Show All


Keep searches simple. Use keywords, e.g. "leaking", "pump", "broken" or "fit".
Crisper frame center rail failure
Remove Crisper drawers from Bottom Shelf.
Remove glass from the top of Bottom Shelf.
Drop new Crisper frame center rail into slots on the top of the Bottom Shelf shelf.
Replace glass onto the top of the Bottom Shelf.
Slide drawers between left and right guides and the Crisper frame center rail.
Total repair time less than one minute.
No tools required.
Parts Used:
-
Robert from Meriden, CT
-
Difficulty Level:Really Easy
-
Total Repair Time:Less than 15 mins
130 of 145 people
found this instruction helpful.
Was this instruction helpful to you?
Thank you for voting!
Refrigerator sat in storage in sub zero weather, water in Dual Water Inlet Valve froze, cracking valve.
This is the 2nd time I have used PartSelect, and this experience was as pleasant as the 1st. The exploded-view diagrams make parts identification very easy; and the photo of the actual part is such a great idea, it allows you to verify what you need. I also got my part (cross country, in 3 days)
Repair Procedure: Shut off water supply. It may be easier to work if you disconnect the water supply tube, but it is not required. On the backside of the refrigerator, remove the bottom, black plastic protection panel. You will need a nut driver or battery-powered screw driver with a 3/8" socket tip on it. Next, remove the black metal panel that holds the water inlet valve in place. Remove screws with a nut driver. 1st remove the two flat-pin power connectors. (They are different sizes and color-coded, so there is no room for making a re-hookup mistake). Then proceed to remove the hoses. The hoses are pressure-lock tubing, so push the plastic disk in or down where the tube goes into the main body of the valve. Do this for all three hoses (tubes). Switch water valves and reverse the procedure. **Be certain that the tubes are pushed back in as far as they can go; if you do not re-seat the tubes, the pressure from the water going back in the valve, will blow the tubes right out the valve (ask me how I know this!). Once reassembled, turn the water back on slowly. Make sure you turn the water supply valve all the way open, it seats itself internally when you do and is less prone to drip leaks. That's it! (As a former kitchen remodeler, I find this a great DIY project).
Repair Procedure: Shut off water supply. It may be easier to work if you disconnect the water supply tube, but it is not required. On the backside of the refrigerator, remove the bottom, black plastic protection panel. You will need a nut driver or battery-powered screw driver with a 3/8" socket tip on it. Next, remove the black metal panel that holds the water inlet valve in place. Remove screws with a nut driver. 1st remove the two flat-pin power connectors. (They are different sizes and color-coded, so there is no room for making a re-hookup mistake). Then proceed to remove the hoses. The hoses are pressure-lock tubing, so push the plastic disk in or down where the tube goes into the main body of the valve. Do this for all three hoses (tubes). Switch water valves and reverse the procedure. **Be certain that the tubes are pushed back in as far as they can go; if you do not re-seat the tubes, the pressure from the water going back in the valve, will blow the tubes right out the valve (ask me how I know this!). Once reassembled, turn the water back on slowly. Make sure you turn the water supply valve all the way open, it seats itself internally when you do and is less prone to drip leaks. That's it! (As a former kitchen remodeler, I find this a great DIY project).
Parts Used:
-
JIM from Greeley, CO
-
Difficulty Level:Easy
-
Total Repair Time:30 - 60 mins
-
Tools:Nutdriver
110 of 120 people
found this instruction helpful.
Was this instruction helpful to you?
Thank you for voting!
The Bearing Cup Assembly was broken and ice would jamb against it during the ice making cycle.
I removed the ice maker from the refrigerator, by removing one screw on the underside bracket and loosening the two screws at the top side, then lifting the ice maker off the loosened screws. I then unplugged the electrical harness that supplies power from the refrigerator to the ice maker. I then disassembled the ice maker by removing the front cover which is snapped in place, then removing two recessed screws at the front. I removed the broken part, I then reassembled the ice maker with the new part. I replaced the two recessed screws at the front and snapped on the cover. Then I reinstalled the ice maker in the refrigator by plugging in the harness, slipping the ice maker over the loosened screws in the refrigerator and replacing the screw that was removed from the underside bracket. Tightening all the screws completed the project.
Parts Used:

-
David from Chester, CA
-
Difficulty Level:Really Easy
-
Total Repair Time:Less than 15 mins
-
Tools:Nutdriver, Screw drivers
108 of 138 people
found this instruction helpful.
Was this instruction helpful to you?
Thank you for voting!