This 18 ml bottle of white appliance touch-up paint is used to cover scratches or marks on your appliance. The white touch-up paint can be used on refrigerators, microwaves, ranges, clothes dryers, an...
This front-load door hinge is a genuine replacement component designed to support the door on compatible washers and dryers, ensuring smooth and secure pivoting during opening and closing. Constructed...
This hose clamp extends from half an inch to an inch in diameter. It is made entirely of metal and is intended for use with Maytag brand washing machines.
Having a problem with a funky-smelling washing machine, or one that just doesn't seem to clean your clothes as well as it used to? Say hello to the Affresh Washing Machine Cleaner by Whirlpool. This p...
Upgrading your laundry room? We can help you save space effortlessly with our Whirlpool Long Vent Dryer Stack Kit. Designed specifically for certain Whirlpool, KitchenAid, Maytag, Jenn-Air, Amana, Ing...
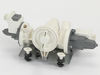
If your washer isn’t draining properly, this water pump could be the fix. It’s the part that helps push water out during the drain cycle, keeping your laundry routine running smoothly. Made to fit sel...
$200.93
In Stock
Questions And Answers for 8TMHW6630HW1
Be the first to ask our experts a question about this model!
✖
Ask a Question
Ask our experts a question on this model and we'll respond as soon as we can.
This product comes in a bottle with a brush like Liquid Paper. It goes on incredibly easy. A second coat might be needed. I wanted to prevent rust from setting in so I covered the scratches and dings. The paint is a little brighter since my washer is 10 years old but it still looks great.
Using the Torx Screwdriver, we removed the door from the unit. Then we removed all of the screws on the inside of the washer door. After that we flipped it over and opened it up exposing the inside. We couldn't separate them entirely because there was a screw under the latch piece that we couldn't figure out how to get to. However with all the screws out on the inside of the door, we did have enough room to open it up and access the place cover that holds the hinges in. Once we accessed that we removed the roller tips from the old unit and placed them on the new one. Then we reversed the process. With a couple screws in we realized we had put the hinge in reversed from what it needed to be, so we reopened it and switched it around. Then completed replacing all the screws and reattached it to the washer. It opens and closes perfectly and we saved a couple hundred dollars for sure, as the quote to come out had been a $150 trip charge.
So I was unable to get my model number so I took the hinge off the washer and was able to order the part. Before removing the hinge I used a marker and marked the hinge location on the washer. Once I got the part I removed the T15 screws on the inside part of the door and separate the pieces. I was able to remove the white tube for all 4 of the pins and put them on the hinge. I installed the hinge an then i put the front door pieces back together again while it was laying on the floor. I though I put it in wrong but I was correct. Once i had the hinge on the door and the door reassembled, I was able to attached the hinge to the washer. The hinge comes off the washer by pushing up on it and to reinstall you push down. I tighten the 4 T25 screws using the marks on the washer and the door is alligned correctly. I am able to close the washer door with one finger instead of my whole hand.