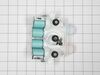
This washing machine inlet valve is a genuine OEM replacement part designed to regulate water flow during the fill cycle. Controlled by an internal solenoid, the valve opens and closes as needed to al...
Having a problem with a funky-smelling washing machine, or one that just doesn't seem to clean your clothes as well as it used to? Say hello to the Affresh Washing Machine Cleaner by Whirlpool. This p...
Are you dealing with a faulty washplate in your washing machine? Meet the Whirlpool Washer Washplate Screw, your personal helper for securing loose or broken washplates. This genuine OEM part is highl...
This drain pump is engineered for top-load washing machines and plays a vital role in the appliance’s drainage system. During the drain cycle, it efficiently removes water from the washer tub and chan...
This clutch slider kit is part of the transmission system in select washing machines, helping control the movement and speed of the agitator during wash and spin cycles. The kit includes a clutch band...
This clutch assembly is designed for use in top-load washing machines, where it plays a crucial role in engaging the transmission during both the agitation and spinning cycles. If your washer is exper...
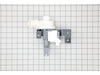
Ensure your washing machine operates safely and reliably with this replacement lid lock latch. Positioned to secure the door or lid during active cycles, it prevents accidental openings and supports p...
Washer would start cycle and return a CL error. No water would flow into the tub. Researched problem and probable cause. Ordered new water inlet valve. Once received, disconnected water hoses and electric plug and removed rear upper access panel (5 screws). Used thin putty knife under sides of front control panel to disengage spring clips. Once access to the faulty valve was attained, removed electrical harness and valve mounting screws. Installation of new valve was reverse process. Figuring out how to raise the front panel for access to the valve was most difficult. Found a YouTube video showing how; it was easy from there. Entire replacement took about 30 mins max.
Did troubleshooting after code LF showed on indicator window. Did troubleshooting; checked hoses for obstructions and small filters on inlets. All good. Ordered new fill valve. Came in a few days, good service. Removed control panel top by removing screws on back of control panel, then by pushing putty knife under each side to release spring clips. Carefully lifted cover and set onto lid. Photographed fill valve at left side as you are standing in front of machine. Removed screws with small ratchet. Carefully removed wires via clips. Lifted out valve. Attached wires to new, set back into its place, replaced screws, tightened but not too tight so as to break part. Replaced control panel, pushing downward to engage spring clips, then replace screws on back. Re attached hoses, ensuring they were on the correct sides, plugged machine into power, ran through cycle and VIOLA!! Worked perfectly!! After a couple weeks, still working perfectly! Was VERY happy it was only fill valve and not mother board as the cost was a fraction. I found trouble shooting videos to be very helpful. Your service quite good.
DIY'er working on a Maytag Centennial type washing machine should be aware that replacing a a transmission or agitator due to worn out splines is only half a job done well. I originally replaced my transmission due to worn splines, only to discover later that the worn agitator splines caused the new transmission splines to wear out at an accelerated rate. Transmission and Agitator should be replaced together, along with a new Agitator mounting bolt. There are plenty of video's online of how to do this repair so I won't get into that here. Just wanted to drop the above sage advice. Transmissions for these washers aren't cheap.


 Diagram and Parts List for Maytag Washer")