This guide rail, also known as a drawer slide rail, is a genuine OEM replacement part for the freezer section of your refrigerator. This slide rail supports the storage basket in your freezer, allowin...
This left-side drawer slide is designed for use in select refrigerator-freezer models, supporting the freezer drawer and allowing it to glide smoothly in and out. Made of durable white plastic and mea...
$153.12
In Stock
Order within the next 1 hr and 15 mins and your part ships today!
Looking for a way to restore your LG refrigerator to prime condition? Our genuine LG Basket Assembly, Door might just be what you need. Made specifically for select LG fridge models, this sturdy and e...
$93.73
In Stock
Order within the next 1 hr and 15 mins and your part ships today!
Built from durable, wear resistant material, this cam prevents door sagging and supports long term hinge stability. It helps maintain proper refrigerator function by ensuring the door operates with co...
$44.97
In Stock
Order within the next 1 hr and 15 mins and your part ships today!
Looking to simplify your fridge organization? We can help! Our LG Refrigerator Deli Drawer Tray Assembly isn't just any part'it's a genuine OEM replacement made specifically for select LG refrigerator...
$161.75
In Stock
Order within the next 1 hr and 15 mins and your part ships today!
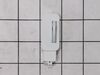
This part is a temperature sensing devise. It senses the rise in evaporator temperature during a defrost cycle and cycles the defrost heater off after all frost is melted. It is calibrated to permit...
$75.80
In Stock
Order within the next 1 hr and 15 mins and your part ships today!
We know how inconvenient it can be when a minor issue affects the functioning of your LG refrigerator, so allow us to present the LG Refrigerator Light Lens Cover. Designed to secure the light bulb in...
$32.93
On Order
Questions And Answers for 79577316601
Be the first to ask our experts a question about this model!
✖
Ask a Question
Ask our experts a question on this model and we'll respond as soon as we can.
This refrigerator/freezer problem had been escalating for almost a year, requiring me to frequently knock the ice buildup free with a rubber mallet. I finally decided to try to identify the problem by removing the freezer door and all of the shelves and shelf tracks (easily removed with only a phillips screwdriver). Then I removed the back plastic panel to expose the cooling coils, which were partially encased in ice. I deduced that the evaporator fan motor was failing, which blows air over the freezer cooling coils and forces the cool air up into the upper refrigerator section (which was not staying cold). I then found and ordered the fan motor from part select. Their search function and exploded drawing schematics made it easy to identify the part and part number. It seems the original part number had been superceded with a new number, which I ordered. Once it arrived after about a week, I transferred the fan blades from the old motor to the new fan motor, and after completely drying out the freezer compartment, I reinstalled all of the parts and plugged in the unit and waited. By the next day, the refrigerator was operating at peak efficiency, and the ice buildup in the freezer has not returned. I was very close to scrapping the entire refrigerator as junk, but with a little diagnostic effort and about $110 for the new motor, I have a fully functioning refrigerator again. Thanks to Part Select for a great experience.
Video makes it look easy. Kenmore refrigerator does not have "groove" along the right hand side of switch that allows for pushing down on release. Used a thin screwdriver to get under to push while holding switch edge with pliers. Kept slipping. Tape sides to avoid scratching inside of refrigerator.
Check YouTube, but no one shows all the details. Need to swap hinges and spring from old retainer to new retainers by removing screw at bottom of hinge, then removing rod with small screwdriver to poke the rod out. I laid the old and new side by side and did swap to ensure proper orientation. Attach cams before sliding gasket retainer back into gasket, I used a few drops of liquid soap as lubricant on the retainer to help it slide in. Very important to ensure the edge of the retainer is tucked behind the door edge or else things will not fit correctly. I did it a few times before I got it right, but didn’t break anything else. Good luck.