This handle screw, also known as a mounting bolt, is a mounting screw to help secure the door handle to your refrigerator door. If your handle is loose, you may just need to tighten the screw. If your...
This ice maker assembly is for refrigerators. This Ice maker assembly contains the complete ice maker and housing. The assembly may include multiple parts; refer to your parts diagram for a complete ...
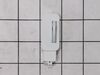
This 13-volt evaporator fan motor helps circulate air over the refrigerator coils. These coils will then convert the heat into cool air, which is then circulated from the freezer section to the fresh ...
Are you tired of wrestling with a sagging freezer basket? Say goodbye to these days thanks to the Left Side Connector Rail, a genuine replacement part from LG. This freezer basket support rail speeds ...
Introduce a flawless and remarkably reliable companion for your Samsung, LG, or Kenmore refrigerator, the Freezer Handle Support. A quintessential component uniquely designed to maintain the seamless ...
Looking for a reliable solution to keep your LG refrigerator or freezer in prime condition? Our genuine OEM Defrost Sensor Assembly from LG could be just what you need. Designed specifically to fit ...
Video makes it look easy. Kenmore refrigerator does not have "groove" along the right hand side of switch that allows for pushing down on release. Used a thin screwdriver to get under to push while holding switch edge with pliers. Kept slipping. Tape sides to avoid scratching inside of refrigerator.
The Refrigerator now runs very quite. After watching several videos I started on mine and found that it was a bit different than any in the videos. However all but the back panel was shown and that was helpful. The back panel was a bit difficult but a hair dryer seemed to help . All in all it was a good choice to do it myself as it was done quicker than waiting on a repair man.
This couldn't have been easier. Two tiny screws in the front needed unscrewed, and then two plastic clips in the middle just had to be popped lose. Finally, you unplugged the power cord. Then, you just needed to reverse the process by plugging the new ice maker in, popping the clips in place, and screwing the two holes back in and turning the whole thing on. Voila! Perfect ice cubes again. And for only a little over $100.