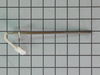
The temperature sensor, also known as an oven probe, detects the temperature within the oven cavity. This temperature sensor is 9 inches in length and is a genuine OEM part. If your oven is too hot, n...
$78.07
In Stock
Order within the next 12 hrs and your part ships today!
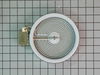
This 40-watt appliance light bulb is a reliable replacement for use in select ranges, refrigerators, freezers, and microwaves. It provides bright, consistent lighting to help you see clearly inside yo...
$30.38
In Stock
Order within the next 12 hrs and your part ships today!
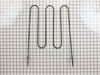
The 6” radiant cooking element with limiter fits under the glass cooktop and supplies heat to the cooking area. If your element is not heating, you can test the element for continuity with a multimete...
$141.21
In Stock
Order within the next 12 hrs and your part ships today!
This is a replacement rack for your oven. The oven rack fits into grooves on the side of the oven wall, and acts as a shelf that you can place food items on when you want to cook them in the oven. Thi...
$154.23
In Stock
Order within the next 12 hrs and your part ships today!
Struggling with a sticky, stubborn stove drawer? Our Frigidaire Range Front Drawer Glide is here to restore the easy glide of your cooker's storage or broil drawer. Produced as an authentic OEM part, ...
$25.31
In Stock
Order within the next 12 hrs and your part ships today!
Having trouble with your stove or oven's light indicator? Don't fret - we have a solution for you. Our Frigidaire Range Light Lens Indicator, ideal for select Frigidaire, Electrolux, White Westinghous...
$21.50
In Stock
Order within the next 12 hrs and your part ships today!
Questions And Answers for 79094203310
Ask our experts a question about this model and we'll get back to you as soon as possible!
5 questions answered by our experts.
< Prev
1
Next >
Sort by:
Search filter:
Clear Filter
Your search term must have 3 or more characters.
Keep searches simple. Use keywords, e.g. "leaking", "pump", "broken" or "fit".
Sorry, we couldn't find any existing answers that matched.Try using some different or simpler keywords, or submit your new question by using the "Ask a Question" button above!
Walter
December 17, 2019
My oven will not heat.
For model number 79094203310
Hi Walter,
Thank you for your question. If the oven is not heating correctly, then the issue is likely with the oven sensor, sometimes called the oven thermostat, and you will need to check it with a multi-meter. When testing the sensor with a multi-meter, the sensor should be tested at room temperature and it should be unplugged from the oven. You will need to measure the resistance between the two prongs at the end of the sensor connector. Replace the oven sensor if the reading is less than 900 Ohms or more than 1200 Ohms. I hope this helps. Thank you and have a great day!
2 people found this helpful.
Was this helpful?
Thank you for voting!
Walter
December 18, 2019
When oven is turned on the fan runs but no oven elements het up at all and i get no error code, is it the control board
For model number 79094203310
Hello Walter, thank you for your question. Yes, per that model information and from the description of the issue we would recommend replacing the control board Part #: PS8746796. I hope this helps.
Was this helpful?
Thank you for voting!
Michael
October 21, 2022
Changed oven sensor and broiler element and oven won't get hot.
For model number 79094203310
Hello Michael, thank you for your question. We recommend checking the bake element, part number PS1991807, and making sure that it is good. You can test it using a multimeter for continuity, if faulty replacing it can potentially solve the problem. Customer service is always available to help you place an order if you are having trouble doing so. Good luck with your repair.
My oven will not heat to set temperature. (Both broiler and oven). I had a technician come out and diagnose as the temp sensor and oven element. Could it just be the temp sensor is bad? Would the bake element have to be checked for continuity to see if it is bad? If so, I did not see him check that. He only took off the back panel and checked the sensor.
For model number 79094203310
Hi Donna, thank you for reaching out. Yes, the issue could be with any of the parts. If your oven does not heat despite the electrical path present on the temperature sensor, then check the continuity of the bake element, part number PS1991807. We hope this will solve your issue!
Oven won’t heat the element ohms out at 14.7 ohms. There’s 220 going to the range only 58 volts to the element
For model number 79094203310
Hello Mathias, thank you for getting in touch. Based on the description that you have provided, we would recommend checking the control board, part number PS8746796, to solve the problem. A malfunctioning control board can most probably cause this issue. We hope this helps!
I called a repair place. They charged $54 to diagnose, (said it needed a new latch motor) then wanted $220 to complete the repair. I checked online prices and did it myself for about 15 minutes work and the latch motor itself ($44?).
Was necessary to uplug the range, pull it away from the wall and remove the back panel sheet metal, then 3 screws that mount the motor. Replace motor, reattach sheet metal. Plug in. Done. Ready to bake cookies.
First we removed two screws under the rim of the range top to open the lid. Lifted the lid and removed the screws from the bracket that holds the elements, Be careful with the clips that hold the element in, if you break them or bend them there aren't any more! Also note which holes they were in, they are marked according to the different sizes of elements. Disconnected the wires, needed needlenose pliers to grip them...connected new element, popped it back in place, replaced bracket, closed top ...Easy peasy!!!
Repair was quite easy, as long as you have the instructions for removing the door. The screws that hold the bottom of the door to the fixed hinge are placed into the side of the hinge assembly after removal; this holds the door at a 45 degree angle for easy removal. After that, just place the door on a flat surface and dismantle the door from the inside. The inner glass is contained in a metal frame with another piece of glass; this frame comes apart easily using the clips in each side. The door assembles easily after the glass is replaced; just take your time and give yourself enough room to lay out the parts as you go. Good luck!